This project is a program to load GoldSrc BSP files. The GoldSrc BSP file format has been derived from the id’s Quake 2 file format by Valve Software for their Half-Life game series.
It has been realized with
Lazarus, Free Pascal
SDL2, OpenGL.
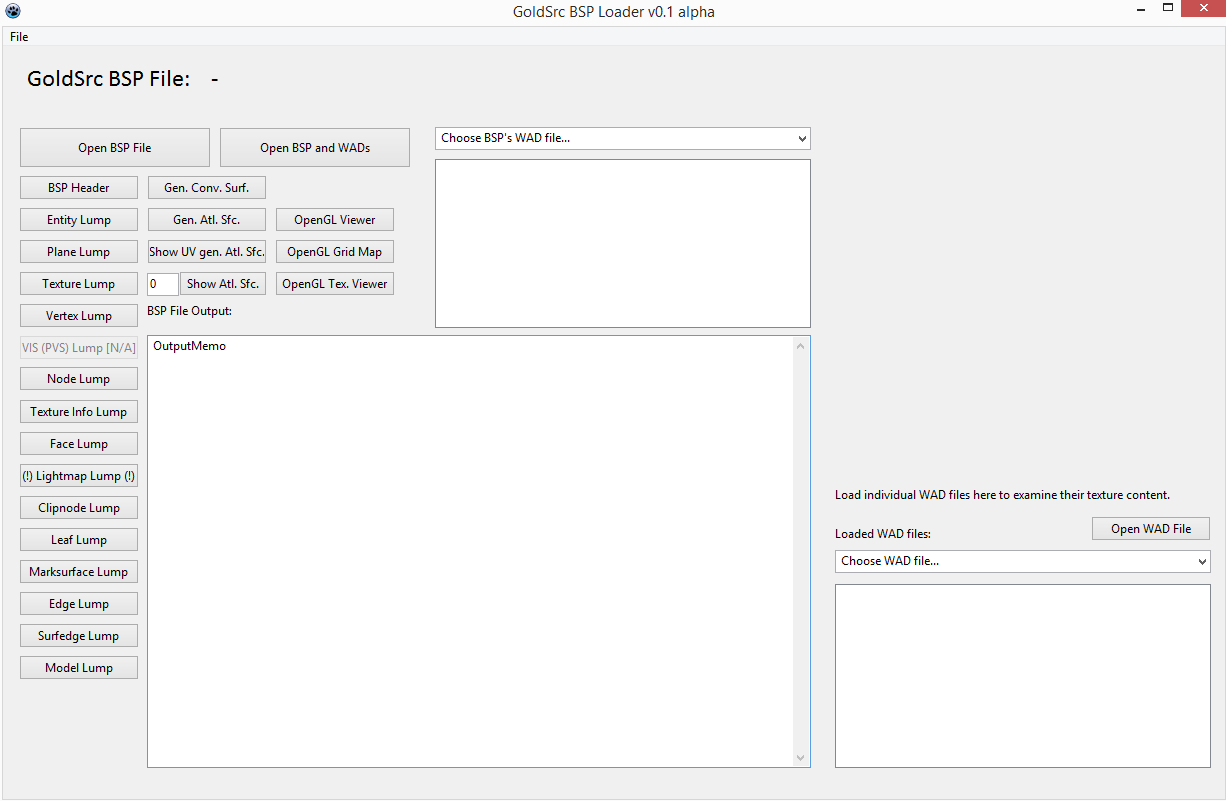
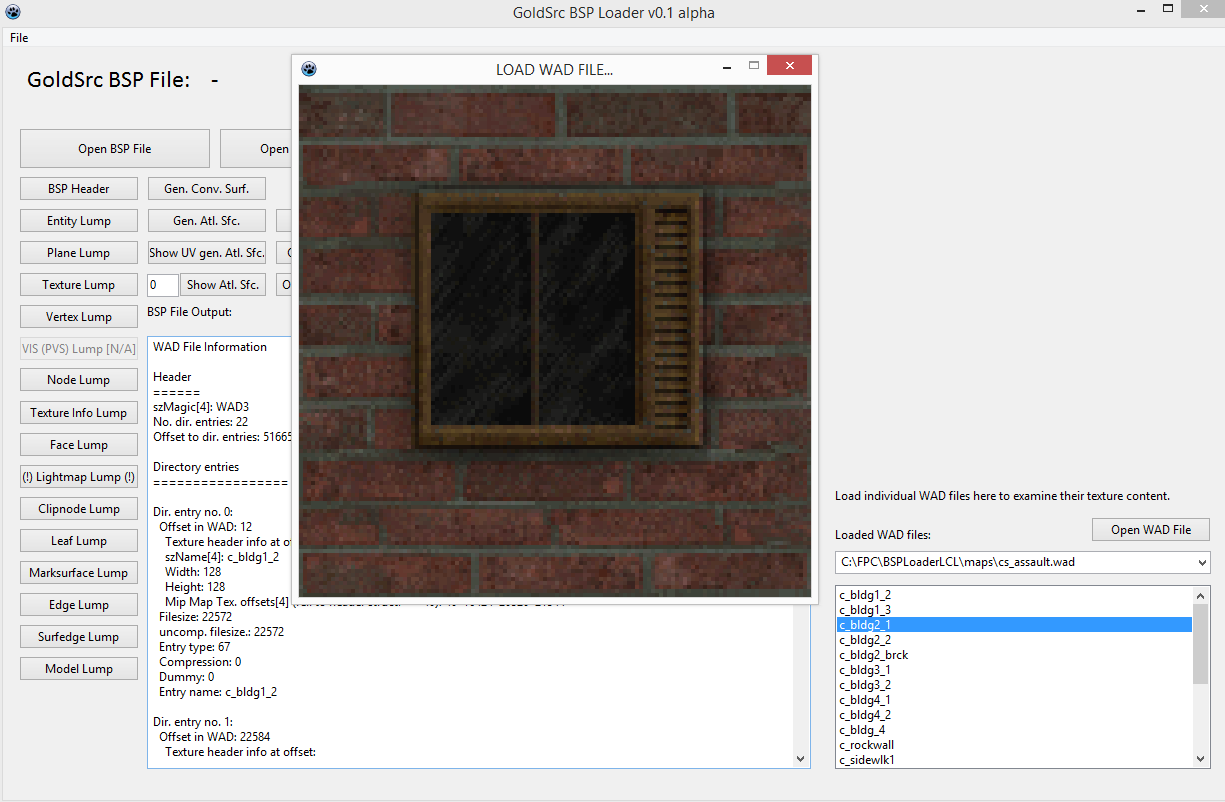
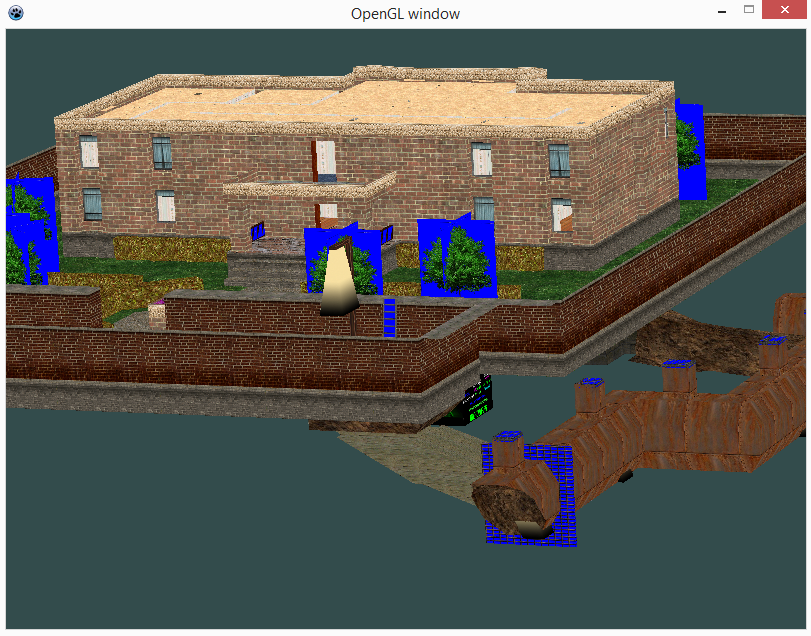
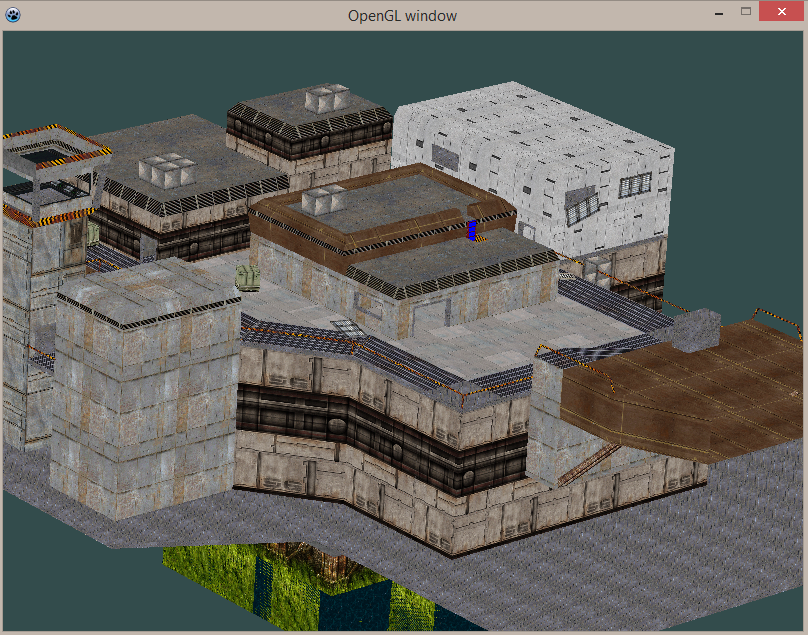
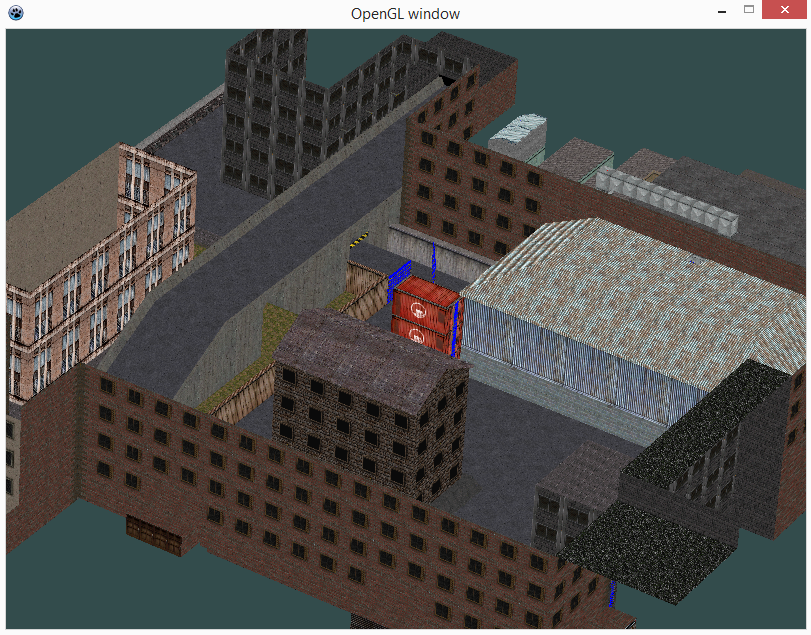
The BSP Loader powered by Lazarus.Loading a WAD file and displaying a selected texture from it.Textured rendering of a scene (estate). The blue colorkey is not interpreted to be transparent yet.Scene: Oilrig.Scene: Assault.
02/08/2018, v0.1 alpha
Capabilities
Load BSP files and show contents of data lumps (exception: VIS Lump)
Load WAD files and render contained textures
Load BSP file and all WAD files which are necessary to render the fully textured scene
Navigate by simple camera through scene
To-Do’s
lightmapping from lightmap data
VIS Lump: treat it at all
collision detection
face culling
have spaces between textures in atlas texture to prevent bleeding-effect (esp. in tiled textures recognizable)
make blue colorkey transparent
sky cube
release the source code (if beta stadium reached)
Important Sources
BSP and WAD File Formats
I cannot state how important these documents were in understanding the structure of the BSP and WAD file formats. Without them, this project wouldn’t have been possible.
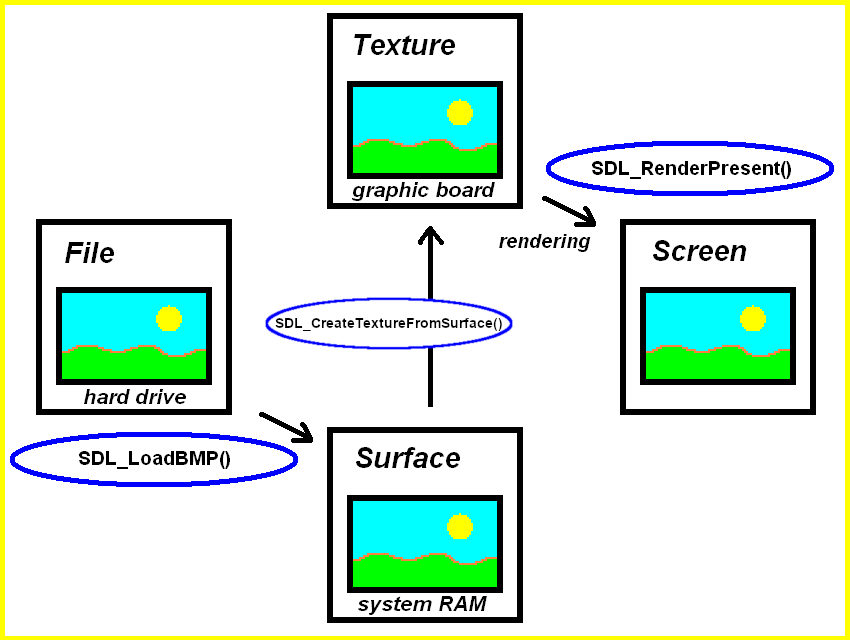
Let’s start on the left in the diagram. The easiest way to get a bitmap (BMP) image file for a game or application ready for usage is to create one in a drawing application. Or use the example bitmap “fpsdl.bmp” we used in the code.
The bmp image file is stored on your hard drive and can be loaded by SDL_LoadBMP function to a SDL2 surface. This SDL2 surface is then transformed into a SDL2 texture by SDL_CreateTextureFromSurface function (whose name is just explaining what is does). And finally this texture is rendered by SDL_RenderPresent, this function we know already.
And now let’s see how it is done in code.
program SDL_LoadingRenderingBMP;

uses SDL2;

var
  sdlWindow1: PSDL_Window;
  sdlRenderer: PSDL_Renderer;
  sdlSurface1: PSDL_Surface;
  sdlTexture1: PSDL_Texture;

begin

  //initilization of video subsystem
  if SDL_Init(SDL_INIT_VIDEO) < 0 then Halt;

  if SDL_CreateWindowAndRenderer(500, 500, SDL_WINDOW_SHOWN, @sdlWindow1, @sdlRenderer) <> 0
    then Halt;

  // create surface from file
  sdlSurface1 := SDL_LoadBMP('fpsdl.bmp');
  if sdlSurface1 = nil then
    Halt;

  // create texture from surface
  sdlTexture1 := SDL_CreateTextureFromSurface(sdlRenderer, sdlSurface1);
  if sdlTexture1 = nil then
    Halt;

  // render texture
  if SDL_RenderCopy(sdlRenderer, sdlTexture1, nil, nil) <> 0 then
    Halt;

  // render to window for 2 seconds
  SDL_RenderPresent(sdlRenderer);
  SDL_Delay(2000);

  // clear memory
  SDL_DestroyTexture(sdlTexture1);
  SDL_FreeSurface(sdlSurface1);
  SDL_DestroyRenderer(sdlRenderer);
  SDL_DestroyWindow (sdlWindow1);

  //closing SDL2
  SDL_Quit;

end.
var
  sdlWindow1: PSDL_Window;
  sdlRenderer: PSDL_Renderer;
  sdlSurface1: PSDL_Surface;
  sdlTexture1: PSDL_Texture;
contains two new variables, namely “sdlSurface1” and “sdlTexture1” of the pointer types PSDL_Surface and PSDL_Texture, respecitvely.
After setting up SDL2, a window and a renderer as known, we find this.
Step 1: Loading the BMP file to a SDL2 Surface
  // create surface from file
  sdlSurface1 := SDL_LoadBMP('fpsdl.bmp');
  if sdlSurface1 = nil then
    Halt;
SDL_LoadBMP(name of bmp image file) does what you expect, it loads the image file and generates a SDL2 surface from it. Attention though, if you just give a file name, it is assumed that the file is found in the same folder as the executing application. Optionally you can also give a full file path, e.g. in Windows something like ‘C:\MyImages\fpsdl.bmp’. The function is declared as
SDL_LoadBMP(_file: PAnsiChar): PSDL_Surface
and return nil on error, e.g. if the file is not found.
Step 2: Creating a SDL2 Texture from the SDL2 Surface
The next step is to get a SDL2 texture. That’s achieve as follows.
  // create texture from surface
  sdlTexture1 := SDL_CreateTextureFromSurface(sdlRenderer, sdlSurface1);
  if sdlTexture1 = nil then
    Halt;
The function to use is SDL_CreateTextureFromSurface(renderer, surface).
It just does what you expect and transforms the SDL2 surface into a SDL2 texture with the help of the given renderer.
Step 3: Prepare the SDL2 Texture to be Rendered
Before actually rendering the texture, we need to copy it to the rendering target (our window) by SDL_RenderCopy(renderer, texture, source rectangle (texture), destination rectangle (rendering target)).
// render texture
  if SDL_RenderCopy(sdlRenderer, sdlTexture1, nil, nil) <> 0 then
    Halt;
So the texture is copied to the rendering target (which is the window). The first nil argument means that we want to copy the whole rectangle. The second nil means that we want to copy to the whole dimensions of the rendering target. Let’s have a closer look at the function.
This will run without any problem, though SDL_CreateTextureFromSurface() will not free the surface created by SDL_LoadBMP(). And you have no handle to free this surface. This creates a memory leak.
This chapter treats some basics you should know to understand the way SDL2 works.
Briefly: The Basics of Graphics Programming
Loading and the movement of images in a game (or other applications) is a major concept in (game) programming. These images are then refered to as sprites, usually. Let’s have a look at a simple example:
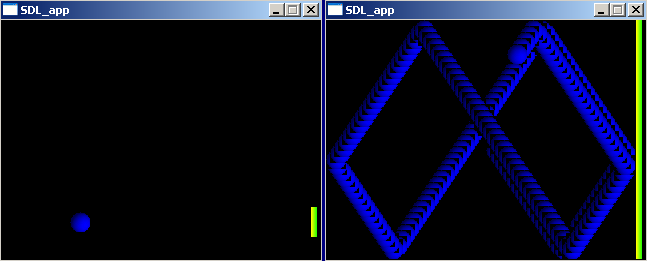
Left: Window is cleared between each new drawn frame. Right: Window is not cleared.
Here are two screenshots from a simple game. The player has to move the yellow-green paddle up- and downwards to prevent the blue ball from getting through to the right side. The game uses two sprites, the blue ball sprite and the yellow-green paddle sprite (see left screenshot). The background color is set to black. The left screenshot is how the game usually appears to the player, here between each frame that got drawn, the former frame has been cleared. The right screenshot demonstrates what happens if the former frame hasn’t been erased before the next one is drawn. – Now it is clearly visible that the sprites are redrawn again and again with sligthly different coordinates, and that is how (game) graphics work (even for the most sophisticated 3d games):
Draw the frame
Show the frame (in a window on screen)
Clear the frame (and go back to step 1)
Briefly: The Relation between Graphic Objects (e.g. Sprites) and Hardware
Actually there are just three locations where these images are stored in your computer system. All images (photo images, drawings, sprites for 2d games, textures for 3d games) are stored on your harddrive somewhere. If you start a photo viewer, a paint program, a 2d game or a 3d game, in all cases the corresponding images need to be loaded from your harddrive to RAM (Random-Access Memory) since displaying and manipulation (e.g. rotation of a photo image by 90°) of images loaded to RAM is much, much faster. Especially for games a fast access to the image data is highly important! And finally there isn’t just one RAM but two, a CPU controlled one located on the motherboard used by every program/application that needs some RAM. The second RAM is located right at your graphic board and controlled by the so-called GPU (graphics processing unit). This is what we want to use if we develop games since it is dedicated, optimized and just hungry for tasks related to fast image processing.
Many games and applications do not only target at common computer systems, but for mobile devices, e.g. smart phones. The principles described are also true for these devices even though there may be differences in detail.
The SDL2 Surface
The SDL2 surface allows you to represent graphic objects like sprites. Every SDL2 surface has a width and height, a pixel format and other properties. Nevertheless, it is a concept which originates from the outdated SDL 1.2 and therefore should not be used anymore. Still, there are reasons why we need to introduce it here. This will be clear soon.
The SDL2 Texture
The SDL2 texture allows you to represent graphic objects just like the SDL2 surface does, although there is a major difference: It is hardware accalerated. So the graphic object is stored in the graphic board’s RAM and any manipulation is done by the graphic board’s GPU.
So as a rule,
always use SDL2 Textures to store your graphic objects (sprites) for SDL 2.0,
then you go for high performance!
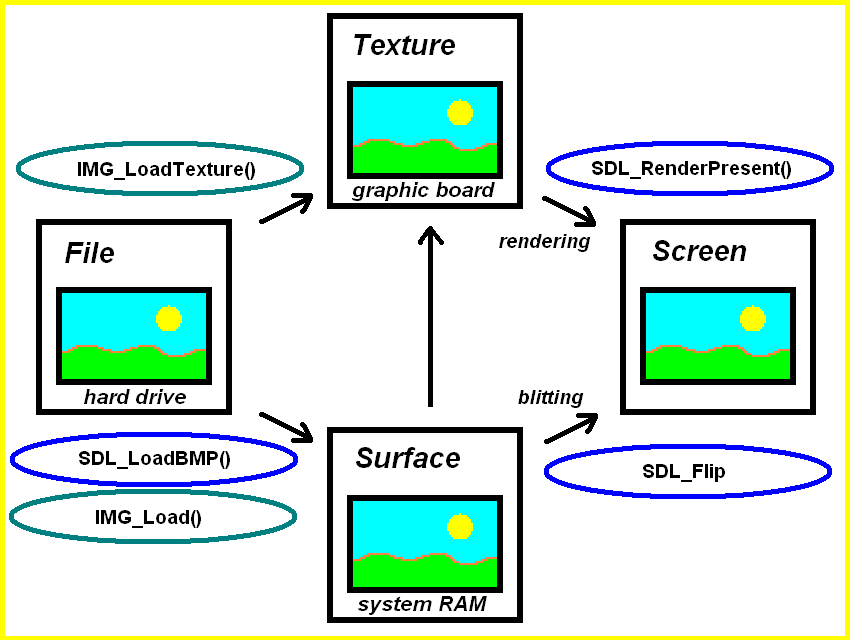
Three ways to SDL_Texture
So, how to get a SDL_Texture? In principle there are three ways to create SDL2 textures. For way 2 and 3 the flow diagram may illustrate how it works.
Way 1: From Scratch
You create a SDL_Texture from scratch, so you set a pixel format and texture access format and have to fill in your texture data manually. This is the most sophisticated way and is usually not necessary, unless you work with raw pixel data.
Way 2: The path from the file to the surface, to the texture and to the screen. Way 3: The path rom the file to the texture and to the screen.
Way 2: From SDL2 Surface
2) You have or create a SDL_Surface from an image file first and then you create the SDL_Texture from the SDL_Surface. This way is shown in the diagram but it means two steps.
Way 3: Directly from Image File
3) You create a SDL_Texture from and image file directly. This is shown in the diagram, too. This is the simplest way to create a SDL_Texture.
A font represents the style how the letters of a word or sentence appear (e.g. Arial, New Times Roman, and so on). These style informations are saved in so-called font files. There are different standards how to save the font into a file, but the most important font file standard is the TrueType Font standard, thus the name SDL2_ttf. SDL2_ttf is capable to work with TrueType fonts. The typical file extension of TrueType font files is “.ttf”. FreeType 2.0 is no font file standard but a software library to render TrueType font files.
Fonts in Applications
In the last chapters you have heard a lot about the creation of textures from image files and how to manipulate and draw to them. But there is nearly no application out there where you go out without some text messages. Of course, you could print some text to an image and load this image to your application to introduce text to it. But what if you like to implement a chat feature to your application where text messages are created dynamically? Or you like the user to insert his name for a highscore list? There are thousands of other circumstances where you need dynamically generated texts.
The SDL2_ttf Unit
Here comes the SDL2_ttf unit into play. The ability to do this is not implemented in the native SDL 2.0 library itself but the SDL project provides an official extension called SDL2_ttf to render TrueType fonts based on the FreeType project and their FreeType 2.0 release.
Installing SDL2_ttf
As for the work with SDL2_image you will need to add some library files to your system to use fonts since SDL2_ttf isn’t part of native SDL 2.0.
download the most recent version of the Runtime Binaries of the SDL2_ttf library for your system
install the library according to your system (Win32/64, Linux, Mac OS X)
SDL2_ttf Installing Instructions for Windows
Download the corresponding SDL2_ttf package depending on your system (32 bit or 64 bit) and extract the zip file. You will end up with a SDL2_ttf.dll and two more dlls (zlib1.dll, libfreetype-6.dll) which are necessary for support of compression and FreeType routines. Copy all these files to your system folder, e.g. for Windows XP or Windows 8.1 32 bit C:\WINDOWS\system32\. If you are not sure about your system folder, you should copy all these files into the same folder where the source code file (.pas or .pp) of your SDL 2.0 program is.
If you are running on a different platform (e.g. Mac OS X, Linux, …), please check the link given above for further information on SDL2_ttf installation.
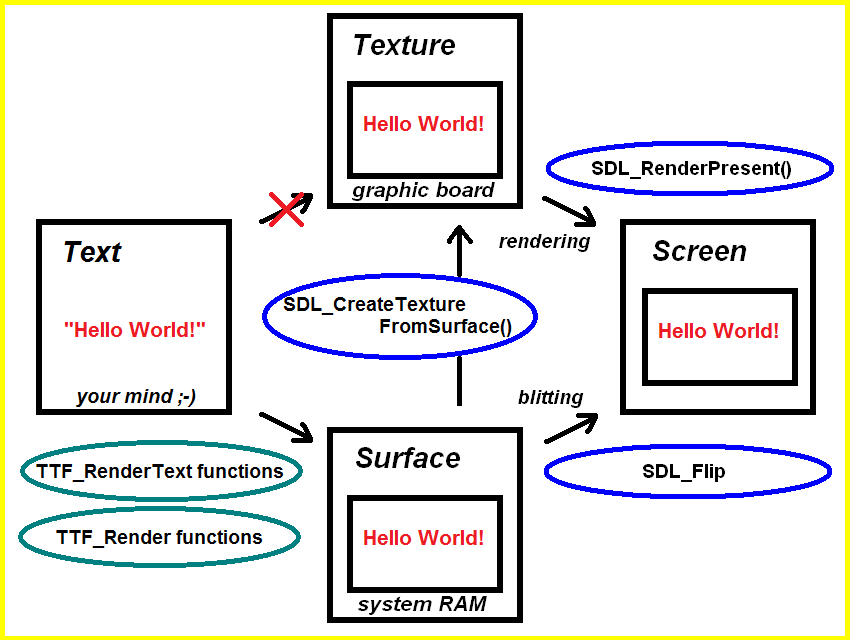
The Road to Texts in SDL 2.0
Before jumping right into the code, let’s discuss the two concepts of SDL 2.0 of saving images in memory again. We prefer to work with textures because they have all the advantages we discussed in prior chapters, especially in Chapter – Surfaces and Textures. Anyway, in SDL2_ttf there are several functions to load a text as a surface (details later). Hence we need to convert the surface into a texture as known. Look at the following diagram to understand the way we need to go:
Create a surface with a given text and create a texture from it. This can be rendered as known to the screen.
So according to the diagram the way to go is as follows, if you have a text in mind (left quadrat in diagram), first create a SDL_Surface by using one of the functions SDL2_ttf provides (lower path to quad at the bottom in the diagram). Next you convert this SDL_Surface into a SDL_Texture by the function SDL_CreateTextureFromSurface (go straight from the buttom quad to the upper quad in the diagram). Finally render the text as you like to the screen.
Sidenote, “blitting” and SDL_Flip are not possible in SDL2 anymore for good (performance) reasons.
Let’s jump into the code now .
program SDL_Fonts;

uses SDL2, SDL2_ttf;

var
  sdlSurface1 : PSDL_Surface;
  ttfFont : PTTF_Font;
  sdlColor1, sdlColor2 : TSDL_Color;
  sdlWindow1 : PSDL_Window;
  sdlRenderer : PSDL_Renderer;
  sdlTexture1 : PSDL_Texture;

begin

  //initilization of video subsystem
  if SDL_Init(SDL_INIT_VIDEO) < 0 then HALT;

  sdlWindow1 := SDL_CreateWindow('Window1', 50, 50, 500, 500, SDL_WINDOW_SHOWN);
  if sdlWindow1 = nil then HALT;

  sdlRenderer := SDL_CreateRenderer(sdlWindow1, -1, 0);
  if sdlRenderer = nil then HALT;


  //initialization of TrueType font engine and loading of a font
  if TTF_Init = -1 then HALT;
  ttfFont := TTF_OpenFont('C:\WINDOWS\fonts\Arial.ttf', 40);
  TTF_SetFontStyle(ttfFont, TTF_STYLE_UNDERLINE or TTF_STYLE_ITALIC);
  TTF_SetFontOutline(ttfFont, 1);
  TTF_SetFontHinting(ttfFont, TTF_HINTING_NORMAL);

  //define colors by RGB values
  sdlColor1.r := 255; sdlColor1.g := 0; sdlColor1.b := 0;
  sdlColor2.r := 0; sdlColor2.g := 255; sdlColor2.b := 255;

  //rendering a text to a SDL_Surface
  sdlSurface1 := TTF_RenderText_Shaded(ttfFont, 'Hello World!', sdlColor1, sdlColor2);

  //convert SDL_Surface to SDL_Texture
  sdlTexture1 := SDL_CreateTextureFromSurface(sdlRenderer, sdlSurface1);

  //rendering of the texture
  SDL_RenderCopy(sdlRenderer, sdlTexture1, nil, nil);
  SDL_RenderPresent(sdlRenderer);
  SDL_Delay(5000);

  //cleaning procedure
  TTF_CloseFont(ttfFont);
  TTF_Quit;

  SDL_FreeSurface(sdlSurface1);
  SDL_DestroyTexture(sdlTexture1);
  SDL_DestroyRenderer(sdlRenderer);
  SDL_DestroyWindow(sdlWindow1);

  //shutting down video subsystem
  SDL_Quit;
end.
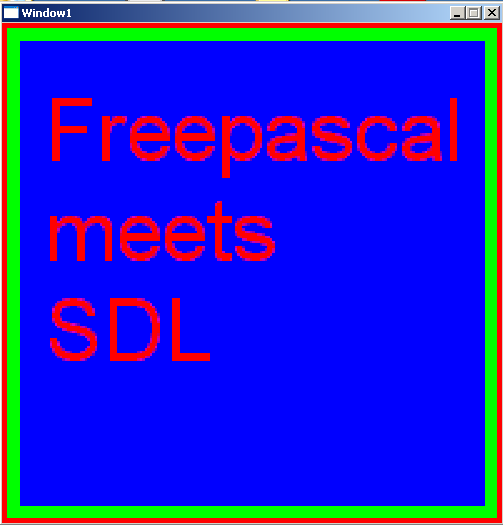
The final result should behave like this: The text “Hello World!” appears for five seconds in italics and underlined. The text is red and the background is cyan. The following screenshot gives an impression what is to be expected.
Let’s begin with the initial lines of code.
program SDL_Fonts;

uses SDL2, SDL2_ttf;
The program is called “SDL_Fonts” and we will need unit SDL2_ttf additional to SDL2 to have access to the TrueType font engine.
var
  sdlSurface1 : PSDL_Surface;
  ttfFont : PTTF_Font;
  sdlColor1, sdlColor2 : TSDL_Color;
  sdlWindow1 : PSDL_Window;
  sdlRenderer : PSDL_Renderer;
  sdlTexture1 : PSDL_Texture;

begin

  //initilization of video subsystem
  if SDL_Init(SDL_INIT_VIDEO) < 0 then HALT;

  sdlWindow1 := SDL_CreateWindow('Window1', 50, 50, 500, 500, SDL_WINDOW_SHOWN);
  if sdlWindow1 = nil then HALT;

  sdlRenderer := SDL_CreateRenderer(sdlWindow1, -1, 0);
  if sdlRenderer = nil then HALT;
Then we are preparing for some new types of variables. First of all we have a pointer variable called “sdlSurface1” which is of type PSDL_Surface and points at a SDL_Surface. The text message we provide will be rendered into this SDL_Surface first.
Next we find a PTTF_Font variable called “ttfFont” which points at TTF_Font that holds the font’s data. The font’s data itself is usually stored in a font file.
Finally there are two color variables “sdlColor1” and “sdlColor” of pointer type PSDL_Color. These pointers point at records which contain color data as composition of a r, b and g value. The exact definition will be shown when they are used in the code.
Well, the next variables are known from previous chapters. Also the initialization of SDL 2.0 and the creation of the window and the renderer are known already. So we should proceed to the next code chunk now.
//initialization of TrueType font engine and loading of a font
  if TTF_Init = -1 then HALT;
  ttfFont := TTF_OpenFont('C:\WINDOWS\fonts\Arial.ttf', 40);
  TTF_SetFontStyle(ttfFont, TTF_STYLE_UNDERLINE or TTF_STYLE_ITALIC);
  TTF_SetFontOutline(ttfFont, 1);
  TTF_SetFontHinting(ttfFont, TTF_HINTING_NORMAL);
To inialize the TrueType font engine
TTF_Init(): Integer
without any arguments is called which returns 0 on success and -1 on error. There is no specific error code returned.
prepares a font. The first parameter “_file” asks for the absolute file path of the font. The parameter “ptsize” asks for an integer value which determines the size of the font. The larger the value, the larger the letters will appear finally (just as known from text editors). Anyway, if you choose too large size the largeste size will be chosen.
further shaping of the appearence of the text can be performed. All the procedures need to know as first argument to which font they should be applied, so “ttfFont” in our case. Then the style can be set by the constants shown in the following table, which are kind of self-explanatory. By OR’ing the style constants you can even combine them as shown in the example code. The text shall be in italics and underlined.
TTF_STYLE_NORMAL
No application of a certain style
TTF_STYLE_BOLD
Set a bold style
TTF_STYLE_ITALIC
Set letters in italics
TTF_STYLE_UNDERLINE
Have the text underlined
TTF_STYLE_STRIKETHROUGH
Have the text stroken through
The outline is simply set by a number. The larger the number, the larger the outline of the letters will appear. If you don’t need an outline, the argument has to be 0.
The hinting is set similar to the style by pre-defined constants shown in the following table. The hinting setting influences the appearance of the letters and text. In general it should lead to sharper letters, anyway, which setting is best for a certain situation and display device may differ. So if you are unsure what setting to use you should choose TTF_HINTING_NORMAL. If you don’t call this procedure this setting is the default anyway.
TTF_HINTING_NORMAL
Normal hinting is applied
TTF_HINTING_LIGHT
Light hinting is applied
TTF_HINTING_MONO
I guess monospaced characters, so all the characters have the same space between each other
TTF_HINTING_NONE
Have the text underlined
All of these three procedure have a counter-function which returns the set style, outline and hinting as an integer number, defined as
TTF_GetFontStyle(font: PTTF_Font): Integer,
TTF_GetFontOutline(font: PTTF_Font): Integer,
TTF_GetFontHinting(font: PTTF_Font): Integer.
Obviously the only parameter to be set is the font whose style, outline or hinting you like to know. These functions aren’t demonstrated in the sample though.
Here we are starting to consider some coloring of the text. The first color set up in “sdlColor1” of kind TSDL_Color will be the color of the letters. The second color set up in “sdlColor2” will be the background color of the letters. Let’s have a look at the definition of TSDL_Color:
The TSDL_Color record has four fields. For additive color mixing you often have a red share, a green share and a blue share (RGB triple). These three fundamental colors are capable of generating any other color by mixing in the respective proportions. E.g. 100% red and 0% green and 0% blue will lead to red. But 100% red, 100% green and 0% blue will lead to yellow. If all three colours are 100% you will get white. If all of them are 0% you will get black. You may notice the variable type UInt8 which means 8bit unsigned integer. From this follows that the values can range between 0 and 255 where 0 equals 0% and 255 equals 100% of the corresponding color. So 2563 = 16,777,216 individual colors can be created.
The a field is for the alpha value, which determines the share of transparency. It is set to opaque (value 255) by default.
Text creation
//rendering a text to a SDL_Surface
  sdlSurface1 := TTF_RenderText_Shaded(ttfFont, 'Hello World!', sdlColor1, sdlColor2);
Finally a text, e.g. the famous “Hello World!” with the chosen colors has to be created. There are several functions to do so and just one of them is chosen for demonstration how the creation generally works. The chosen function is
It requires four arguments and returns a PSDL_Surface (no PSDL_Texture!), a pointer to a SDL_Surface. The first argument is the font you would like to use. Next is the actual text. The text can be directly written as shown in the example but also could be stored in a variable of type PAnsiChar.
PAnsiChar and Pascal Strings
Usually String variables are used in Pascal programming language, so why here we have a PAnsiChar? Well, since SDL is written in C/C++, and there typically null-terminated strings of characters are used to store and handle text, this is kept for better compatibility and easier translation of SDL 2.0 for Pascal compilers. In principle it is no big deal to use PAnsiChar instead of String, even though Pascal programmers prefer String variables.
Last but not least there are the two arguments “fg” and “bg” which translates to foreground and background. Here we insert the colors we defined before. That’s it.
Text Quality and Rendering Speed
Okay, as mentioned before there are more functions to create a SDL_Surface with text. In general there are three groups of functions according to their properties. The general naming scheme is as follows:
TTF_Render[encoding]_[suffix]
Those which have the suffix “Solid” are very fast created but their quality is low. Use them when rendering fast changing text (e.g. the score of a pinball simulation). The second group has the suffix “Shaded”. They are slower rendered and have a background color but have much better quality. The last group of functions have the suffix “Blended”. They are of high quality but slow to be rendered. Use them for more static text which doesn’t change a lot.
For each group of quality and functions you find “Text”, “UTF8”, “UNICODE” and “Glyph” in the encoding part of the functions name right after “TTF_Render”. “Text”, “UTF8” and “UNICODE” are three different types of encoding of the text. “Text” corresponds to Latin1 encoding, “UTF8” to UTF-8 encoding and “UNICODE” to Unicode encoding. Which type to choose depends on what type of characters (e.g. Cyrillic letters, Latin characters, Chinese characters) you are going to use. If you are unsure which of these functions to use, go with the “UNICODE” version.
For rendering a single character by its Unicode code, use the function which contains “Glyph” as suffix to “TTF_Render”.
Finally I’d like to mention a special function which is just available in high quality “Blended” mode. It has the suffix “_Blended_Wrapped”. Additional to the usual parameters there is a parameter wrapLength of type UInt32 (32 bit unsigned integer). Here you can have an integer value which determines the amount of pixels until the text will be word-wrapped. So in our case with a width of the window of 500 pixels the setting of wrapLength to 250 for example would result in a word-wrap when a word would exceed 250 pixels.
Overview: Rendering modes
The following list summarizes all the functions and most important properties for the three differen rendering modes.
All the functions will return nil on failure to create a SDL_Surface.
Converting a SDL_Surface into a SDL_Texture
Okay, now let’s proceed to the next lines of code.
//convert SDL_Surface to SDL_Texture
  sdlTexture1 := SDL_CreateTextureFromSurface(sdlRenderer, sdlSurface1);

//rendering of the texture
  SDL_RenderCopy(sdlRenderer, sdlTexture1, nil, nil);
  SDL_RenderPresent(sdlRenderer);
  SDL_Delay(5000);
In the previous table you saw all the functions to generate SDL_Surfaces with a certain text. Now we need to transform it into a SDL_Texture. The function to do so by SDL_CreateTextureFromSurface as known.
Then the result will be rendered to the window. For simplicity the third and fourth argument for SDL_RenderCopy() are nil which means that the SDL_Texture with the text will be stretched to the window. The rendered result is shown for 5000 ms (5 seconds).
We can proceed to the cleaning process.
//cleaning procedure
  TTF_CloseFont(ttfFont);
  TTF_Quit;

  SDL_FreeSurface(sdlSurface1);
  SDL_DestroyTexture(sdlTexture1);
  SDL_DestroyRenderer(sdlRenderer);
  SDL_DestroyWindow(sdlWindow1);

//shutting down video subsystem
  SDL_Quit;
All the allocated memory has to be free’d now. The font is free’d by procedure
TTF_CloseFont(font: PTTF_Font)
and the TrueType engine is quit by procedure
TTF_Quit.
“sdlSurface1” is free’d by procedure
SDL_FreeSurface(surface: PSDL_Surface)
and the texture, renderer and window as known. After that SDL 2.0 is shut down.
Remark: DO NOT create text surfaces on the fly!
As for the loading of bitmap files, while it is possible to directly load the surface to the texture without declaring a surface by combining the surface creation with the texture creation as follows:
Image files to use in games and applications often are available in other formats than simple bitmap files (e.g. jpg, png, tif and so forth), because often bitmap files need a significant higher amount of disk space memory.
Also it would be desirable to load an image file directly and create a SDL2 texture from it instead of firstly creating a SDL2 surface and then creating a SDL2 texture from the surface (as seen in the chapter about bitmap loading).
The SDL2_image Unit
Here comes the SDL2_image unit into play. It allows:
Creation of SDL2 texture from image files directly
These features are obviously not part of native SDL 2.0. SDL2_image is an official extension of SDL 2.0, which is developed and maintained by the same developers. Therefore, before right jumping into the code we need the corresponding library files.
Installing SDL2_image
download the most recent version of the Runtime Binaries of the SDL2_image library for your system
install the library according to your system (Win32/64, Linux, Mac OS X)
SDL2_image Installing Instructions for Windows
Download the corresponding SDL2_image package depending on your system (32 bit or 64 bit) and extract the file. You will end up with a SDL2_image.dll and some further dlls which are necessary for support of some image formats. Copy all these files to your system folder, e.g. for Windows XP 32 bit C:\WINDOWS\system32\. If you are not sure about your system folder, you should copy all these files to the same folder where the source code file (.pas or .pp) of your SDL 2.0 program is.
Have a look at the flow diagram below which is an extended version of the diagram seen in the chapter about loading of bitmap files. You see it is extended by two function with the prefix IMG instead of SDL, namely IMG_LoadTexture() and IMG_Load(). Both of these functions allow to load image files of all the supported file formats mentioned above. Also you see that IMG_LoadTexture() creates a texture directly from the image file, so we skip the step of first creating a SDL2 surface from the image file.
Let’s try the following image files (dimensions: 200 x 200 pixels, formats: bmp, jpg and png) but feel free to use any other image file you like.
download (right click and “save as”)
download (right click and “save as”)
download (right click and “save as”)
Coding example with SDL2_image
And now let’s start with some code. I will show the code as a whole first and after that I will discuss it in smaller pieces from top to bottom until the “end.” 🙂
program Chapter4_SDL2;

uses SDL2, SDL2_image;

var
sdlWindow1 : PSDL_Window;
sdlRenderer : PSDL_Renderer;
sdlTexture1 : PSDL_Texture;

begin

  //initilization of video subsystem
  if SDL_Init(SDL_INIT_VIDEO) < 0 then HALT;

  sdlWindow1 := SDL_CreateWindow('Window1', 50, 50, 500, 500, SDL_WINDOW_SHOWN);
  if sdlWindow1 = nil then HALT;

  sdlRenderer := SDL_CreateRenderer(sdlWindow1, -1, 0);
  if sdlRenderer = nil then HALT;

  sdlTexture1 := IMG_LoadTexture(sdlRenderer, 'C:\fpsdl.bmp');
  if sdlTexture1 = nil then HALT;
  SDL_RenderCopy(sdlRenderer, sdlTexture1, nil, nil);
  SDL_RenderPresent (sdlRenderer);
  SDL_Delay(2000);

  SDL_DestroyTexture(sdlTexture1);
  SDL_DestroyRenderer(sdlRenderer);
  SDL_DestroyWindow (sdlWindow1);

  //shutting down video subsystem
  SDL_Quit;

end.
Well, here it is. This code will create a window of dimensions 500 x 500 pixels which is showing the “Freepascal meets SDL” image for two seconds. After that the window closes automatically. The following screenshot shows the result of the example program.
program Chapter4_SDL2;

uses SDL2, SDL2_image;

var
sdlWindow1 : PSDL_Window;
sdlRenderer : PSDL_Renderer;
sdlTexture1 : PSDL_Texture;
Now the first eight lines are discussed. Well, the first line starts a Pascal program as usual. In contrast to the previous chapter, the uses clause is extended by SDL2_image. To be clear again, native SDL 2.0 has no support for different image formats, except for BMP image files. Although native SDL 2.0 allows for loading of BMP image files, it just allows for creation of SDL_Surfaces, but we would like to create SDL_Textures.
We need a texture variable to which we can load the image information of an image file. This will be “sdlTexture1” of PSDL_Texture type. All these variable types are pointer types which is indicated by the captial “P” at the beginning of the variable types’ names.
begin

  //initilization of video subsystem
  if SDL_Init(SDL_INIT_VIDEO) < 0 then HALT;

  sdlWindow1 := SDL_CreateWindow('Window1', 50, 50, 500, 500, SDL_WINDOW_SHOWN);
  if sdlWindow1 = nil then HALT;

  sdlRenderer := SDL_CreateRenderer(sdlWindow1, -1, 0);
  if sdlRenderer = nil then HALT;
As any Pascal program the main program’s begin-end block is initiated by “begin”. The initilization of SDL 2.0 is started as discussed in detail in the last chapter by SDL_Init().
After successful initialization of SDL 2.0 a window with title “Window1” and a renderer is created as known from a previous chapter.
Creation of SDL_Texture and Rendering in SDL 2.0
  sdlTexture1 := IMG_LoadTexture(sdlRenderer, 'C:\fpsdl.bmp');
  if sdlTexture1 = nil then HALT;
  SDL_RenderCopy(sdlRenderer, sdlTexture1, nil, nil);
  SDL_RenderPresent (sdlRenderer);
  SDL_Delay(2000);
Now we load the image file to the SDL_Texture we called “sdlTexture1”. The function to do this is
This function is provided by SDL2_image. Its prefix is IMG instead of SDL for native SDL 2.0 functions. That function is why we needed to insert SDL2_image in the uses clause. The parameters of this function are a renderer, that is “sdlRenderer” for us, and as a second the absolute or relative path to an image file, for us it is “C:\fpsdl.bmp”. Of course you may use any other directory to store/load the image or even use a different image. The function will recognize the image file’s format automatically, so feel free to load any of the allowed formats. If the loading fails, for instance you gave a wrong path as argument, this function will return nil.
Next we would like the successfully loaded image in “sdlTexture1” to be rendererd for which reason we pass it to the renderer by function
At first this function asks for a renderer (and indirectly for the related window) to which we would like to copy the texture. In our case this will be “sdlRenderer” again. Next the texture to be copied to the renderer/window is required, this is “sdlTexture1” here. The last two parameters are named “srcrect” and “dstrect” and of type PSDL_Rect. PSDL_Rect is a SDL 2.0 predefined record to define rectangles, hence the name. I will not go into details about this here, but in the next chapter (Chapter 5) we will learn more about PSDL_Rect, although it will be in another context. For simplicity we just use nil as argument here. This makes the function to pass the full texture to the renderer/window and stretching it to the dimensions of the window. So the 200 x 200 pixel image is strechted to 500 x 500 pixels, the latter being the width and height of the window. This function returns 0 on success and the negative error code on failure.
Finally everything gets rendered to the window by the SDL_RenderPresent(Renderer) procedure as known from the previous chapter. To be able to see it, we wait with a 2 seconds delay.
Clean up the memory in SDL 2.0
  SDL_DestroyTexture(sdlTexture1);
  SDL_DestroyRenderer(sdlRenderer);
  SDL_DestroyWindow (sdlWindow1);

  //shutting down video subsystem
  SDL_Quit;

end.
We first created a window, then a renderer and finally a texture. So now we go the opposite way, first destroy the texture, then the renderer and finally the window. The procedures are:
SDL_DestroyTexture(texture: PSDL_Texture)
SDL_DestroyRenderer(renderer: PSDL_Renderer)
and
SDL_DestroyWindow(window: PSDL_Window).
After removing the objects from memory, SDL 2.0 has to be quit as seen in the previous chapter.
Wow, we finally made it. Congratulations, this chapter is finished :-). The next chapter is waiting though.
This is an SDL 1.2 chapter. SDL 1.2 is obsolete since it has been replaced by SDL 2.0. Unless you have good reasons to stay here you may prefer to go for the modern SDL 2.0 :-).
It is highly recommended that you read the previous Chapter 8. The code from last chapter was used and modified to show how the conversion works. However, I won’t explain twice everything already introduced in Chapter 8. Also I’d like to express here that NeHe Productions’ OpenGL tutorial 06 “Texture Mapping” and the translated (by Dominique Louis) Jedi-SDL file was inspiring me a lot for this chapter.
You need this software:
Software
Version
Source
Description
OpenGL driver
–
–
Usually your graphic card provides the corresponding OpenGL driver and you don’t have to do anything. And if so it is very likely that version 1.1 is fully supported. However if you are one of the few poor people whose graphic card doesn’t support OpenGL, check the graphic card’s manufacturer’s homepage for OpenGL drivers.
Now following the whole code at once as usual. As you will notice many lines are exactly the same as in Chapter 8.
PROGRAM chap8a;
USES CRT, SDL, GL, GLU;

VAR
userkey:CHAR;
screen, picture:pSDL_SURFACE;
h,hh,th,thh:REAL;
ogl_texture:pGLUINT;

BEGIN

//some calculations needed for a regular tetrahedron with side length of 1
h:=SQRT(0.75); //height of equilateral triangle
hh:=h/2;       //half height of equilateral triangle
th:=0.75;      //height of tetrahedron
thh:=th/2;     //half height of tetrahedron

SDL_INIT(SDL_INIT_VIDEO);

SDL_GL_SETATTRIBUTE(SDL_GL_RED_SIZE, 5);
SDL_GL_SETATTRIBUTE(SDL_GL_GREEN_SIZE, 5);
SDL_GL_SETATTRIBUTE(SDL_GL_BLUE_SIZE, 5);
SDL_GL_SETATTRIBUTE(SDL_GL_DEPTH_SIZE, 16);
SDL_GL_SETATTRIBUTE(SDL_GL_DOUBLEBUFFER, 1);

screen:=SDL_SETVIDEOMODE(640, 480, 0, SDL_OPENGL);
IF screen=NIL THEN HALT;

//preparing SDL image
picture:=SDL_LOADBMP('C:\fpsdl256.bmp');
IF picture=NIL THEN HALT;

//preparing OpenGL texture
NEW(ogl_texture);
glGENTEXTURES(1, ogl_texture);
glBINDTEXTURE(GL_TEXTURE_2D, ogl_texture^);
glTEXIMAGE2D(GL_TEXTURE_2D, 0, 3, picture^.w, picture^.h, 0,
             GL_RGB, GL_UNSIGNED_BYTE, picture^.pixels);
glTEXPARAMETERi(GL_TEXTURE_2D, GL_TEXTURE_MIN_FILTER, GL_LINEAR);
glTEXPARAMETERi(GL_TEXTURE_2D, GL_TEXTURE_MAG_FILTER, GL_LINEAR);
SDL_FREESURFACE(picture);


glCLEARCOLOR(0.0, 0.0, 1.0, 0.0);
glVIEWPORT(0,0,640,480);
glMATRIXMODE(GL_PROJECTION);
glLOADIDENTITY;
gluPERSPECTIVE(45.0, 640.0/480.0, 1.0, 3.0);
glMATRIXMODE(GL_MODELVIEW);
glLOADIDENTITY;
glCLEAR(GL_COLOR_BUFFER_BIT);
glENABLE(GL_CULL_FACE);
glTRANSLATEf(0.0, 0.0, -2.0);

REPEAT
SDL_DELAY(50);

glROTATEf(5, 0.0, 1.0, 0.0);
glCLEAR(GL_COLOR_BUFFER_BIT);

//drawing textured face of tetrahedron
glENABLE(GL_TEXTURE_2D);
glBEGIN(GL_TRIANGLES);
    glTEXCOORD2f(2,2);
    glVERTEX3f(thh, 0.0, 0.0);
    glTEXCOORD2f(0,0);
    glVERTEX3f(-thh, hh, 0.0);
    glTEXCOORD2f(0,2);
    glVERTEX3f(-thh, -hh, 0.5);
glEND;
glDISABLE(GL_TEXTURE_2D);

//drawing remaining three untextured faces
glBEGIN(GL_TRIANGLES);
    glCOLOR3f(0.0, 1.0, 1.0);
    glVERTEX3f(thh, 0.0, 0.0);
    glVERTEX3f(-thh, -hh, -0.5);
    glVERTEX3f(-thh, hh, 0.0);

    glCOLOR3f(1.0, 0.0, 1.0);
    glVERTEX3f(thh, 0.0, 0.0);
    glVERTEX3f(-thh, -hh, 0.5);
    glVERTEX3f(-thh, -hh, -0.5);

    glCOLOR3f(1.0, 1.0, 1.0);
    glVERTEX3f(-thh, -hh, 0.5);
    glVERTEX3f(-thh, hh, 0.0);
    glVERTEX3f(-thh, -hh, -0.5);
glEND;

SDL_GL_SWAPBUFFERS;
UNTIL keypressed;

glDELETETEXTURES(1, ogl_texture);
DISPOSE(ogl_texture);
SDL_QUIT;
END.
This code will again draw a tetrahedron which is spinning, as known from Chapter 8. However, this time one face is textured with the “Free Pascal meets SDL” image known from Chapter 3. Now lets go through the code step by step.
PROGRAM chap8a;
USES CRT, SDL, GL, GLU;

VAR
userkey:CHAR;
screen, picture:pSDL_SURFACE;
h,hh,th,thh:REAL;
ogl_texture:pGLUINT;
The program is called “chap8a”. Additionally to the variables defined in the previous chapter there are two new variables. The SDL surface “picture” which will store the SDL image before converting it to an OpenGL texture. ogl_texture is an integer pointer variable (provided by the OpenGL Uitility Library (GLU), so pGLUINT) which is needed to reference to the OpenGL texture we will create from the SDL image.
BEGIN

//some calculations needed for a regular tetrahedron with side length of 1
h:=SQRT(0.75); //height of equilateral triangle
hh:=h/2;       //half height of equilateral triangle
th:=0.75;      //height of tetrahedron
thh:=th/2;     //half height of tetrahedron

SDL_INIT(SDL_INIT_VIDEO);

SDL_GL_SETATTRIBUTE(SDL_GL_RED_SIZE, 5);
SDL_GL_SETATTRIBUTE(SDL_GL_GREEN_SIZE, 5);
SDL_GL_SETATTRIBUTE(SDL_GL_BLUE_SIZE, 5);
SDL_GL_SETATTRIBUTE(SDL_GL_DEPTH_SIZE, 16);
SDL_GL_SETATTRIBUTE(SDL_GL_DOUBLEBUFFER, 1);

screen:=SDL_SETVIDEOMODE(640, 480, 0, SDL_OPENGL);
IF screen=NIL THEN HALT;
The code shown here is discussed in detail in Chapter 8. In short the tetrahedron parameters are calculated, some important OpenGL scene settings are applied and finally the SDL video subsystem is intilized.
//preparing SDL image
picture:=SDL_LOADBMP('C:\fpsdl256.bmp');
IF picture=NIL THEN HALT;
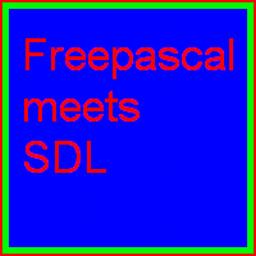
First we should load a simple BMP image to a SDL surface as known from Chapter 3. There are some limitations about the height and length of images if used as OpenGL textures. Their pixel height and pixel length has to be power of 2. So whatever image you use, its height and lengths should fulfill the following equation: f(n) = 2n. So appropriate values are: 2, 4, 8, 16, 32, 64, 128, 256, 512, 1024, 2048,… The height and length don’t have to be of the same size, so an image with height 64 px and width 32 px is perfectly acceptable. This means the image of Chapter 3 with height and length of 200 x 200 px is not acceptable. A new image with 256 x 256 dimensions is therefore provided now:
Free Pascal meets SDL images with 256×256 dimensions
First the pointer “ogl_texture” gets some space. glGENTEXTURES(number of IDs, array of integer pointer) generates one or more OGL integer identifiers for textures. Anyway, we just have one texture, so we just need one texture identifier, therefore we request “1” and ogl_texture should point at it. If we need to identify the texture we just need to call ogl_texture from now on.
glBINDTEXTURE(target, texture) essentially creates a texture object of type: GL_TEXTURE_1D or GL_TEXTURE_2D. Usually textures in 2d and 3d games are two-dimensional, so GL_TEXTURE_2D is a good choice. Now it is clear, ogl_texture will be a 2d texture.
Briefly, glTEXIMAGE2D(target, mipmap level, internal image format, width, height, border, pixel format, pixel type, actual pixel data) creates the actual 2d texture. The target is GL_TEXTURE_2D again since we are looking for creating a 2d texture. The mipmap level should be set to 0 because we wouldn’t want to have a mipmap effect here. A higher number corresponds to the number’s mipmap level, anyway in the example for a number different from 0 there is no image at all finally. The internal image format is RGB because the image is a RGB image, anyway there is a large list of possibilities for this parameter, you should look it up in the internet if you’re interested. The width and height of the image in pixels is received from the SDL image. The border is off (values 0 and 1 are acceptable). The pixel format is RGB, too, so again SDL_RGB is the right choice here. The pixel explains how the pixel data is stored. The pixel data from the SDL image is stored as unsigned byte (GL_UNSIGNED_BYTE). Finally the pixel data pointer of the SDL image is needed. Essentially the SDL image is now transformed to an OGL texture!
Briefly, glTEXPARAMETERi(target, texture parameter, parameter value) allocates a certain value to a specific texture parameter. The possible parameters and values are OGL specific and won’t be treated here in more detail. Anyway, again we are concerned about our 2d texture, so the target is GL_TEXTURE_2D. The parameters to be set are GL_TEXTURE_MIN_FILTER and GL_TEXTURE_MAG_FILTER. They are used to define how to treat textures that have to be drawn to a smaller or larger scale. The routine used for this is specified by GL_LINEAR.
Since the SDL image isn’t needed anymore it can be omitted as known by SDL_FREESURFACE.
This part is completely described in Chapter 8. Nothing has changed for this part. In short, the viewport is set up so that the tetrahedron finally can be seen.
Now the REPEAT..UNTIL loop is entered which is delayed by 50 milliseconds by known SDL_DELAY. Each cycle the the scene gets rotated by 5 degrees around the y-axis by function glROTATEf. More details about this in Chapter 8.
The actual texturing of one of the four triangles of the tetrahedron is now described. Therefore 2d texturing has to be enabled by glENABLE(OGL capability). The capability we would like to enable is defined by GL_TEXTURE_2D.
Just as known from Chapter 8 the triangle mode is started by glBEGIN(geometric primitive type) with GL_TRIANGLES. Instead of a color we now define specific texture coordinates which should be allocated to specific vertices. glTEXCOORD2f(s coordinate, t coordinate) is used to define the coordinate of the texture we then allocate to a specific vertex. By the way, even though the official names of the texture coordinates are s and t, they can be considered as x and y values, which is more common for two-dimensional coordinate systems. The values for s and t are relative, so a value of 1 (= 100%) means the full width or height, independent of the actual width or height (32 x 32, 64 x 64, 128 x 256, …), a value of 2 (= 200%) then corresponds to two times the texture’s width or height. The coordinate (s, t) = (2, 2) is allocated to the vertex with the vertex coordinates (x, y, z) = (thh, 0.0, 0.0). Texture coordinate (0, 0) is allocated to vertex (thh, hh, 0.0). Texture coordinate (0, 2) is allocated to vertex (thh, hh, 0.5). Often this texturing process is compared to papering a wall, and indeed there are similarities. The vertex coordinates are exactly the same as for the first triangle in Chapter 8.
Finally the geometry definition and the texturing mode is finished by glEND and glDISABLE(OGL capability).
The remaining three areas of the triangle are kept as in Chapter 8. Finally the display buffer if swapped after each cycle and the REPEAT..UNTIL loop stopped if a key is pressed in the console.
Last but not least everything has to be free’s and closed as known. Anyway, the texture has to free’d by glDELETETEXTURES(number of textures, texture pointer). Then the pointer can be disposed as known and SDL can be quit.
Again, if you want to learn OpenGL and its capabilities to a more advaced extend you need to read more professional tutorials related to pure OpenGL programming. As a starting point I’d like to mention NeHe Productions’ OpenGL tutorials again, because they are professional and provide example code for JEDI-SDL for several lessons. 🙂
This file contains the source code: chap8a.pas (right click and “save as”)
This file is the executable: chap8a.exe (right click and “save as”)
The final result should look and behave like this: A tetrahedron consisting of three different coloured areas (cyan, magenta and white) and one textured area is spinning slowly around itself. When pressing a key in the console the show quits.