This chapter treats some basics you should know to understand the way SDL2 works.
Briefly: The Basics of Graphics Programming
Loading and the movement of images in a game (or other applications) is a major concept in (game) programming. These images are then refered to as sprites, usually. Let’s have a look at a simple example:
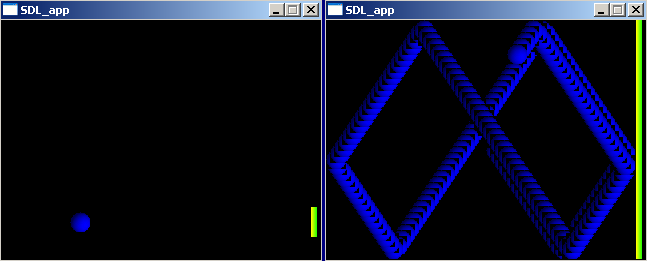
Here are two screenshots from a simple game. The player has to move the yellow-green paddle up- and downwards to prevent the blue ball from getting through to the right side. The game uses two sprites, the blue ball sprite and the yellow-green paddle sprite (see left screenshot). The background color is set to black. The left screenshot is how the game usually appears to the player, here between each frame that got drawn, the former frame has been cleared. The right screenshot demonstrates what happens if the former frame hasn’t been erased before the next one is drawn. – Now it is clearly visible that the sprites are redrawn again and again with sligthly different coordinates, and that is how (game) graphics work (even for the most sophisticated 3d games):
- Draw the frame
- Show the frame (in a window on screen)
- Clear the frame (and go back to step 1)
Briefly: The Relation between Graphic Objects (e.g. Sprites) and Hardware
Actually there are just three locations where these images are stored in your computer system. All images (photo images, drawings, sprites for 2d games, textures for 3d games) are stored on your harddrive somewhere. If you start a photo viewer, a paint program, a 2d game or a 3d game, in all cases the corresponding images need to be loaded from your harddrive to RAM (Random-Access Memory) since displaying and manipulation (e.g. rotation of a photo image by 90°) of images loaded to RAM is much, much faster. Especially for games a fast access to the image data is highly important! And finally there isn’t just one RAM but two, a CPU controlled one located on the motherboard used by every program/application that needs some RAM. The second RAM is located right at your graphic board and controlled by the so-called GPU (graphics processing unit). This is what we want to use if we develop games since it is dedicated, optimized and just hungry for tasks related to fast image processing.
Many games and applications do not only target at common computer systems, but for mobile devices, e.g. smart phones. The principles described are also true for these devices even though there may be differences in detail.
The SDL2 Surface
The SDL2 surface allows you to represent graphic objects like sprites. Every SDL2 surface has a width and height, a pixel format and other properties. Nevertheless, it is a concept which originates from the outdated SDL 1.2 and therefore should not be used anymore. Still, there are reasons why we need to introduce it here. This will be clear soon.
The SDL2 Texture
The SDL2 texture allows you to represent graphic objects just like the SDL2 surface does, although there is a major difference: It is hardware accalerated. So the graphic object is stored in the graphic board’s RAM and any manipulation is done by the graphic board’s GPU.
So as a rule,
always use SDL2 Textures to store your graphic objects (sprites) for SDL 2.0,
then you go for high performance!
Three ways to SDL_Texture
So, how to get a SDL_Texture? In principle there are three ways to create SDL2 textures. For way 2 and 3 the flow diagram may illustrate how it works.
Way 1: From Scratch
You create a SDL_Texture from scratch, so you set a pixel format and texture access format and have to fill in your texture data manually. This is the most sophisticated way and is usually not necessary, unless you work with raw pixel data.

Way 2: From SDL2 Surface
2) You have or create a SDL_Surface from an image file first and then you create the SDL_Texture from the SDL_Surface. This way is shown in the diagram but it means two steps.
Way 3: Directly from Image File
3) You create a SDL_Texture from and image file directly. This is shown in the diagram, too. This is the simplest way to create a SDL_Texture.
Between way 2 and 3, which one is the best? Is it that way #2 might be better if we need to build a texture out of many blit from multiple surfaces ? Way #3 if we have a single image file?
Hi Emile,
there is no “better” choice in terms of performance as you work with textures finally.
You are right, if you want to process the image you loaded prior to generating the texture, you should load it as a surface first, make the processing, finally transform it to a texture. If you just need the image without any further processing then you can directly load it into a texture. – The processing of the image makes only sense if it is something you can’t do with the texture anyway (like combining it as you suggested).
Be careful though, for the (game) rendering loop only textures should be used for maximum performance and you should not go via surface on every loop cycle.
Best regards
Matthias
Ukrainian translation is here: https://lazarus-games.blogspot.com/p/5.html