Displaying of textures as discussed in previous chapters are sometimes accompanied by drawing operations. For some applications and games drawing operations are even essential, e.g. you need to draw buttons of dynamic dimension in your application. Discussion of a more detailed case is found right after the code example.
Supported Primitives: Points, Lines, Rectangles
SDL2 supports natively the drawing of
- Points
- Lines
- Rectangles (outline only)
- Filled Rectangles.
Drawing in SDL 2.0
Now lets jump right into the code:
program Chapter5_SDL2;
uses SDL2;
var
i: Integer;
sdlWindow1: PSDL_Window;
sdlRenderer: PSDL_Renderer;
sdlRect1: TSDL_Rect;
sdlPoints: array[0..499] of TSDL_Point;
begin
//initilization of video subsystem
if SDL_Init(SDL_INIT_VIDEO) < 0 then
halt;
sdlWindow1 := SDL_CreateWindow('Window1', 50, 50, 500, 500, SDL_WINDOW_SHOWN);
if sdlWindow1 = nil then
halt;
sdlRenderer := SDL_CreateRenderer(sdlWindow1, -1, 0);
if sdlRenderer = nil then
halt;
//render and show cleared window with background color
SDL_SetRenderDrawColor(sdlRenderer, 0, 255, 255, 255);
SDL_RenderClear(sdlRenderer);
SDL_RenderPresent(sdlRenderer);
SDL_Delay(1000);
//render and show a line
SDL_SetRenderDrawColor(sdlRenderer, 255, 0, 0, 255);
SDL_RenderDrawLine(sdlRenderer, 10, 10, 490, 490);
SDL_RenderPresent(sdlRenderer);
SDL_Delay(1000);
//render and draw points diagonally with distance between each other
SDL_SetRenderDrawColor(sdlRenderer, 0, 0, 0, 255);
for i := 0 to 47 do
SDL_RenderDrawPoint(sdlRenderer, 490-i*10, 10+i*10);
SDL_RenderPresent(sdlRenderer);
SDL_Delay(1000);
//prepare, render and draw a rectangle
sdlRect1.x := 260;
sdlRect1.y := 10;
sdlRect1.w := 230;
sdlRect1.h := 230;
SDL_SetRenderDrawColor(sdlRenderer, 0, 255, 0, 255);
SDL_RenderDrawRect(sdlRenderer, @sdlRect1);
//relocate, render and draw the rectangle
sdlRect1.x := 10;
sdlRect1.y := 260;
SDL_SetRenderDrawBlendMode(sdlRenderer, SDL_BLENDMODE_BLEND);
SDL_SetRenderDrawColor(sdlRenderer, 0, 0, 255, 128);
SDL_RenderFillRect(sdlRenderer, @sdlRect1);
SDL_RenderPresent(sdlRenderer);
SDL_Delay(1000);
//prepare, render and draw 500 points with random x and y values
Randomize;
for i := 0 to 499 do
begin
sdlPoints[i].x := Random(500);
sdlPoints[i].y := Random(500);
end;
SDL_SetRenderDrawColor(sdlRenderer, 128, 128, 128, 255);
SDL_RenderDrawPoints(sdlRenderer, sdlPoints, 500);
SDL_RenderPresent(sdlRenderer);
SDL_Delay(3000);
//clean memory
SDL_DestroyRenderer(sdlRenderer);
SDL_DestroyWindow (sdlWindow1);
//shut down SDL2
SDL_Quit;
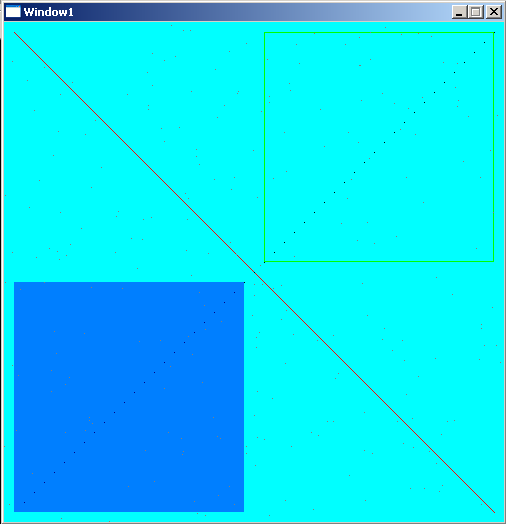
end.Wow, that looks like a big load of new functions, but I promise, drawing in SDL2 is very simple. What the executed program will look like is shown in the following screenshot.
Now, let’s have a closer look to the first lines of code.
program Chapter5_SDL2;

uses SDL2;

var
  i: Integer;
  sdlWindow1: PSDL_Window;
  sdlRenderer: PSDL_Renderer;
  sdlRect1: TSDL_Rect;
  sdlPoints: array[0..499] of TSDL_Point;
The program is called “Chapter5_SDL2”. We will need a counter variable “i” of native Pascal type integer later. We need a window and a renderer and call them “sdlWindow1” and “sdlRenderer” as known from the previous chapters. Next we declare a variable “sdlRect1” which is of type TSDL_Rect. The same is true for “sdlPoints” which is an array of 500 elements of type TSDL_Point.
begin
  //initilization of video subsystem
  if SDL_Init(SDL_INIT_VIDEO) < 0 then
    halt;

  sdlWindow1 := SDL_CreateWindow('Window1', 50, 50, 500, 500, SDL_WINDOW_SHOWN);
  if sdlWindow1 = nil then
    halt;

  sdlRenderer := SDL_CreateRenderer(sdlWindow1, -1, 0);
  if sdlRenderer = nil then
    halt;
Nothing new here, we initilize SDL2, create a window with 500 pixels width and 500 pixels height and associate the renderer with this window.
Colours, alpha value and RGB(A) notation in SDL 2.0
  //render and show cleared window with background color
  SDL_SetRenderDrawColor(sdlRenderer, 0, 255, 255, 255);
  SDL_RenderClear(sdlRenderer);
  SDL_RenderPresent(sdlRenderer);
  SDL_Delay(1000);
Now we have something new here, SDL_SetRenderDrawColor() sets a colour for drawing operations, just as if you choose for a pencil colour to draw something. This function doesn’t draw anything though. It returns 0 on success and the negative error code on failure.
SDL_SetRenderDrawColor(renderer: PSDL_Renderer; r: UInt8; g: UInt8; b: UInt8; a: UInt8): SInt32
First you need to set the renderer for which this drawing colour is meant. After that you have to set the colours red, green, blue and the alpha value. They can range from 0 to 255 (integer values only). Think in terms of 255 being 100% and 0 being 0% of that colour or the alpha value. As a start let’s neglect the alpha value.
If you like to have a red colour, you need to set the value for the red colour high, e.g. 100%, the maximum value is 255, and since you don’t want to mix in green and blue, they get the minimum value of 0 (hence 0%). Setting up red therefore corresponds to 255/0/0 in terms of r/g/b. For comparision, 0/255/0 will lead to green, 255/255/255 is white and 0/0/0 is black, and so on. In the example code we used 0/255/255 which leads to cyan (mixing up green and blue additively). With these three values you can generate every colour possible.
So what is the meaning of the alpha value then? Well, it determines the transparency. 255 means fully opaque and 0 means full transparency. This is very important for blend effects in computer graphics and will be demonstrated later on in the code. By the way, instead of 255 you could use SDL_ALPHA_OPAQUE. If you count the alpha value also as colour variation you have 4.29 billion different possibilities.
Setting up a background in SDL2
The function SDL_RenderClear() is for clearing the screen with the drawing colour. As argument you just need to tell the renderer. It is simple as that :-). Since we set the drawing colour to cyan before, the screen will be cleared with a cyan colour.
SDL_RenderClear(renderer: PSDL_Renderer): SInt32
This function will return 0 on success and a negative error code on failure. The cleared screen will be shown for one second by SDL_RenderPresent() and SDL_Delay(). These two procedures are known from the previous chapter.
Drawing Lines and Points in SDL2
  //render and show a line
  SDL_SetRenderDrawColor(sdlRenderer, 255, 0, 0, 255);
  SDL_RenderDrawLine(sdlRenderer, 10, 10, 490, 490);
  SDL_RenderPresent(sdlRenderer);
  SDL_Delay(1000);
Now we change the drawing colour by SDL_SetRenderDrawColor() to red and use SDL_RenderDrawLine() to draw a simple line.
SDL_RenderDrawLine(renderer: PSDL_Renderer; x1: SInt32; y1: SInt32; x2: SInt32; y2: SInt32): SInt32
Again you need the renderer, which is “sdlRenderer” in our case. After that you specify the x/y coordinates where the line should begin and then the x/y coordinates where the line should end. Remember that the origin 0/0 is at the top left corner of the window. The coordinates 10/10 mean to start at the point ten pixels to the right and ten pixel to the bottom relative to the origin. Thus, the coordinates 490/490 for the second point will lead to a diagonal line across the window. This diagonal line will be 10 pixels short with respect to the window edge. This function returns 0 on success and a negative error code on failure.
After that again we ask to render this line to the screen by SDL_RenderPresent() and wait one second by SDL_Delay().
  //render and draw points diagonally with distance between each other
  SDL_SetRenderDrawColor(sdlRenderer, 0, 0, 0, 255);
  for i := 0 to 47 do
    SDL_RenderDrawPoint(sdlRenderer, 490-i*10, 10+i*10);
  SDL_RenderPresent(sdlRenderer);
  SDL_Delay(1000);
Now we change the colour to black and draw some points by the function SDL_RenderDrawPoint(). It is nearly identical to SDL_RenderDrawLine() but instead of four coordinates you need just two coordinates where the point should be drawn.
SDL_RenderDrawPoint(renderer: PSDL_Renderer; x: SInt32; y: SInt32): SInt32
This function returns 0 on success and the negative error code on failure.
I thought it would be nice to have more than just one point to be drawn, so the function is used in a for-loop to draw altogether 48 points. Here we need the counter variable “i”. Maybe you can guess from the code where the points are and how they are arranged, if not, just run the code ;-). Finally the result is rendered to the screen by SDL_RenderPresent() and the program waits one second by SDL_Delay().
Let’s proceed to the next chunk of code now.
  //prepare, render and draw a rectangle
  sdlRect1.x := 260;
  sdlRect1.y := 10;
  sdlRect1.w := 230;
  sdlRect1.h := 230;
  SDL_SetRenderDrawColor(sdlRenderer, 0, 255, 0, 255);
  SDL_RenderDrawRect(sdlRenderer, @sdlRect1);
The drawing colour is set to green by SDL_SetRenderDrawColor() and the rectangle is drawn by SDL_RenderDrawRect().
SDL_RenderDrawRect(renderer: PSDL_Renderer; rect: PSDL_Rect): SInt32
It requires the renderer, which is “sdlRenderer” for us and a PSDL_Rect , thus we use the @ operator for the declared rectangle of TSDL_Rect type to get its pointer value. This function returns 0 on success and the negative error code on failure. Notice, we neither render the result to the screen now nor do we delay here. Anyway, we want a second rectangle! 🙂
  //relocate, render and draw the rectangle
  sdlRect1.x := 10;
  sdlRect1.y := 260;
  SDL_SetRenderDrawBlendMode(sdlRenderer, SDL_BLENDMODE_BLEND);
  SDL_SetRenderDrawColor(sdlRenderer, 0, 0, 255, 128);
  SDL_RenderFillRect(sdlRenderer, @sdlRect1);
  SDL_RenderPresent(sdlRenderer);
  SDL_Delay(1000);
We change the rectangles x/y coordinates for the second rectangle but keep its width and height. What we are looking for is a filled rectangle that has some transparency. Until now we always used 255 (opaque) as alpha value. We set the colour to draw the second rectangle to blue by SDL_SetRenderDrawColor(). Notice that the fourth value is 128 (half-transparent) instead of 255 (opaque). So everything behind the blue rectangle, e.g. the cyan background, should therefore shine through. To generate a filled rectangle SDL_RenderFillRect() is used:
SDL_RenderFillRect(renderer: PSDL_Renderer; rect: PSDL_Rect): SInt32
The renderer and the rectangle of type PSDL_Rect are the parameters of this function. So we use “sdlRenderer” and “sdlRect1” (with the @ operator) again to draw the rectangle. This function returns 0 on success and the negative error code on failure.
The Blend Mode in SDL 2.0
But to be honest, even if you change the alpha value it will be opaque. This is because the blend mode is set to SDL_BLENDMODE_NONE by default. We need to change this to be able to use the alpha value as desired. SDL_SetRenderDrawBlendMode() is what we are looking for:
SDL_SetRenderDrawBlendMode(renderer: PSDL_Renderer; blendMode: TSDL_BlendMode): SInt32
First the renderer for which the blend mode has to be set is chosen. In our case it is “sdlRenderer” again. Then there are four blend modes available. Their description is taken from the official SDL2 Wiki.
- SDL_BLENDMODE_NONE
- no blending
- dstRGBA = srcRGBA
- SDL_BLENDMODE_BLEND
- alpha blending
- dstRGB = (srcRGB * srcA) + (dstRGB * (1-srcA))
- dstA = srcA + (dstA * (1-srcA))
- SDL_BLENDMODE_ADD
- additive blending
- dstRGB = (srcRGB * srcA) + dstRGB
- dstA = dstA
- SDL_BLENDMODE_MOD
- color modulate
- dstRGB = srcRGB * dstRGB
- dstA = dstA
We are looking for alpha blending, so we use SDL_BLENDMODE_BLEND as argument for the blend mode. This function returns 0 on success and the negative error code on failure.
After doing so the result is rendered to the screen by SDL_RenderPresent() and shown for one second by SDL_Delay(). Both rectangles, the green one and the half-transparent blue one appear at the same time.
Spread Points Randomly using PSDL_Point
  //prepare, render and draw 500 points with random x and y values
  Randomize;
  for i := 0 to 499 do
  begin
    sdlPoints[i].x := Random(500);
    sdlPoints[i].y := Random(500);
  end;
Randomize is a Free Pascal procedure (from system unit) to initilize the random number generator. Imagine this as shaking the dice.
Let’s have a look at TSDL_Point. It is just a record of this structure:
PSDL_Point = ^TSDL_Point;
TSDL_Point = record
  x: SInt32;
  y: SInt32;
end;
As expected, the TSDL_Point record has two values, the x/y coordinates of the point. Notice how PSDL_Point is just a pointer to it. Free Pascal’s Random() function generates random numbers between 0 and the number which is used as argument substracted by one. So we generate 500 times a random x and y value between 0 and 499 and save them into the 500 SDL_Point records.
  SDL_SetRenderDrawColor(sdlRenderer, 128, 128, 128, 255);
  SDL_RenderDrawPoints(sdlRenderer, sdlPoints, 500);
  SDL_RenderPresent(sdlRenderer);
  SDL_Delay(3000);
A grey colour is set by SDL_SetRenderDrawColor() for the points. To draw the points in the array “sdlPoints” we use SDL_RenderDrawPoints().
SDL_RenderDrawPoints(renderer: PSDL_Renderer; points: PSDL_Point; count: SInt32): SInt32
This function returns 0 on success and the negative error code on failure. First you need to set the renderer, then just a pointer to an array of TSDL_Point (returned by simply passing the array’s name) and finally the number of points. The latter should be consistent with the array. So, if your array has 500 elements, the count should be 500 at maximum. Notice how we are not using a loop here to draw all 500 points by calling a certain function 500 times. Instead we just pass an array of points once. This way we save a lot of time at runtime, especially if you think of a real application where even more points have to be drawn. There are similar functions for lines, rectangles and filled rectangles. They are not used in the example but it may be interesting to know, so here they are:
SDL_RenderDrawLines(renderer: PSDL_Renderer; points: PSDL_Point; count: SInt32): SInt32
SDL_RenderDrawRects(renderer: PSDL_Renderer; rects: PSDL_Rect; count: SInt32): SInt32
SDL_RenderFillRects(renderer: PSDL_Renderer; rects: PSDL_Rect; count: SInt32): SInt32
As a hint, try replacing SDL_RenderDrawPoints by SDL_RenderDrawLines, and changing the count to 499. You will be rewarded with a beautiful pattern. 🙂
  //clean memory
  SDL_DestroyRenderer(sdlRenderer);
  SDL_DestroyWindow (sdlWindow1);

  //shut down SDL2
  SDL_Quit;
end.
Finally all the memory reserved for points, the rectangle, the renderer and the window is free’d and SDL2 shut down by SDL_Quit.
Congratulations, you just finished this chapter :-).
You may read
- Trouble: Using Array of PSDL_Point
- Case: Drawing for Dynamic Colouring
- Understanding Colours in Computer Graphics
below, or you may directly skip to the next chapter .
← previous Chapter | next Chapter →
Trouble: Using Array of PSDL_Point
To put your array in the heap, you would want to use an array of PSDL_Point instead of an array of TSDL_Point. For some reason it doesn’t seem to work well with the SDL_RenderDrawPoints() function. This means, instead of, let’s say 500 points just a quarter of all points (125 in the example) is shown unless you specifiy the count as being four times greater (2000 in the example). The reason behind this, is not clear to me.
Case: Drawing for Dynamic Colouring
As an example when drawing can be very helpful, think of the following situation. You create a game, let’s say a racing game. There are different players. Of course, each player’s car has to have a different colour. There are generally two ways to achieve this:
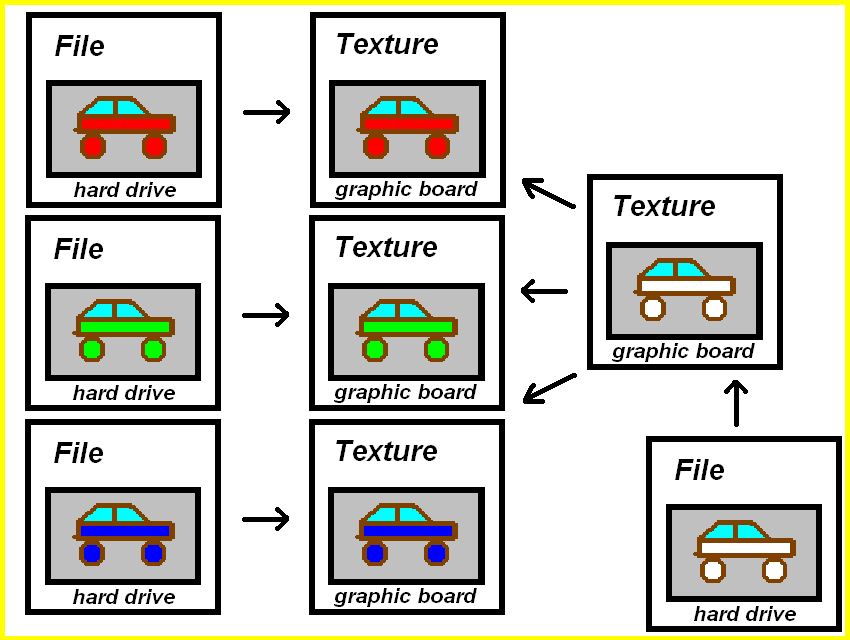
1) You create several images with differently coloured cars and store them on your harddrive.
This is perfectly okay if you have a small number of cars (and colours) to be chosen. But what if you want the player to choose from a large variety of colours, 100 colours or more, or what if you want to let the player to choose the colour of his car by himself? Notice, in case of 16 bit colouring that means 65536 possibilities after all! Would you want to create that many images? In case of 32 bit colouring you have fantastic 4.29 billion colours!! Amazing, but you will never be able to create so many images in just one human being’s life. Furthermore, this would take up a lot of hard drive memory (4.29 billion times the file size of the car image) for just a simple car racing game. Look at the following image. It contains the discussed method from left to the middle. On the right to the middle is the solution :-).
Instead of having each car coloured as an image file, why not using just one image file of a car without colouring? It is kind of a template. Now you can easily ask the player what colour he prefers (and he may pick from 4.29 billion colours if necessary), and then you simply colour the car on the fly. This is the second way:
2) You create one template image on your harddrive and colour it during runtime of the program.
This is just one example where drawing is very helpful.
Understanding Colours in Computer Graphics
The colour is composed of four components, RGBA, that is red, green, blue and the alpha value. The physical screen consists of many small units. Every unit itself consists of three different coloured lights. These colours are red, green and blue. If you mix them up, you can get every other colour. These colours are mixed up additively. For example if you mix red and green you get yellow. For three colours that can be mixed with each other, there are eight combinations possible which lead to different colours (RGB, RG, RB, R, GB, G, B, all lights off). If you mix red, green and blue (all lights on, RGB), you get white, and if all lights are off, you get black. Some may say, white and black are no colours at all. Well, that is right but doesn’t matter here and to keep simpliness I will talk of colours even if I talk of black and white.
Your screen definitvly has more than eight colours, doesn’t it? The reason is, your screen isn’t just able to switch lights on or off. Besides it is able to differ the intensities of the lights. The more intensity levels you have the more colours you can display. The case that you have eight colours as discussed before means that you just have one intensity level, on or off. If your screen is in 8 bit mode every pixel on the screen has the possibility to display 2 power 8 colours. That are 256 different colours. Every of the three lights has therefore a certain amount of different light intensity levels. If you have 16 bit mode you have 2 power 16 and that are 65536 colours. Each light therefore has the appropriate amount of intensity levels. Since we prefer 32 bit mode, we have 4.29 billion different colours!
Ukrainian translation avaliable here: https://lazarus-games.blogspot.com/p/10.html