Error handling in Pascal means raising exceptions and catching them. SDL2 has also a way to treat errors. Both worlds can be combined and this chapter shows you how.
Let’s look at the whole program code:
program SDL_ErrorHandling;

uses SDL2, SysUtils;

type
  ESDLNilPointer = class(Exception);

var
  sdlWindow1: PSDL_Window;
  sdlRenderer: PSDL_Renderer;
  sdlSurface1: PSDL_Surface;

const
  filename = 'nofile.bmp'; // this file does not exist

begin
  // Initialize SDL2
  if SDL_Init(SDL_INIT_VIDEO) < 0 then Exit;

  // Create a window, renderer and a surface
  try
    SDL_CreateWindowAndRenderer(500, 500, SDL_WINDOW_SHOWN,
      @sdlWindow1, @sdlRenderer);

    if not Assigned(sdlWindow1) then
      raise ESDLNilPointer.CreateFmt(
        'sdlWindow1 is nil. SDL_GetError: %s', [SDL_GetError]);

    if not Assigned(sdlRenderer) then
      raise ESDLNilPointer.CreateFmt(
        'sdlRenderer is nil. SDL_GetError: %s', [SDL_GetError]);

    sdlSurface1 := SDL_LoadBMP(filename); // sdlSurface1 will be nil!
    if not Assigned(sdlSurface1) then
      raise ESDLNilPointer.CreateFmt(
        'sdlSurface1 is nil on loading %s. ' + sLineBreak + 'SDL_GetError: %s',
        [filename, SDL_GetError]);
  except
    on E: ESDLNilPointer do
    begin
      WriteLn('Exception ESDLNilPointer: ' + sLineBreak + E.Message);
      Readln;
    end;
  end;

  // Clean-up and quit SDL2
  if Assigned(sdlSurface1) then SDL_FreeSurface(sdlSurface1);
  if Assigned(sdlRenderer) then SDL_DestroyRenderer(sdlRenderer);
  if Assigned(sdlWindow1) then SDL_DestroyWindow(sdlWindow1);
  SDL_Quit;
end.
If you run this program, it will stop execution because it catches an exception. It will return several helpful information to make identification of the cause of the exception easier. It allows you to proceed running after the exception has been caught to free resources and prevent memory leaks. It will report the following exception messages:
sdlSurface1 is nil on loading nofile.bmp.
SDL_GetError: Parameter ‘src’ is invalid
Let’s start with the first part of the code:
program SDL_ErrorHandling;

uses SDL2, SysUtils;

type
  ESDLNilPointer = class(Exception);

var
  sdlWindow1: PSDL_Window;
  sdlRenderer: PSDL_Renderer;
  sdlSurface1: PSDL_Surface;

const
  filename = 'nofile.bmp'; // this file does not exist
The program “SDL_ErrorHandling” has three variables representing a SDL2 window, a SDL2 renderer and a SDL2 surface. It also has a constant “filename” which defines a file name of an imaginary file called “nofile.bmp”. As this file doesn’t exists, it will cause an exception on trying to load it (later in the code).
Right above the var block is an exception class declared whose names start by convention with a capital E instead of a capital T. It is called “ESDLNilPointer” and will be raised whenever a SDL2 function returns a nil pointer as error code. Nearly all function in SDL2 return an error code where 0 usually means sucess and -1 usually means failure. SDL2 function which create objects usually simply indicate failure by nil-pointers.
The main program’s begin .. end. code block starts with the initilization of the SDL2 system and ends with the clean up part and the quitting of the SDL2 system. I will not cover this in detail here again. Let’s instead have a detailed look into the core part of the begin .. end. block:
  // Create a window, renderer and a surface
  try
    SDL_CreateWindowAndRenderer(500, 500, SDL_WINDOW_SHOWN,
      @sdlWindow1, @sdlRenderer);

    if not Assigned(sdlWindow1) then
      raise ESDLNilPointer.CreateFmt(
        'sdlWindow1 is nil. SDL_GetError: %s', [SDL_GetError]);

    if not Assigned(sdlRenderer) then
      raise ESDLNilPointer.CreateFmt(
        'sdlRenderer is nil. SDL_GetError: %s', [SDL_GetError]);

    sdlSurface1 := SDL_LoadBMP(filename); // sdlSurface1 will be nil!
    if not Assigned(sdlSurface1) then
      raise ESDLNilPointer.CreateFmt(
        'sdlSurface1 is nil on loading %s. ' + sLineBreak + 'SDL_GetError: %s',
        [filename, SDL_GetError]);
Exception handling in Pascal
In short: Pascal’s exceptions are raised by the raise keyword and stop the program flow at this point. As this would terminate the program immediately, usually raised exception are caught and handled by try .. except or try .. finally blocks. After proper exception handling the program can run without termination although an exception occured.
As you can see, here the whole whole code is encapsuled by a try .. except statement.
Error handling in SDL2
SDL2 knows three error related functions: SDL_GetError, SDL_SetError(Format string, Arguments) and SDL_ClearError. They are completely independent of Pascal’s error handling but are very useful to gather the necessary information to fix issues.
Most SDL2 functions return an error code which indicated success or failure. SDL_GetError returns a string (as PAnsiChar) which gives you information about the error of the last function that returned an error code which indicated failure. Attention here, only fails will result in a message in SDL_GetError and they won’t be cleared autmatically if other functions run successully afterwards, hence you should use SDL_ClearError to clear the last error message from older functon calls. Hint: Sometimes SDL_GetError can be populated with a message even though functions were run successfully.
In the try-block of our code there are actually just two things tried:
Create a renderer and a window
Create a SDL2 surface from a bitmap file
After creating the renderer and window as known to you, we check for the error code (in these cases we check if one or both of them are nil). If the error code indicated a failure, an exception should be raised. Actually this code should not raise an exception and just run smoothly to the second step.
Creating a SDL2 surface will fail intentionally because there is no bitmap file to load. SDL_LoadBMP will return a nil pointer, hence “sdlSurface1” is nil. This will raise the previously declared “ESDLNilPointer” exception with a message as format string (see below if you don’t know about format strings).
The error message string is:
'sdlSurface1 is nil on loading %s. ' + sLineBreak + 'SDL_GetError: %s'
The arguments are represented by an array of constants:
[filename, SDL_GetError]
The error message has three parts. The first part states the failing variable and the associated file name. The second part (sLineBreak) is a cross-platform line break. The third part returns the message of the SDL_GetError function.
What is a Format string?
Coming from C, format strings are strings which contain data placeholders of defined type (string, integer, float, …) which are then combined to the final string. The data placeholders are preceded by a percent symbol (%) and followed by single symbol indicating its type (s for string, d for decimal integer, …)
Ex.: ‘This %s has more than %d words.’ [chapter, 20] will result in: “This chapter has more than 20 words.”
Back to the code:
  except
    on E: ESDLNilPointer do
    begin
      WriteLn('Exception ESDLNilPointer: ' + sLineBreak + E.Message);
      Readln;
    end;
  end;
The except-block handles the raised exception. In the example code it just prints the error message we composed on creation of the exception.
  // Clean-up and quit SDL2
  if Assigned(sdlSurface1) then SDL_FreeSurface(sdlSurface1);
  if Assigned(sdlRenderer) then SDL_DestroyRenderer(sdlRenderer);
  if Assigned(sdlWindow1) then SDL_DestroyWindow(sdlWindow1);
  SDL_Quit;
end.
Finally, the resources are free’d.
Combining Pascal exception and SDL2 error handling
The SDL2 error functions are a convenient way to have a good insight in errors related to the SDL2 functions. It builds a powerful symbiosis with Pascal’s exception handling capabilities.
By the way, SDL_SetError(Format string, Arguments) allows to create your own error messages. In Pascal this is usually not necessary though because the message is set in the exception class.
In the next chapter we will see how so called events are processed to handle input of any kind (keyboard, mouse, joystick,…) Before that I’d like to introduce a simple, yet powerful way to handle keyboard input via the keyboard state.
Lets have a look at the most important function here. The keyboard state represents the state (pressed = 1 or unpressed = 0) of all the keyboard keys, hence the key states. By
function SDL_GetKeyboardState(numkeys: PInt): PUInt8
we have easy access to this array. This is a highly efficient and fast way of gathering keyboard information without the need to queue any events.
Advantages of using the keyboard state
It is very fast and efficient compared to processing keyboard events. It can (and should) be combined freely with the classical event processing of key-events or other events. You have no hassle with case-statements to care for all the keys you like to consider but rather instant access to all keys on the keyboard. The keyboard state can easily propagated through your program as it is a simple and plain pointer. – Running speed is a crucial property for many games so you should consider using keyboard states if your game relies heavily on keyboard input.
Disadvantages of using the keyboard state
The keyboard states does not consider key modifiers like the shift-key. So you know a key has been pressed but you cannot distinguish between a letter and a capital letter for example. There are no equivalent input states for other devices like mouse, joystick, joypad, and so on. Last but not least, you still need the event processing in the program loop because otherwise the state does not get updated (see below for more information on that). This also means, if the key state of a certain key changes from unpressed to pressed and back to unpressed before the event loop has been processed, the pressed key remains unnoticed.
The red rectangle can be moved by the WASD keys by reading out their key states.
The following code example will draw a red rectangle which can be moved by the WASD keys. Therefore we read out their key states on every cycle of the program loop.
program SDL_KeyboardState;

uses SDL2;

var
  sdlWindow1: PSDL_Window;
  sdlRenderer: PSDL_Renderer;
  sdlRectangle: TSDL_Rect;
  sdlKeyboardState: PUInt8;
  Running: Boolean = True;

begin

  //initilization of video subsystem
  if SDL_Init(SDL_INIT_VIDEO) < 0 then Halt;

  if SDL_CreateWindowAndRenderer(500, 500, SDL_WINDOW_SHOWN, @sdlWindow1, @sdlRenderer) <> 0
    then Halt;

  // prepare rectangle
  sdlRectangle.x := 250;
  sdlRectangle.y := 250;
  sdlRectangle.w := 10;
  sdlRectangle.h := 10;

  // get keyboard state pointer
  sdlKeyboardState := SDL_GetKeyboardState(nil);

  // program loop
  while Running = True do
  begin
    SDL_PumpEvents;

    // ESC pressed
    if sdlKeyboardState[SDL_SCANCODE_ESCAPE] = 1 then
      Running := False;

    // WASD keys pressed
    if sdlKeyboardState[SDL_SCANCODE_W] = 1 then
      sdlRectangle.y := sdlRectangle.y-1;
    if sdlKeyboardState[SDL_SCANCODE_A] = 1 then
      sdlRectangle.x := sdlRectangle.x-1;
    if sdlKeyboardState[SDL_SCANCODE_S] = 1 then
      sdlRectangle.y := sdlRectangle.y+1;
    if sdlKeyboardState[SDL_SCANCODE_D] = 1 then
      sdlRectangle.x := sdlRectangle.x+1;

    // black background
    SDL_SetRenderDrawColor(sdlRenderer, 0, 0, 0, SDL_ALPHA_OPAQUE);
    SDL_RenderClear(sdlRenderer);
    // draw red rectangle
    SDL_SetRenderDrawColor(sdlRenderer, 255, 0, 0, SDL_ALPHA_OPAQUE);
    SDL_RenderDrawRect(sdlRenderer, @sdlRectangle);

    SDL_RenderPresent(sdlRenderer);
    SDL_Delay(20);
  end;

  // clear memory
  SDL_DestroyRenderer(sdlRenderer);
  SDL_DestroyWindow (sdlWindow1);

  //closing SDL2
  SDL_Quit;

end.
To get the keyboard state, we define a unsigned 8 bit pointer variable sdlKeyboardState in the var clause. It points to the array of key states.
After setting up a SDL2 window and and preparing a SDL2 rectangle, we jump right into allocating the keyboard state pointer to the sdlKeyboardState variable by the function SDL_GetKeyboardState. The argument should be nil. It is sufficient to this once in your program code as you see in the second line:
  // get keyboard state pointer
  sdlKeyboardState := SDL_GetKeyboardState(nil);

  // program loop
  while Running = True do
  begin
    SDL_PumpEvents;
In the program event loop we need to update the event queue by procedure SDL_PumpEvents (or SDL_PollEvent or SDL_WaitEvent; both call SDL_PumpEvent implicitly). Only calling one of these procedures in the program loop updates the keyboard state.
    // ESC pressed
    if sdlKeyboardState[SDL_SCANCODE_ESCAPE] = 1 then
      Running := False;

    // WASD keys pressed
    if sdlKeyboardState[SDL_SCANCODE_W] = 1 then
      sdlRectangle.y := sdlRectangle.y-1;
    if sdlKeyboardState[SDL_SCANCODE_A] = 1 then
      sdlRectangle.x := sdlRectangle.x-1;
    if sdlKeyboardState[SDL_SCANCODE_S] = 1 then
      sdlRectangle.y := sdlRectangle.y+1;
    if sdlKeyboardState[SDL_SCANCODE_D] = 1 then
      sdlRectangle.x := sdlRectangle.x+1;
We now can check for the of any key in the array by sdlKeyboardState[SDL_SCANCODE_…] using its scancode as a handle (e.g. SDL_SCANCODE_ESCAPE for the escape key) and react as desired, e.g. exit the program loop or change the x/y coordinates of the rectangle. The scancode represents the position of the related key state in the array. A detailed description of scancodes in the next chapter. A list of all the scancodes shows all possible scancodes.
Simply, this record describes a rectangle, hence the name. The variables x and y correspond to the x/y coordinates of the left upper corner of the rectangle, related to the origin 0/0 which is the left upper corner of, e.g. a texture, window,… The variable w is the width and h the height of the rectangle. That’s it. The next step is to define the rectangle by assign some values for x, y, w and h.
If you use PSDL_Rect, you free the required memory by Pascal’s new procedure as you would for any simple record pointer.
Using Rectangles for Movement and Scaling
The following code demonstrates the basic principle how to achieve the impression of movement of images (sprites) and how scaling works. You will be impressed how simple it actually is.
program SDL_RectanglesScaling;

uses SDL2;

var
  sdlWindow1: PSDL_Window;
  sdlRenderer: PSDL_Renderer;
  sdlSurface1: PSDL_Surface;
  sdlTexture1: PSDL_Texture;
  sdlRectangle: TSDL_Rect;

begin

  //initilization of video subsystem
  if SDL_Init(SDL_INIT_VIDEO) < 0 then Halt;

  if SDL_CreateWindowAndRenderer(500, 500, SDL_WINDOW_SHOWN, @sdlWindow1, @sdlRenderer) <> 0
    then Halt;

  // set scaling quality
  SDL_SetHint(SDL_HINT_RENDER_SCALE_QUALITY, 'nearest');

  // create surface from file
  sdlSurface1 := SDL_LoadBMP('fpsdl.bmp');
  if sdlSurface1 = nil then
    Halt;

  // load image file
  sdlTexture1 := SDL_CreateTextureFromSurface(sdlRenderer, sdlSurface1);
  if sdlTexture1 = nil then
    Halt;

  // prepare rectangle
  sdlRectangle.x := 12;
  sdlRectangle.y := 25;
  sdlRectangle.w := 178;
  sdlRectangle.h := 116;

  // render texture
  SDL_RenderCopy(sdlRenderer, sdlTexture1, @sdlRectangle, nil);
  SDL_RenderCopy(sdlRenderer, sdlTexture1, nil, @sdlRectangle);

  // render to window for 2 seconds
  SDL_RenderPresent(sdlRenderer);
  SDL_Delay(2000);

  // clear memory
  SDL_DestroyTexture(sdlTexture1);
  SDL_FreeSurface(sdlSurface1);
  SDL_DestroyRenderer(sdlRenderer);
  SDL_DestroyWindow (sdlWindow1);

  //closing SDL2
  SDL_Quit;

end.
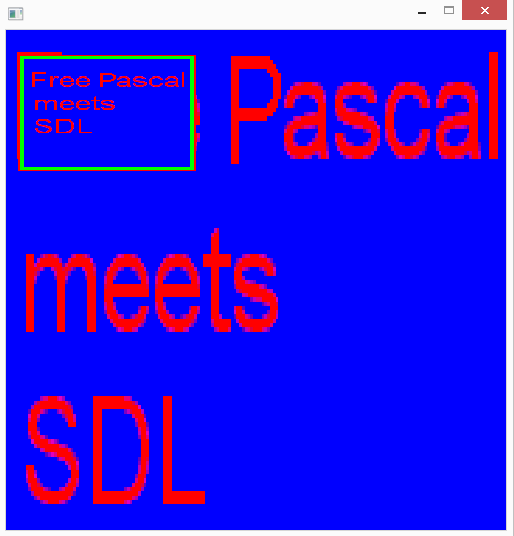
After initializing SDL2 and setting up the window and renderer as known, the rectangle is getting some values. It just encloses the words “Free Pascal meets SDL” in the original image (see above).
Scaling in SDL2
Scaling Quality
Right before creating the surface and texture, there is this line in code.
  // set scaling quality
  SDL_SetHint(SDL_HINT_RENDER_SCALE_QUALITY, 'nearest');
It sets the render quality. It has to be set before creating the texture. The SDL_SetHint(hint name, hint value) function is no specific function for setting scaling quality, but here we use it for exactly that. Possible values are
nearest or 0
nearest pixel sampling
linear or 1
linear filtering
support by OpenGL and Direct3D
best or 2
anisotropic filtering
support by Direct3D.
All of the values have to be set as string values, so ‘nearest’ or ‘0’. Here is a comparision of the nearest- and the linear filter.
Nearest pixel sampling filter for scaling.
Linear filter for scaling.
The anisotropic filter doesn’t do anything for me, even if I used Direct3D.
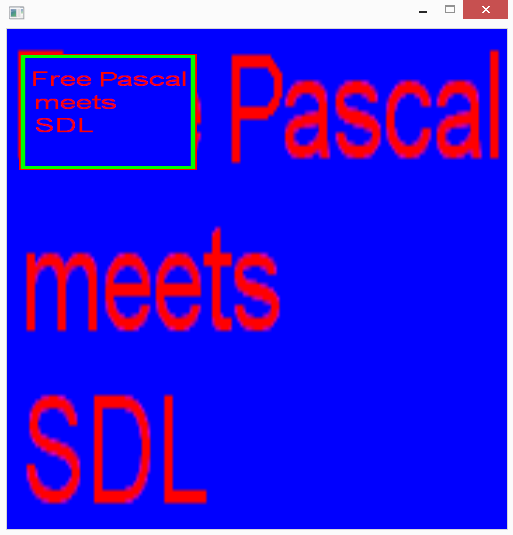
At this point happens the magic that leads to the resulting image. By the way, since the SDL_RenderCopy() function requires the rectangle arguments to be of PSDL_Rect, we use the @-operator (pointer operator) here.
This means, copy the area described by “sdlRectangle” from the source (“sdlTexture1” here) to the whole area (because of nil value) of the destination, hence the window.
Since the window has a width and height of 500 px each, the source rectangle just a width of 178 px and a height of 116 px, SDL2 automatically scales the image to fit into the larger (or smaller) dimensions of the destination.
This means, copy the whole source (because of nil value) to the area described by “sdlRectangle”. The source is the 200×200 px image, which has to squeezed to the 178×116 px rectangle at position (12/25). This is just what you see in the resulting image (above) where the whole image is squeezed into this area.
Movement of Images (Sprites)
Although not covered directly by this code example, you get the picture how movement works. Every frame you adjust the (x/y) coordinates of the rectangle for the destination to bring the sprite about to move.
After cleaning up the memory the program finishes.
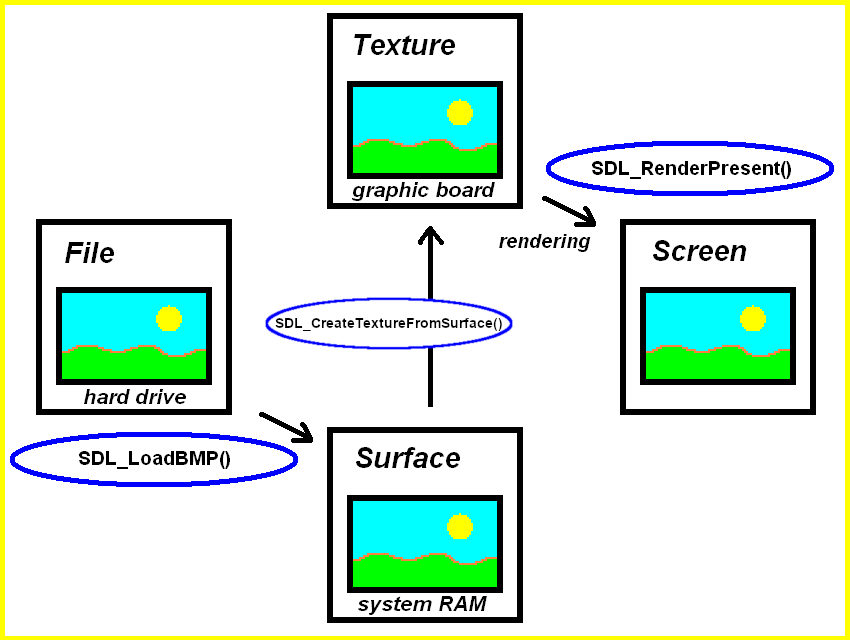
Let’s start on the left in the diagram. The easiest way to get a bitmap (BMP) image file for a game or application ready for usage is to create one in a drawing application. Or use the example bitmap “fpsdl.bmp” we used in the code.
The bmp image file is stored on your hard drive and can be loaded by SDL_LoadBMP function to a SDL2 surface. This SDL2 surface is then transformed into a SDL2 texture by SDL_CreateTextureFromSurface function (whose name is just explaining what is does). And finally this texture is rendered by SDL_RenderPresent, this function we know already.
And now let’s see how it is done in code.
program SDL_LoadingRenderingBMP;

uses SDL2;

var
  sdlWindow1: PSDL_Window;
  sdlRenderer: PSDL_Renderer;
  sdlSurface1: PSDL_Surface;
  sdlTexture1: PSDL_Texture;

begin

  //initilization of video subsystem
  if SDL_Init(SDL_INIT_VIDEO) < 0 then Halt;

  if SDL_CreateWindowAndRenderer(500, 500, SDL_WINDOW_SHOWN, @sdlWindow1, @sdlRenderer) <> 0
    then Halt;

  // create surface from file
  sdlSurface1 := SDL_LoadBMP('fpsdl.bmp');
  if sdlSurface1 = nil then
    Halt;

  // create texture from surface
  sdlTexture1 := SDL_CreateTextureFromSurface(sdlRenderer, sdlSurface1);
  if sdlTexture1 = nil then
    Halt;

  // render texture
  if SDL_RenderCopy(sdlRenderer, sdlTexture1, nil, nil) <> 0 then
    Halt;

  // render to window for 2 seconds
  SDL_RenderPresent(sdlRenderer);
  SDL_Delay(2000);

  // clear memory
  SDL_DestroyTexture(sdlTexture1);
  SDL_FreeSurface(sdlSurface1);
  SDL_DestroyRenderer(sdlRenderer);
  SDL_DestroyWindow (sdlWindow1);

  //closing SDL2
  SDL_Quit;

end.
var
  sdlWindow1: PSDL_Window;
  sdlRenderer: PSDL_Renderer;
  sdlSurface1: PSDL_Surface;
  sdlTexture1: PSDL_Texture;
contains two new variables, namely “sdlSurface1” and “sdlTexture1” of the pointer types PSDL_Surface and PSDL_Texture, respecitvely.
After setting up SDL2, a window and a renderer as known, we find this.
Step 1: Loading the BMP file to a SDL2 Surface
  // create surface from file
  sdlSurface1 := SDL_LoadBMP('fpsdl.bmp');
  if sdlSurface1 = nil then
    Halt;
SDL_LoadBMP(name of bmp image file) does what you expect, it loads the image file and generates a SDL2 surface from it. Attention though, if you just give a file name, it is assumed that the file is found in the same folder as the executing application. Optionally you can also give a full file path, e.g. in Windows something like ‘C:\MyImages\fpsdl.bmp’. The function is declared as
SDL_LoadBMP(_file: PAnsiChar): PSDL_Surface
and return nil on error, e.g. if the file is not found.
Step 2: Creating a SDL2 Texture from the SDL2 Surface
The next step is to get a SDL2 texture. That’s achieve as follows.
  // create texture from surface
  sdlTexture1 := SDL_CreateTextureFromSurface(sdlRenderer, sdlSurface1);
  if sdlTexture1 = nil then
    Halt;
The function to use is SDL_CreateTextureFromSurface(renderer, surface).
It just does what you expect and transforms the SDL2 surface into a SDL2 texture with the help of the given renderer.
Step 3: Prepare the SDL2 Texture to be Rendered
Before actually rendering the texture, we need to copy it to the rendering target (our window) by SDL_RenderCopy(renderer, texture, source rectangle (texture), destination rectangle (rendering target)).
// render texture
  if SDL_RenderCopy(sdlRenderer, sdlTexture1, nil, nil) <> 0 then
    Halt;
So the texture is copied to the rendering target (which is the window). The first nil argument means that we want to copy the whole rectangle. The second nil means that we want to copy to the whole dimensions of the rendering target. Let’s have a closer look at the function.
This will run without any problem, though SDL_CreateTextureFromSurface() will not free the surface created by SDL_LoadBMP(). And you have no handle to free this surface. This creates a memory leak.
This chapter treats some basics you should know to understand the way SDL2 works.
Briefly: The Basics of Graphics Programming
Loading and the movement of images in a game (or other applications) is a major concept in (game) programming. These images are then refered to as sprites, usually. Let’s have a look at a simple example:
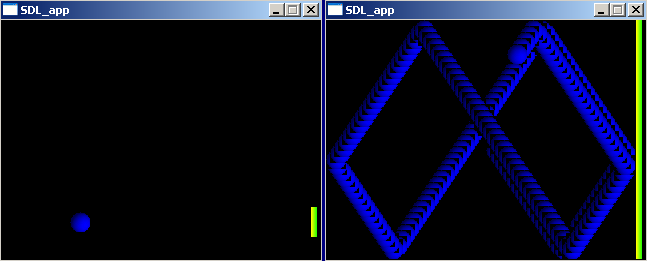
Left: Window is cleared between each new drawn frame. Right: Window is not cleared.
Here are two screenshots from a simple game. The player has to move the yellow-green paddle up- and downwards to prevent the blue ball from getting through to the right side. The game uses two sprites, the blue ball sprite and the yellow-green paddle sprite (see left screenshot). The background color is set to black. The left screenshot is how the game usually appears to the player, here between each frame that got drawn, the former frame has been cleared. The right screenshot demonstrates what happens if the former frame hasn’t been erased before the next one is drawn. – Now it is clearly visible that the sprites are redrawn again and again with sligthly different coordinates, and that is how (game) graphics work (even for the most sophisticated 3d games):
Draw the frame
Show the frame (in a window on screen)
Clear the frame (and go back to step 1)
Briefly: The Relation between Graphic Objects (e.g. Sprites) and Hardware
Actually there are just three locations where these images are stored in your computer system. All images (photo images, drawings, sprites for 2d games, textures for 3d games) are stored on your harddrive somewhere. If you start a photo viewer, a paint program, a 2d game or a 3d game, in all cases the corresponding images need to be loaded from your harddrive to RAM (Random-Access Memory) since displaying and manipulation (e.g. rotation of a photo image by 90°) of images loaded to RAM is much, much faster. Especially for games a fast access to the image data is highly important! And finally there isn’t just one RAM but two, a CPU controlled one located on the motherboard used by every program/application that needs some RAM. The second RAM is located right at your graphic board and controlled by the so-called GPU (graphics processing unit). This is what we want to use if we develop games since it is dedicated, optimized and just hungry for tasks related to fast image processing.
Many games and applications do not only target at common computer systems, but for mobile devices, e.g. smart phones. The principles described are also true for these devices even though there may be differences in detail.
The SDL2 Surface
The SDL2 surface allows you to represent graphic objects like sprites. Every SDL2 surface has a width and height, a pixel format and other properties. Nevertheless, it is a concept which originates from the outdated SDL 1.2 and therefore should not be used anymore. Still, there are reasons why we need to introduce it here. This will be clear soon.
The SDL2 Texture
The SDL2 texture allows you to represent graphic objects just like the SDL2 surface does, although there is a major difference: It is hardware accalerated. So the graphic object is stored in the graphic board’s RAM and any manipulation is done by the graphic board’s GPU.
So as a rule,
always use SDL2 Textures to store your graphic objects (sprites) for SDL 2.0,
then you go for high performance!
Three ways to SDL_Texture
So, how to get a SDL_Texture? In principle there are three ways to create SDL2 textures. For way 2 and 3 the flow diagram may illustrate how it works.
Way 1: From Scratch
You create a SDL_Texture from scratch, so you set a pixel format and texture access format and have to fill in your texture data manually. This is the most sophisticated way and is usually not necessary, unless you work with raw pixel data.
Way 2: The path from the file to the surface, to the texture and to the screen. Way 3: The path rom the file to the texture and to the screen.
Way 2: From SDL2 Surface
2) You have or create a SDL_Surface from an image file first and then you create the SDL_Texture from the SDL_Surface. This way is shown in the diagram but it means two steps.
Way 3: Directly from Image File
3) You create a SDL_Texture from and image file directly. This is shown in the diagram, too. This is the simplest way to create a SDL_Texture.
Every SDL2 program that shall show some graphic output has to have at least one SDL2 window and a SDL2 renderer. The window is the entity that is showing the graphic output and the renderer is the “machine” that is generating the output to be shown in the window. The code to set up a window and a renderer is as follows.
program SDL_WindowAndRenderer;

uses SDL2;

var
  sdlWindow1: PSDL_Window;
  sdlRenderer: PSDL_Renderer;

begin

  //initilization of video subsystem
  if SDL_Init(SDL_INIT_VIDEO) < 0 then Halt;

  // full set up
  sdlWindow1 := SDL_CreateWindow('Window1', 50, 50, 500, 500, SDL_WINDOW_SHOWN);
  if sdlWindow1 = nil then Halt;

  sdlRenderer := SDL_CreateRenderer(sdlWindow1, -1, 0);
  if sdlRenderer = nil then Halt;

  // quick set up
  {
  if SDL_CreateWindowAndRenderer(500, 500, SDL_WINDOW_SHOWN, @sdlWindow1, @sdlRenderer) <> 0
    then Halt;
  }

  // render to window for 2 seconds
  SDL_RenderPresent(sdlRenderer);
  SDL_Delay(2000);

  // clear memory
  SDL_DestroyRenderer(sdlRenderer);
  SDL_DestroyWindow (sdlWindow1);

  //closing SDL2
  SDL_Quit;

end.
Let’s have closer look at the var clause.
var
  sdlWindow1: PSDL_Window;
  sdlRenderer: PSDL_Renderer;
The SDL2 Window
In SDL 2.0 you can create as many windows as you like, and each window is adressed by its PSDL_Window variable. We just need one window for now, let’s call it “sdlWindow1”. It defines the window’s properties, e.g. size, appearance, border, title name and so on. And it holds the content it shows.
Creation of a Window
  // full set up
  sdlWindow1 := SDL_CreateWindow('Window1', 50, 50, 500, 500, SDL_WINDOW_SHOWN);
  if sdlWindow1 = nil then Halt;
The creation of a SDL2 window is simple as using the function SDL_CreateWindow(title, x, y, width, height, flags) or more specific:
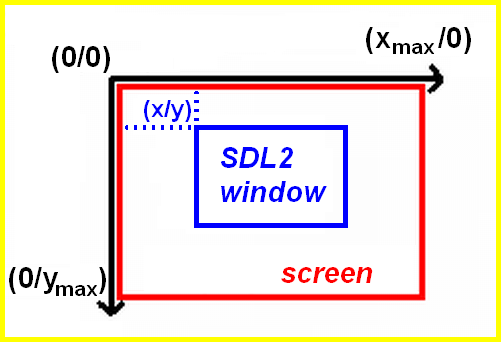
In our example the window is titled “Window1”, it is located at position x = 50 and y = 50 pixels (relative to your screen). It has a width and height of 500 pixels respecitvly. And we have used the flag SDL_WINDOW_SHOWN. More about these flags later. First let’s get an understanding of the coordinate system in SDL2.
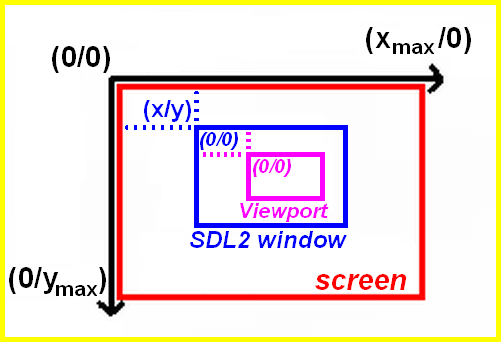
The Coordinate System in SDL 2.0
This rule applies:
The origin from where to count to place a window is always the left upper corner of your screen.
So if you choose (0/0) as coordinates the window’s left upper corner will be placed right at the left upper corner of your screen. The diagram below may help to understand this. You may try SDL_WINDOWPOS_CENTERED for each or both coordinates which will lead to a centered window with respect of the screen. If you choose SDL_WINDOWPOS_UNDEFINED you don’t care for the window’s position.
Now let’s talk about the flags. They decide for the properties of the window. Look at the following table (source) of possible flags and you may get an idea what they do.
Flag
Description
SDL_WINDOW_FULLSCREEN
fullscreen window
SDL_WINDOW_FULLSCREEN_DESKTOP
fullscreen window at the current desktop resolution
SDL_WINDOW_OPENGL
window usable with OpenGL context
SDL_WINDOW_SHOWN
window is visible
SDL_WINDOW_HIDDEN
window is not visible
SDL_WINDOW_BORDERLESS
no window decoration
SDL_WINDOW_RESIZABLE
window can be resized
SDL_WINDOW_MINIMIZED
window is minimized
SDL_WINDOW_MAXIMIZED
window is maximized
SDL_WINDOW_INPUT_GRABBED
window has grabbed input focus
SDL_WINDOW_INPUT_FOCUS
window has input focus
SDL_WINDOW_MOUSE_FOCUS
window has mouse focus
SDL_WINDOW_FOREIGN
window not created by SDL
SDL_WINDOW_ALLOW_HIGHDPI
window should be created in high-DPI mode if supported (available since SDL 2.0.1)
As you can see, these flags determine different properties of the window. E.g. SDL_WINDOW_FULLSCREEN will create a fullscreen window and SDL_WINDOW_BORDERLESS will create a borderless window. You may combine several flags by OR (if appropriate). For our purpose SDL_WINDOW_SHOWN is a good choice because we just create a shown window without any further restrictions.
The SDL2 Renderer
In computer graphics rendering means the process of synthesizing the final image on your screen from the individual basic data structures. To draw some content to the window, we need therefore a renderer. The PSDL_Renderer (which we declared in the var clause) is responsible for synthesizing all the content in a window, be it some lines, a flat background, a texture, a 3d object, or whatever. We call our PSDL_Renderer “sdlRenderer”.
Creation of a Renderer
  sdlRenderer := SDL_CreateRenderer(sdlWindow1, -1, 0);
  if sdlRenderer = nil then Halt;
The creation of the renderer is as simple as one function call of SDL_CreateRenderer(window, index, flags) or
First we need the renderer to know where to render the finished/rendered output. That will be “Window1” in our case. Next the shown function asks for a cryptic “index”. Well, each driver which is capable of rendering (e.g. OpenGL, Direct3d, Software,…) is indexed in SDL 2.0. In principle you could choose one specific driver here by choosing the corresponding index. Since we don’t know too much about the drivers at the moment the best choice is -1. -1 means that the first driver which is supporting the chosen flag(s) is chosen. Talking about flags, there are four flags you may choose:
SDL_RENDERER_SOFTWARE
SDL_RENDERER_ACCELERATED
SDL_RENDERER_PRESENTVSYNC
SDL_RENDERER_TARGETTEXTURE
You should always prefer SDL_RENDERER_ACCELERATED because this means the graphics board is responsible for rendering, SDL_RENDERER_SOFTWARE in contrast means, the CPU has to do the rendering. As discussed before for best performance the graphic board is the best choice for rendering/graphic related tasks. SDL_RENDERER_PRESENTVSYNC allows for so called vertical synchronization which means that the display of the rendered image is synchronized with the refresh rate of the monitor. SDL_RENDERER_TARGETTEXTURE allows for rendering to a texture. You may have noticed that none of these flags but 0 was used in the example code. This automatically gives priority to hardware accelerated renderers.
Quick Creation of a Window and a Renderer
 // quick set up
  {
  if SDL_CreateWindowAndRenderer(500, 500, SDL_WINDOW_SHOWN, @sdlWindow1, @sdlRenderer) <> 0
    then Halt;
  }
Instead of creating the window and the renderer separately as demonstrated, you may use SDL_CreateWindowAndRenderer(width, height, window flags, window pointer pointer, renderer pointer pointer). This has the advantage that you just need one line to set up a window and a renderer, though setting a window title, a window position or specific renderer flags have to be done afterwards if necessary.
Just remove the curly brackets and enclose the “full set up” -part to try it.
This function returns 0 on success and -1 on failure.
Rendering a SDL2 Scene
The actual rendering is achieved by SDL_RenderPresent(renderer). As a sidenote for people coming from SDL 1.2, this is what formerly has been achieved by SDL_Flip().
SDL_RenderPresent(renderer: PSDL_Renderer)
Freezing (delaying) a running program in SDL 2.0
SDL_Delay(time in milliseconds) is a simple, yet powerful and important procedure to stop the program running for a certain time in milliseconds. 2000 milliseconds are two seconds. This is kind of a twin of Pascal’s Delay procedure.
Clean up the memory in SDL 2.0
Now the final lines of code are discussed. One of the most important rules for sophisticated programming is followed here:
Always clean up the memory on program finish.
For nearly any pointer type generated by SDL 2.0, there is a destroy procedure to remove it from memory. These procedures are comparable to Pascal’s dispose procedure to remove pointer types from memory. Make sure to destroy the objects in the opposite sequence of their generation. We first created a window, then a renderer. So now we go the opposite way, first destroy the renderer and then the window by the procedures SDL_DestroyRenderer(renderer) and SDL_DestroyWindow(window) respectively.
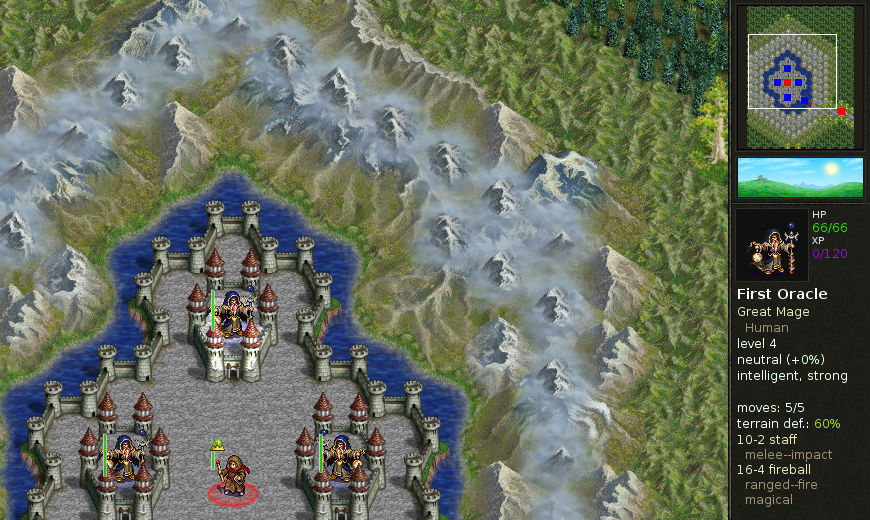
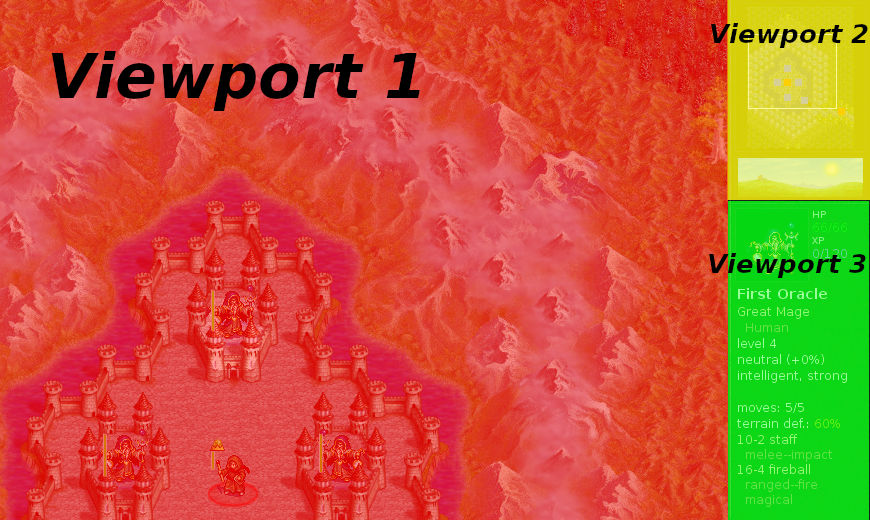
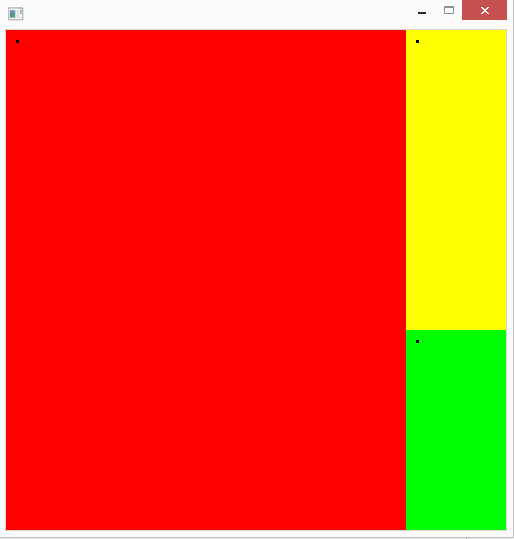
This is a classical situation to use viewports. The game screen is clearly parted into three distinguished areas. The main screen is the large part left with the mountains and the castles. Then there is the minimap in the right-upper corner. And a statistics overview under the minimap. These areas and the corresponding viewports are highlightened in the following screenshot.
The advantage of viewports is that each of them behaves like an own window, so if you draw to the right outside of viewport 1 in the screenshot above, the texture will just be clipped and there is no overlap into viewport 2 oder 3.
The relation of your screen, a SDL2 window and a viewport within this window are outlined here.
Let’s have a look at the code.
program SDL2_Viewport;
uses SDL2;
const
Viewport1: TSDL_Rect = (x: 0; y: 0; w: 400; h: 500);
Viewport2: TSDL_Rect = (x: 400; y: 0; w: 100; h: 300);
Viewport3: TSDL_Rect = (x: 400; y: 300; w: 100; h: 200);
BlackDot: TSDL_Rect = (x: 10; y: 10; w: 3; h: 3);
var
sdlWindow1: PSDL_Window;
sdlRenderer: PSDL_Renderer;
begin
//initilization of video subsystem
if SDL_Init(SDL_INIT_VIDEO) < 0 then Halt;
SDL_CreateWindowAndRenderer(500, 500, SDL_WINDOW_SHOWN, @sdlWindow1, @sdlRenderer);
if (sdlWindow1 = nil) or (sdlRenderer = nil) then Halt;
// fill every viewport with background color and draw a black dot into it
SDL_RenderSetViewport(sdlRenderer, @Viewport1);
SDL_SetRenderDrawColor(sdlRenderer, 255, 0, 0, SDL_ALPHA_OPAQUE);
SDL_RenderFillRect(sdlRenderer, nil);
SDL_SetRenderDrawColor(sdlRenderer, 0, 0, 0, SDL_ALPHA_OPAQUE);
SDL_RenderFillRect(sdlRenderer, @BlackDot);
SDL_RenderSetViewport(sdlRenderer, @Viewport2);
SDL_SetRenderDrawColor(sdlRenderer, 255, 255, 0, SDL_ALPHA_OPAQUE);
SDL_RenderFillRect(sdlRenderer, nil);
SDL_SetRenderDrawColor(sdlRenderer, 0, 0, 0, SDL_ALPHA_OPAQUE);
SDL_RenderFillRect(sdlRenderer, @BlackDot);
SDL_RenderSetViewport(sdlRenderer, @Viewport3);
SDL_SetRenderDrawColor(sdlRenderer, 0, 255, 0, SDL_ALPHA_OPAQUE);
SDL_RenderFillRect(sdlRenderer, nil);
SDL_SetRenderDrawColor(sdlRenderer, 0, 0, 0, SDL_ALPHA_OPAQUE);
SDL_RenderFillRect(sdlRenderer, @BlackDot);
// render to window for 2 seconds
SDL_RenderPresent(sdlRenderer);
SDL_Delay(2000);
  // clear memory
  SDL_DestroyRenderer(sdlRenderer);
  SDL_DestroyWindow (sdlWindow1);
//shutting down video subsystem
SDL_Quit;
end.
“Viewport1” represents the red viewport (left), “Viewport2” the yellow (upper-right) and “Viewport3” the green (lower-right) viewport in the result image.
Notice how we just prepare one “BlackDot” rectangle for a black dot of 3×3 px dimension at location (10/10).
After setting up SDL2, a renderer and a window as known, we start to set up the first (red, left) viewport.
  // fill every viewport with background color and draw a black dot into it
  SDL_RenderSetViewport(sdlRenderer, @Viewport1);
  SDL_SetRenderDrawColor(sdlRenderer, 255, 0, 0, SDL_ALPHA_OPAQUE);
  SDL_RenderFillRect(sdlRenderer, nil);
  SDL_SetRenderDrawColor(sdlRenderer, 0, 0, 0, SDL_ALPHA_OPAQUE);
  SDL_RenderFillRect(sdlRenderer, @BlackDot);
It is simple as that. Use the function SDL_RenderSetViewport(renderer, rectangle pointer) to set up a viewport. This function returns 0 on success or -1 on failure.
After we set up the viewport, we set the draw color by SDL_SetRenderDrawColor(renderer, red, green, blue, alpha) to red (255/0/0/no transparency). Then we use SDL_RenderFillRect(renderer, rectangle pointer) to fill the whole viewport by not specifying a rectangle (nil). Both functions are known from a previous chapter.
Then the color is set to black and a tiny 3×3 rectangle is drawn at location (10/10).
This procedure is repeated for the other two viewports. Notice again, how we use the same rectangle for the black dot though and where it is shown in the result image. The black dot is always drawn at location (10/10) relative to the respective viewport’s location!
As general rule it applies:
The coordinates are always relative to the currently set viewport.
Well, the remaining parts of the code provides nothing new, just the rendering for 2 seconds and some clean up.
Let’s close with some helpful remarks.
No SDL_RenderClear for Viewports!
Do not use SDL_RenderClear(renderer). It will ignore the viewports and clear the whole window with the set drawing color.
Resetting the Viewport
The resetting is done simple by SDL_RenderSetViewport(renderer, nil) as one would expect.
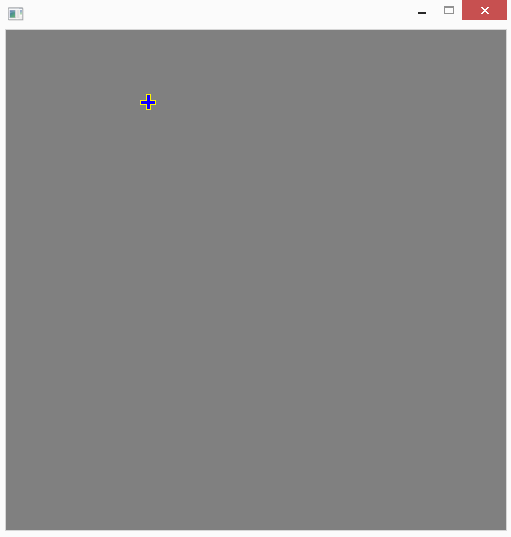
Any good game has a custom mouse cursor. You may think it would be a good idea to have a SDL2 surface or SDL2 texture and render it as any other sprite right at the mouse position to simulate a mouse cursor. DO NOT do this! The mouse cursor is handled separatly from the other rendering to have it smooth and working in critical situations.
The following code shows how to set up a custom mouse cursor with SDL2 the correct way.
program SDL_MouseCursor;

uses SDL2, SDL2_image;

var
  sdlWindow1: PSDL_Window;
  sdlRenderer: PSDL_Renderer;
  sdlSurface1: PSDL_Surface;
  sdlMouseCursor: PSDL_Cursor;
  sdlEvent: TSDL_Event;
  ExitLoop: Boolean = False;

begin

  //initilization of video subsystem
  if SDL_Init(SDL_INIT_VIDEO) < 0 then Halt;

  SDL_CreateWindowAndRenderer(500, 500, SDL_WINDOW_SHOWN, @sdlWindow1, @sdlRenderer);
  if (sdlWindow1 = nil) or (sdlRenderer = nil) then Halt;

  sdlSurface1 := IMG_Load('Cursor.png' );
  if sdlSurface1 = nil then Halt;

  // create and set new mouse cursor
  sdlMouseCursor := SDL_CreateColorCursor(sdlSurface1, 8, 8);
  if sdlMouseCursor = nil then Halt;

  SDL_SetCursor(sdlMouseCursor);

  while ExitLoop = False do
  begin

    // exit loop if mouse button pressed
    while SDL_PollEvent(@sdlEvent) = 1 do
      if sdlEvent.type_ = SDL_MOUSEBUTTONDOWN then
        ExitLoop := True;

    SDL_SetRenderDrawColor(sdlRenderer, 128, 128, 128, SDL_ALPHA_OPAQUE);
    SDL_RenderClear(sdlRenderer);

    SDL_RenderPresent(sdlRenderer);
    SDL_Delay( 20 );
  end;

  SDL_FreeCursor(sdlMouseCursor);

  SDL_FreeSurface(sdlSurface1);
  SDL_DestroyRenderer(sdlRenderer);
  SDL_DestroyWindow (sdlWindow1);

  //shutting down video subsystem
  SDL_Quit;

end.
To have a custom mouse cursor we need a variable of type PSDL_Cursor. We call it “sdlMouseCursor” here.
  sdlSurface1 := IMG_Load('Cursor.png' );
  if sdlSurface1 = nil then Halt;

  // create and set new mouse cursor
  sdlMouseCursor := SDL_CreateColorCursor(sdlSurface1, 8, 8);
  if sdlMouseCursor = nil then Halt;

  SDL_SetCursor(sdlMouseCursor);
This is the interesting part of the code with regard to creating a custom mouse cursor. The cursor’s image is defined by a SDL surface. We create the SDL surface as known from a previous chapter from a png image file to “sdlSurface1” here.
The custom mouse cursor is created by the following function, which returns nil on error.
It needs the surface to use as cursor image and two coordinates (hot_x/hot_y) as arguments. They determine where the actual hitting point for this cursor is. Since the example cursor image is of dimensions 16×16 px and represents a cross, the “hot” (hitting) coordiates are (8/8), hence the cross’ center is used for hitting a button or something. In contrast you may imagine a typical arrow shaped mouse cursor, where the hitting point has to be adjusted to be right on the tip of the arrow in the arrow’s image.
If the cursor creation has been successful, it is necessary to set it to be the actual cursor. You may have created many different cursors, so tell SDL which one to use by the following procedure.
SDL_SetCursor(cursor: PSDL_Cursor)
The remaining part of the code is just rendering a 500 by 500 pixels window with a grey (128, 128, 128) background that is updated as long as no mouse button has been pressed.
Finally do not forget to free the mouse cursor by SDL_FreeCursor(mouse cursor) as shown.
This chapter illustrates quickly how to set up a Free Pascal and SDL2 development environment within a few minutes under Linux.
Attention: The following instruction particularly work for many Debian and Ubuntu based Linux distributions (like Linux Mint used here). In general it outlines the way to go, though.
The distribution and software I used:
Linux Distribution: Linux Mint 19.3 (Ubuntu/Debian based)
Download and install FPC, FPC sourc code and Lazarus
The first step is to install the Free Pascal compiler (version 3.0.4 or higher), the Compiler’s source code (same version as the compiler) and the Lazarurs IDE (version 2.0.6 or higher). To get the most recent, stable environment, download these three files from the official Lazarus website: https://www.lazarus-ide.org/index.php?page=downloads.
Important: Do not intermix FPC or Lazarus installs from the package manager. This will lead to troubles because these installs are not compatible. Purge any of these installs. Use, e.g.:
Choose one of the “Linux DEB Releases” according to your system (32 bit or 64 bit). Most probably your running on a 64 bit system, which is the standard case for Linux.
In case of a 64 bit system download these three files:
fpc-laz_3.0.4-1_amd64.deb
fpc-src_3.0.4-2_amd64.deb
lazarus-project_2.0.6-0_amd64.deb
The download page looks somewhat like this:
SourceForge download page for all three files necessary. The original description is kept in the image.
If you downloaded these three files successfully, you run them in the same order! First FPC, then FPC’s sources and finally Lazarus.
If everything went right, Lazarus can be started up by typing “startlazarus” in the terminal or by finding the program in the application menue.
Start up Lazarus the first time
On start up of Lazarus the directories for FPC and the FPC source code were found and set already. As a hint I show where these are located on my system:
FPC: /usr/bin/fpc
FPC Source code: /usr/share/fpcsrc/3.0.4 (because $(FPCVER) equals the version number, see screenshot)
The configurations screen may look somewhat different to the screen of the following screenshot, but that is because the screenshot is outdated a bit.
Either detected automatically or can be manually added by Tools > Options …
Before proceeding, my suggestion is to simply compile the project (press F9 in Lazarus) which is presented to you. It should compile and show the form.
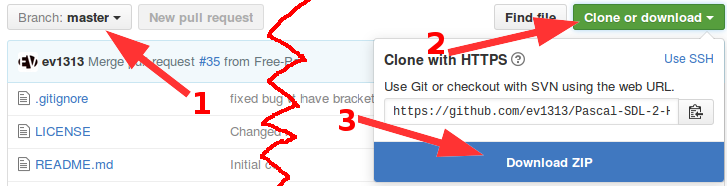
Get the SDL2 units
Get the latest version of the translated SDL2 units.
Choose the master branch (1), click on “Clone or download” (2) and click on Download ZIP (3).
Make sure you have the master branch chosen and then click on “Clone or download”, then “Download ZIP”.
After extracting the ZIP file I suggest to rename the new folder into “sdl2” or “SDL2” and place it at any location, perhaps your development folder, e.g.:
(DO NOT use the suggested folder in the screenshot)
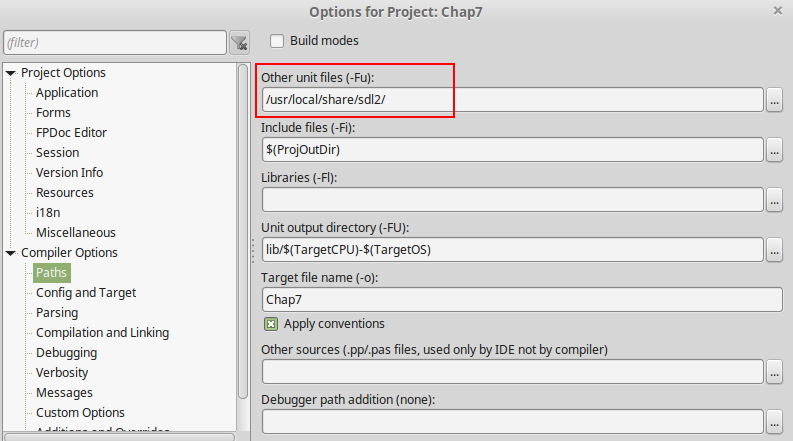
This folder is suggested as a place for the SDL2 units (DO NOT use this folder!). By the way, “Chap7” is just a random name for this project and you may have anything else there instead (I was trying out Chapter 7 tutorial code).
Get the SDL2 shared object files
If you are looking for the most recent pre-compiled SDL2 dynamic link library files (e.g. libSDL2.so) on the official SDL2 website, you just find a remark that reads like this:
Linux:
Please contact your distribution maintainer for updates.
Since SDL2 is very widespread it is very likely that your distribution maintainer already included the files.
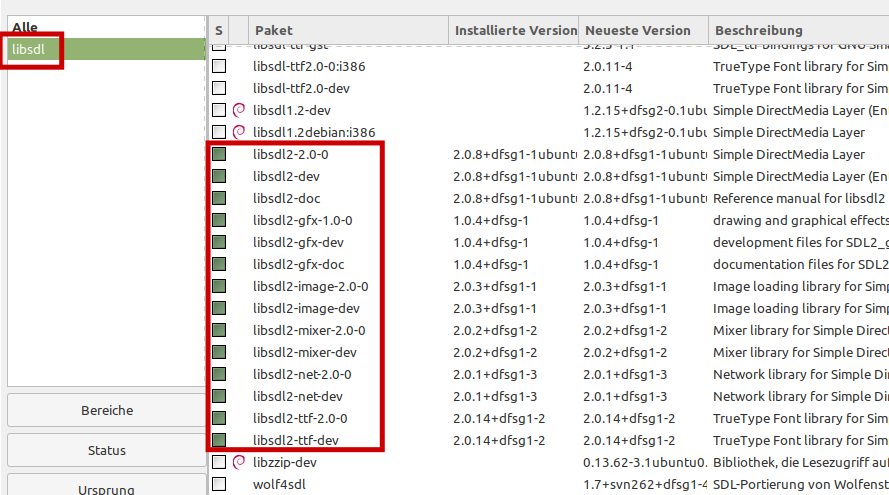
Find SDL2 and all necessary libraries in your distribution’s package manager, here it is the synaptic package manager. Look for libsdl and install every package shown in the screenshot:
Find all necessary libraries and install them. These you should install:
libsdl2
libsdl2-dev
libsdl2-gfx
libsdl2-gfx-dev
libsdl2-image
libsdl2-image-dev
libsdl2-mixer
libsdl2-mixer-dev
libsdl2-net
libsdl2-net-dev
libsdl2-ttf
libsdl2-ttf-dev
The dev-packages are necessary to compile SDL2 applications. The other packages are necessary to run SDL2 applications.
The version of these libraries does not necessarily need to be the most recent unfortunately. If you really need the most recent versions here, you may try to contact the maintainer to ask to update the version.
Congratulation! After that, everything should run smoothly :-)!
This chapter will introduce you on how to combine the SDL library with the famous Open Graphics Library (OpenGL).
What is OpenGL?
OpenGL is the first choice when it comes to platform independent 2d and 3d graphics programming. The emphasis is on graphics programming only though!
Why and when to combine SDL and OpenGL?
SDL is an excellent choice if you need platform independent 2d graphics. OpenGL is capable of 2d graphics, too, but why using the more complicated library if you could use the easy to use SDL library? – And by the way, underneath SDL is actually using OpenGL (or similar libraries depending upon the system) to achieve its hardware accelerated 2d graphics.
However, if your project needs 3d graphics, which isn’t covered by SDL, you can set up your system for this quite easy with SDL. The setup of an OpenGL environment is very easy and platform independent with SDL. Without SDL you would’ve to write different code to set up OpenGL for each operating system. In fact, even professional developers use SDL to set up their OpenGL applications.
Furthermore, since OpenGL is a pure graphics library, any other task is further done by SDL (e.g. keyboard handling, sound,…).
At this point I’d like to quote Klaus Vor der Landwehr (professional developer) from Turtle-Games, who described the relation of SDL and OpenGL in a very clear way.
Although the graphics are often in the foreground, it is for me as a game programmer only one aspect of many with which I have to deal. And the graphics do not even require the most work. OpenAL for example costs much more time and effort if you want to build a 3D sound channel management. And there are many other interfaces. Here is a list of categories in which SDL has been a great help:
As of version 2.0 of OpenGL, the so-called fixed pipeline has been replaced by a programmable pipeline (modern OpenGL). In general, the pipeline makes your input data appear on the screen in a hardware accelerated manner by using your graphics card. For the fixed pipeline it was easy to draw something to the screen but, as the name suggests, it was quite fixed and unflexible. The programmable pipeline which is controlled by a newly introduced shader (script) language is far more flexible, though, the ease is gone :-D.
Anyway, some people refer to OpenGL version 3.0 and up as modern OpenGL. This is because a lot of typical functionality was deprecated as of this version. The backwards compatibility is gone.
In this chapter I will demonstrate how to use SDL 3.0 and up to set up a modern OpenGL environment using some basic shaders. I based the description heavily on an excellent C++ tutorial over at opengl-tutorial.org and their second chapter. You may look for further OpenGL stuff there or have a look at this WikiBook OpenGL Introduction (C++). I’m not aware of OpenGL tutorials for Free Pascal or Delphi treating modern OpenGL (let me know if you know).
OpenGL Pascal units (headers)
Similar to SDL 2.0, you need specific units which translate and connect your code to the OpenGL library. There is a native OpenGL unit GL which covers the main functionality of OpenGL. Additionally for modern OpenGL you need the unit GLext which covers the functionality up to OpenGL version 4.0. These units are shipped right along with the Free Pascal compiler.
In case you are interested in support of OpenGL version 4.4, you should look into the dglOpenGL.pas. This unit is not shipped natively along with the Free Pascal compiler.
Let the fun begin
Let’s have a look at the code:
program chap10_SDL2;
uses Classes, SysUtils, SDL2, GL, GLext;

const
  vertexShaderFile = 'VertexShader.txt';
  fragmentShaderFile = 'FragmentShader.txt';
  triangleData: array[0..8] of GLfloat = ( -1.0, -1.0, 0.0,
                                            1.0, -1.0, 0.0,
                                            0.0,  1.0, 0.0  );

var
sdlWindow1: PSDL_Window;
sdlGLContext1: TSDL_GLContext;
i: Word;
VertexArrayID: GLuint;
triangleVBO: GLuint;

VertexShaderID: GLuint;
VertexShaderCode: PGLchar;
FragmentShaderID: GLuint;
FragmentShaderCode: PGLchar;
ShaderCode: TStringList;
ProgramID: GLuint;
compilationResult: GLint = GL_FALSE;
InfoLogLength: GLint;
ErrorMessageArray: array of GLChar;

begin
  if SDL_Init( SDL_INIT_VIDEO ) < 0 then HALT;

  //get an OpenGL window and create OpenGL context
  sdlWindow1 := SDL_CreateWindow( 'OpenGL window', 50, 50, 500, 500, SDL_WINDOW_OPENGL );
  if sdlWindow1 = nil then HALT;

  sdlGLContext1 := SDL_GL_CreateContext( sdlWindow1 );
  if @sdlGLContext1 = nil then HALT;

  //init OpenGL and load extensions
  if Load_GL_VERSION_4_0 = false then
    if Load_GL_VERSION_3_3 = false then
      if Load_GL_VERSION_3_2 = false then
        if Load_GL_VERSION_3_0 = false then
        begin
          writeln(' ERROR: OpenGL 3.0 or higher needed. '); readln;
          HALT;
        end;

  //print out OpenGL vendor, version and shader version
  writeln( 'Vendor: ' + glGetString( GL_VENDOR ) );
  writeln( 'OpenGL Version: ' + glGetString( GL_VERSION ) );
  writeln( 'Shader Version: ' + glGetString( GL_SHADING_LANGUAGE_VERSION ) );

  //create Vertex Array Object (VAO)
  glGenVertexArrays( 1, @VertexArrayID );
  glBindVertexArray( VertexArrayID );

  //creating Vertex Buffer Object (VBO)
  glGenBuffers( 1, @triangleVBO );
  glBindBuffer( GL_ARRAY_BUFFER, triangleVBO );
  glBufferData( GL_ARRAY_BUFFER, SizeOf( triangleData ), @triangleData, GL_STATIC_DRAW );

  //creating shaders
  VertexShaderID := glCreateShader( GL_VERTEX_SHADER );
  FragmentShaderID := glCreateShader( GL_FRAGMENT_SHADER );

  //load shader code and get PChars
  ShaderCode := TStringList.Create;
  ShaderCode.LoadFromFile( VertexShaderFile );
  VertexShaderCode := ShaderCode.GetText;
  if VertexShaderCode = nil then HALT;
  ShaderCode.LoadFromFile( FragmentShaderFile );
  FragmentShaderCode := ShaderCode.GetText;
  if FragmentShaderCode = nil then HALT;
  ShaderCode.Free;

  //compiling and error checking vertex shader
  write('Compiling and error checking Vertex Shader... ' );
  glShaderSource( VertexShaderID, 1, @VertexShaderCode, nil );
  glCompileShader( VertexShaderID );

  glGetShaderiv( VertexShaderID, GL_COMPILE_STATUS, @compilationResult );
  glGetShaderiv( VertexShaderID, GL_INFO_LOG_LENGTH, @InfoLogLength );
  if compilationResult = GL_FALSE then
  begin
    writeln( 'failure' );
    SetLength( ErrorMessageArray, InfoLogLength+1 );
    glGetShaderInfoLog( VertexShaderID, InfoLogLength, nil, @ErrorMessageArray[0] );
    for i := 0 to InfoLogLength do write( String( ErrorMessageArray[i] ) );
    writeln;
  end else writeln( 'success' );

  //compiling and error checking fragment shader
  write('Compiling and error checking Fragment Shader... ' );
  glShaderSource( FragmentShaderID, 1, @FragmentShaderCode, nil );
  glCompileShader( FragmentShaderID );

  glGetShaderiv( FragmentShaderID, GL_COMPILE_STATUS, @compilationResult );
  glGetShaderiv( FragmentShaderID, GL_INFO_LOG_LENGTH, @InfoLogLength );
  if compilationResult = GL_FALSE then
  begin
    writeln( 'failure' );
    SetLength( ErrorMessageArray, InfoLogLength+1 );
    glGetShaderInfoLog( VertexShaderID, InfoLogLength, nil, @ErrorMessageArray[0] );
    for i := 0 to InfoLogLength do write( String( ErrorMessageArray[i] ) );
    writeln;
  end else writeln( 'success' );

  //creating and linking program
  write('Creating and linking program... ' );
  ProgramID := glCreateProgram();
  glAttachShader( ProgramID, VertexShaderID );
  glAttachShader( ProgramID, FragmentShaderID );
  glLinkProgram( ProgramID );

  glGetShaderiv( ProgramID, GL_LINK_STATUS, @compilationResult );
  glGetShaderiv( ProgramID, GL_INFO_LOG_LENGTH, @InfoLogLength );
  if compilationResult = GL_FALSE then
  begin
    writeln( 'failure' );
    SetLength( ErrorMessageArray, InfoLogLength+1 );
    glGetShaderInfoLog( VertexShaderID, InfoLogLength, nil, @ErrorMessageArray[0] );
    for i := 0 to InfoLogLength do write( String( ErrorMessageArray[i] ) );
    writeln;
  end else writeln( 'success' );

  for i := 0 to 400 do
  begin
    glClearColor( 0.0, 1.0-i/400, 0.0+i/400, 1.0 );
    glClear( GL_COLOR_BUFFER_BIT );
    glUseProgram( ProgramID );
    glEnableVertexAttribArray( 0 );
    glBindBuffer( GL_ARRAY_BUFFER, triangleVBO );
    glVertexAttribPointer( 0, 3, GL_FLOAT, GL_FALSE, 0, nil );
    glDrawArrays( GL_TRIANGLES, 0, 3 );
    glDisableVertexAttribArray( 0 );
    SDL_Delay( 20 );
    SDL_GL_SwapWindow( sdlWindow1 );
  end;

  //clean up
  glDetachShader( ProgramID, VertexShaderID );
  glDetachShader( ProgramID, FragmentShaderID );

  glDeleteShader( VertexShaderID );
  glDeleteShader( FragmentShaderID );
  glDeleteProgram( ProgramID );

  StrDispose( VertexShaderCode );
  StrDispose( FragmentShaderCode );

  glDeleteBuffers( 1, @triangleVBO );
  glDeleteVertexArrays( 1, @VertexArrayID );

  SDL_GL_DeleteContext( sdlGLContext1 );
  SDL_DestroyWindow( sdlWindow1 );

  SDL_Quit;
end.
Wow that is a lot of code. What you will get is this:
The background will change slowly from green to blue. And you will get this:
The vendor, OpenGL version and shader version information will be different according to your system. Also, if your system doen’t support the needed OpenGL version you’ll not have “success” but rather “failure” after the compiling and linking processes. Additional information may be shown then.
The program is called “chap10_SDL2” for obvious reason.
Additionally to the SDL2 unit we load the native FPC units Classes (for TStringList support), SysUtils (for PChar functions) and GL and GLext for OpenGL support.
Thre are three constants declared. The first two are defined as the filenames of the so-called shader source files. Basically they are simple text files which contain a script. More about shaders and the script later. The third is an array of nine GLfloat values. GLfloat is the OpenGL float variable type which in fact is translated as Pascal’s Single type. In short, these nine values describe three points in 3d space which, if connected, form a triangle. More about this later.
The first variable “sdlWindow1” is well known from previous chapters. Any variable to follow is new though. Most of them are related to OpenGL.
“sdlGLContext1” is of type TSDL_GLContext needed to create a so-called OpenGL context. In fact, this variable type is provided by SDL and a key type to set up an OpenGL conext in a simple and cross-platform manner.
The variable “i” is a simple Word variable for counting purposes.
OpenGL’s Integers and Strings
Most of the following variables are either of type GLuint or of type PGLchar. The last variable is an dynamic array of GLchars. Their specific meaning will be discussed later but GLuint is the OpenGL unsigned integer type (no negative values) which translates to Pascal’s Cardinal/Longword type. Text handling in OpenGL works by null-terminated strings of type PGLchar which translate to Pascal’s PChar. GLchar translates to Char then, obviously.
At this point you may wonder why as for SDL the null-terminated strings are used instead of simple strings (see Chapter 7 for the PAnsiChar variable type discussion). The answer again is that OpenGL is based upon C which handles strings this way. PChar equals PAnsiChar by the way.
The remaining variables “ShaderCode” of type TStringList will be used to handle the shader text files. “compilationResult” and “InfoLogLength” are of GLint type. In contrast to GLuint they allow for negative values.
begin
  if SDL_Init( SDL_INIT_VIDEO ) < 0 then HALT;

  //get an OpenGL window and create OpenGL context
  sdlWindow1 := SDL_CreateWindow( 'OpenGL window', 50, 50, 500, 500, SDL_WINDOW_OPENGL );
  if sdlWindow1 = nil then HALT;

  sdlGLContext1 := SDL_GL_CreateContext( sdlWindow1 );
  if @sdlGLContext1 = nil then HALT;

  //init OpenGL and load extensions
  if Load_GL_VERSION_4_0 = false then
    if Load_GL_VERSION_3_3 = false then
      if Load_GL_VERSION_3_2 = false then
        if Load_GL_VERSION_3_0 = false then
        begin
          writeln(' ERROR: OpenGL 3.0 or higher needed. '); readln;
          HALT;
        end;

  //print out OpenGL vendor, version and shader version
  writeln( 'Vendor: ' + glGetString( GL_VENDOR ) );
  writeln( 'OpenGL Version: ' + glGetString( GL_VERSION ) );
  writeln( 'Shader Version: ' + glGetString( GL_SHADING_LANGUAGE_VERSION ) );
First SDL2 is initilized as known. “sdlWindow1” is created as known by SDL_CreateWindow. Be careful though, in order to work with OpenGL the flag SDL_WINDOW_OPENGL has to be set!
SDL 2.0 and the OpenGL context
An OpenGL context is kind of an abstract name. It doesn’t represents just a window, even though it is created from a SDL2 window, but rather it contains everything (including the window information) that is related to this OpenGL context. The OpenGL context is therefore kind of “broader” than just a window, that is why it is called context rather than just a OpenGL window.
The function to create an OpenGL context from a SDL2 window is:
function SDL_GL_CreateContext(window: PSDL_Window): TSDL_GLContext
So, it is simple as that, just use the SDL2 window as argument and voila, you’ll get a OpenGL context, platform-independent. That is why everybody loves SDL2 to work with OpenGL. Note that the returned Context isn’t a pointer but an actual instance. So to error check against nil you need to refer to the instance’s addresse by the @ operator.
OpenGL version check and initialization
The nested if-then-statements check if at least version 3.0 of OpenGL is installed. If so, the highest available version is loaded. If not, the program is stopped and returns a text message.
If your hardware doen’t support OpenGL 3.0 or higher you should try to update your graphics driver. There is a good chance that you are able to use OpenGL 3.0 or higher then. Anyway, if the upgrade doesn’t work out or you wouldn’t want to update, you may have a look into the JEDI-SDL Chapter about OpenGL, there the old OpenGL is treated (although that chapter treats SDL 1.2, it shouldn’t be too hard to make it work with SDL 2.0 with minor changes).
Next there are three text messages printed out. These present the Vendor, the OpenGL version and the Shading language version. To get them in a readable form you need to transform the constants into strings by function glGetString. Let’s have a look at the command window again:
Have a look at the first three lines and you see what it could look like.
If you are new to OpenGL, OpenGL as kind of machine with many switches. Each switch
Briefly, a Vertex Array Object (VAO) is a specific OpenGL object which contains important settings (e.g. format of vertex data) and references to other objects, including Vertex Buffer Objects (VBO). Notice, it doesn’t store the object’s data (content) itself, it just stores the reference to these objects.
The Vertex Buffer Object (VBO) contains the actual data (content). In the example case these are three vertices, each described by three float point values in cartesian space.
OpenGL Object name or ID
Because it is important to understand, in contrast to SDL where objects usually are directly submitted to a function by its pointer reference, in OpenGL you have a so-called OpenGL Object name, which actually is an integer value of GLuint type. Therefore ID is a suitable name, too. Let’s see how this works:
The VAO is created by function glGenVertexArrays( number of VAO names, pointer to VAO names array ). The first parameter determines how many VAO names I’d like to create. We just need 1. The second parameter asks for a pointer to an array of VAO names. Since VAO names are just simple GLuints, it is a simple array of GLuints. Anyway, since we just need one, a pointer to a simple GLuint variable will be suitable, too. In our case that is “VertexArrayID”. To bind (“activate”) the corresponding VAO to the OpenGL context, the function glBindVertexArray( name of VAO ) is used. The argument is the name of the VAO we just created in “VertexArrayID”.
Similar to the VAO, the VBO is created by function glGenBuffers( number of VBO names, pointer to VBO names array ). Again, we just need 1 VBO whose name should be returned to “triangleVBO”. This variable just stores an ID (object name) of GLuint type.
From the naming of “triangleVBO” it is clear to us what we intent here (representing a triangle by three vertices), anyway, how should OpenGL know? – We explain the meaning of this buffer object to OpenGL by using glBindBuffer ( target, VBO name ). There are numerous options as target but GL_VERTEX_BUFFER is the right choice here.
The actual VBO is created by glBufferData( target, size of object’s data store in bytes, pointer to data to be copied into VBO, expected usage ). This functions takes four arguments. The target is GL_VERTEX_BUFFER again. The size of the VBO’s data store in bytes is determined by Pascal’s SizeOf function applied to “triangleData”. The “triangleData” constant also holds the data to be copied into the VBO, so its pointer is suitable as the third argument. Since we are not going to change the data a lot, we should use GL_STATIC_DRAW as fourth argument.
If you are a newcomer to OpenGL, don’t worry if you are confused the first time. Most people are. And now it may even get worse :-(.
Shaders and OpenGL Shading Language
When starting with modern OpenGL the so-called Shaders are talked about a lot. Shaders are scripts written in a C-like script language called OpenGL Shading Language (GLSL). These scripts are compiled at runtime and influence the way how the graphics data is processed at certain steps in the so-called rendering pipeline of OpenGL. In fact, you can create rather complex and special effects with shaders without even changing one line of code of your source code.
Vertex Shader and Fragment Shader
There are two Shaders that are crucial and have to be set up to work with modern OpenGL. They are called Vertex Shader and Fragment Shader. There are more Shaders not covered here, though. Each type of Shader influences different aspects of the rendering.
The Vertex Shader is the first Shader program executed in the rendering pipeline. Every vertex is “put through” the Vertex Shader program and processed accordingly, hence the name. Often this Shader is used to perform transformation operations. The Shader script used in this tutorial is shown next:
This GLSL source code is saved into a file VertexShader.txt and located in the same directory as the source code of this chapter’s example source code. I’m not going to explain this GLSL code in detail here, but a detailed explanation is found over at opengl-tutorial.org Chapter 2 where I got this Shader code from, by the way.
The Frgament Shader is the last Shader program executed in the renderin pipeline. The so-called rasterization process produces fragments. Every fragment is “put through” the Fragment Shader program and processed accordingly. The Shader script used for the Fragment Shader is:
#version 330 core

out vec3 color;

void main(){
   color = vec3(1,0,0);
 }
This code is in file FragmentShader.txt and located in the same directory as the VertexShader.txt. The detailed explanation is found over at opengl-tutorial.org Chapter 2 again. Anyway, you’ll notice that there is a “color” variable (three component vector). As you see, it sets the (red,green,blue) values for the fragments to (1,0,0) which means red should be the result, red = 100%, green and blue = 0%. You may play around with these values.
  //creating shaders
  VertexShaderID := glCreateShader( GL_VERTEX_SHADER );
  FragmentShaderID := glCreateShader( GL_FRAGMENT_SHADER );

  //load shader code and get PChars
  ShaderCode := TStringList.Create;
  ShaderCode.LoadFromFile( VertexShaderFile );
  VertexShaderCode := ShaderCode.GetText;
  if VertexShaderCode = nil then HALT;
  ShaderCode.LoadFromFile( FragmentShaderFile );
  FragmentShaderCode := ShaderCode.GetText;
  if FragmentShaderCode = nil then HALT;
  ShaderCode.Free;
Both Shaders are created by function glCreateShader( Shader type ). It returns the reference (or name) as GLuint as seen before for the VAO and VBO. We store them in the VertexShaderID and FragmenShaderID, respecitvely.
The next part is about loading the source code from the two Shader files (VertexShader.txt, FragmentShader.txt) and converting them to be used with OpenGL. First a “ShaderCode” variable of TStringList type is created. Its LoadFromFile method let us load the file contents into the variable conveniently. First for the Vertex Shader, whose file name is stored in constant “VertexShaderFile”. The variable “VertexShaderCode” is of type PGLchar, which is the way OpenGL handles strings. Since PGLchar is of type PChar anyway, the method GetText is perfectly suitable here to convert the source code string into a null-terminated array of chars. Finally, there is a simple check if the PGLchars are empty (nil), which shouldn’t be the case if the source code is pointed to as expected.
Exactly the same is done for the FragmentShader and the source code associated with “FragmentShaderCode”.
Finally, the dummy variable “ShaderCode” is free’d.
  //compiling and error checking vertex shader
  write('Compiling and error checking Vertex Shader... ' );
  glShaderSource( VertexShaderID, 1, @VertexShaderCode, nil );
  glCompileShader( VertexShaderID );

  glGetShaderiv( VertexShaderID, GL_COMPILE_STATUS, @compilationResult );
  glGetShaderiv( VertexShaderID, GL_INFO_LOG_LENGTH, @InfoLogLength );
  if compilationResult = GL_FALSE then
  begin
    writeln( 'failure' );
    SetLength( ErrorMessageArray, InfoLogLength+1 );
    glGetShaderInfoLog( VertexShaderID, InfoLogLength, nil, @ErrorMessageArray[0] );
    for i := 0 to InfoLogLength do write( String( ErrorMessageArray[i] ) );
    writeln;
  end else writeln( 'success' );

  //compiling and error checking fragment shader
  write('Compiling and error checking Fragment Shader... ' );
  glShaderSource( FragmentShaderID, 1, @FragmentShaderCode, nil );
  glCompileShader( FragmentShaderID );

  glGetShaderiv( FragmentShaderID, GL_COMPILE_STATUS, @compilationResult );
  glGetShaderiv( FragmentShaderID, GL_INFO_LOG_LENGTH, @InfoLogLength );
  if compilationResult = GL_FALSE then
  begin
    writeln( 'failure' );
    SetLength( ErrorMessageArray, InfoLogLength+1 );
    glGetShaderInfoLog( VertexShaderID, InfoLogLength, nil, @ErrorMessageArray[0] );
    for i := 0 to InfoLogLength do write( String( ErrorMessageArray[i] ) );
    writeln;
  end else writeln( 'success' );
To associate the source code we stored in “VertexSourceCode” to “VertexShaderID” of GLuint type, the function glShaderSource( Shader reference, number of array elements, pointer to array of source code PGLchars, pointer to array of lengths ). The Vertex Shader reference is stored in “VertexShaderID” which is the first argument. We just have one source code, so the second argument is 1. The source code is stored VertexShaderCode, and its pointer is addressed by @VertexShaderCode as the third argument. As seen before, since we just have one element here, it is not necessary to have really an array. The fourth parameter allows for some length specification, but if set to nil it expects null-terminated arrays of chars.
The compilation is straight forward done by glCompileShader( Shader reference ). It is really advised to to error checking here, that is why it is shown how to do that. The function glGetShaderiv( Shader reference, object parameter, pointer of correct type for return value ) is used to request information about objects. First we like to know if the compilation was successful. The Shader reference is stored in “VertexShaderID”, the object parameter is GL_COMPILE_STATUS. This will return a GLint value, which can be interpreted as GL_FALSE or GL_TRUE. The result is stored in “compilationResult” by using its pointer (@compilationResult) as argument.
Right after that we request the length of the information log by GL_INFO_LOG_LENGTH. It will be greater than 0 if some information were logged (probably an error occured on compilation then). The result is returned to “InfoLogLength” by its pointer @InfoLogLength.
If an error occurs, “compilationResult” is GL_FALSE. In this case “failure” along with more specific information is printed out. I’m not going into detail here, since this shouldn’t happen. Otherwise (and that should be the case), “success” is printed out.
The very same way the Fragment Shader is compiled and checked.
  //creating and linking program
  write('Creating and linking program... ' );
  ProgramID := glCreateProgram();
  glAttachShader( ProgramID, VertexShaderID );
  glAttachShader( ProgramID, FragmentShaderID );
  glLinkProgram( ProgramID );

  glGetShaderiv( ProgramID, GL_LINK_STATUS, @compilationResult );
  glGetShaderiv( ProgramID, GL_INFO_LOG_LENGTH, @InfoLogLength );
  if compilationResult = GL_FALSE then
  begin
    writeln( 'failure' );
    SetLength( ErrorMessageArray, InfoLogLength+1 );
    glGetShaderInfoLog( VertexShaderID, InfoLogLength, nil, @ErrorMessageArray[0] );
    for i := 0 to InfoLogLength do write( String( ErrorMessageArray[i] ) );
    writeln;
  end else writeln( 'success' );
The shaders have to be attached and linked by a Shader program. A Shader program is created by glCreateProgram(). The parenthesis are important here. It returns an reference of GLuint type which is stored in ProgramID.
The Shaders are attached to this Shader program by glAttacheShader( Program reference, Shader reference ). The program is linked by glLinkProgram( Program reference ). The reference for the Shader program is “ProgramID”. The references for the Shaders are “VertexShaderID” and “FragmentShaderID”, respectively.
By complete analogy to the error checking for the Shader compilation, the Shader program linking is checked. Anyway, instead of GL_COMPILE_STATUS, GL_LINK_STATUS is used.
  for i := 0 to 400 do
  begin
    glClearColor( 0.0, 1.0-i/400, 0.0+i/400, 1.0 );
    glClear( GL_COLOR_BUFFER_BIT );
    glUseProgram( ProgramID );
    glEnableVertexAttribArray( 0 );
    glBindBuffer( GL_ARRAY_BUFFER, triangleVBO );
    glVertexAttribPointer( 0, 3, GL_FLOAT, GL_FALSE, 0, nil );
    glDrawArrays( GL_TRIANGLES, 0, 3 );
    glDisableVertexAttribArray( 0 );
    SDL_Delay( 20 );
    SDL_GL_SwapWindow( sdlWindow1 );
  end;
The for-loop counts from 0 to 400. Within each cycle it first changes the background color by glClearColor( red, green, blue, alpha ). Red and alpha are constant, green and blue are varied each cycle dependend upon variable i. This makes the background slowly changing from green to blue, feel free to play around with the rgba values. To actually clear the color buffer glClear( buffer ) with GL_COLOR_BUFFER_BIT as argument is used.
glUseProgram( Shader program reference ) is used to apply the Shader program to the rendering state. “ProgramID” is the Shader program reference in the example code.
glEnableVertexAttribArray( array index ) is used in order to make the attribute array available for rendering by glDrawArrays. The index is 0 here. The “triangleVBO” is bound by glBindBuffer( target, buffer ) to the GL_BUFFER_ARRAY target to change attribute data of said VBO. Latter is done by glVertexAttribPointer( index, size, type, normalized, stride, offset of first component ) with the given arguments. Hence, the index is 0, 3 components per generic vertex attribute, each of float point type (thus, GL_FLOAT), not normalized (thus GL_FALSE), no strides between vertex attributes, no offset for the first component.
The rendering is done by glDrawArrays( type of primitive, starting index, number of elements ). The type of primitive is a triangle, hence GL_TRIANGLES is the first argument. We start at the very beginning, so index is 0. We have 3 sequential elements (vertices).
glDisableVertexAttribArray( array index ) is the counter function to glEnableVertexAttribArray( array index ), obviously. It disables the vertex attribute array.
SDL_Delay delays the loop by 20 milliseconds.
The procedure
procedure SDL_GL_SwapWindow(window: PSDL_Window)
is used to actually display the rendering result to the the window “sdlWindow1”. Keep in mind that this window has to be initialized as an OpenGL window. This procedure is comparable to SDL’s SDL_RenderPresent.
For the clean up, the shaders have to be detached from the shader program by glDetachShader( program, shader ). After that they can be deleted by glDeleteShader( shader ), and the program by glDeleteProgram( program ).
The shader script PChars are disposed by StrDispose( PChar ).
The VBO and the vertex array have to be free’d by glDeleteBuffers( number of buffer objects, pointer to array of buffers ) and glDeleteVertexArrays( number of VAOs, pointer to array of VAOs ) respectively. The first parameter is the number of objects to be deleted, which is 1 in both our cases.