Working with the video subsystem assumes that you understand the concept behind. In SDL the surface is a central concept. Surfaces are parts of the memory (RAM) where an image is saved. Every surface can have its own size (pixels x pixels, e.g. 640 x 480) and properties (e.g. with or without alpha channel for transparency effects). You can copy(=blit) a part or the whole surface to any other surface. This is the second very important concept and is called blitting
There is a special surface: the display surface. Everything that got blit to this surface gets displayed on the physical screen (monitor) after refreshing (SDL_FLIP(…), SDL_UPDATERECT(…))!
For example in demo03.pas / demo03.exe from a modified SDL4Free Pascal demo file the ball, the paddle and the black background (display surface background color) are surfaces. The ball and the paddle are copied(=blitted) onto the black screen surface again and again slightly moved up. So the ball and the paddle seem to move.
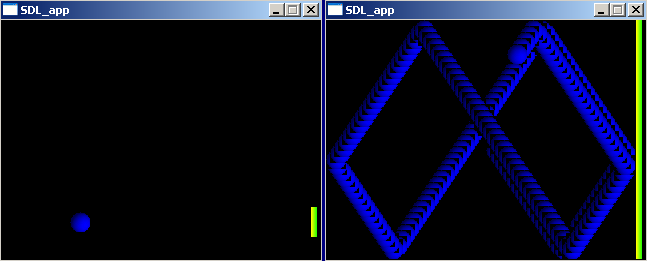 If you think carefully about this or check the source code you will notice that between every blitting process the ball and paddle of the previous frame have to be overdrawn by black rectangles erasing them (left), otherwise the result would look like the right example.
 So our task is to create a display surface. Furthermore we need a surface that contains a picture. Eventually the picture should get copied onto the display surface. After that the picture should be displayed at the physical screen. The whole code looks like this.
PROGRAM chap3;
USES SDL, CRT;
VAR
screen,picture:pSDL_SURFACE;
source_rect,destination_rect:pSDL_RECT;

BEGIN
SDL_INIT(SDL_INIT_VIDEO);
screen:=SDL_SETVIDEOMODE(200,200,32,SDL_SWSURFACE);
IF screen=NIL THEN HALT;

picture:=SDL_LOADBMP('C:\FPC\2.0.4\bin\i386-win32\test\fpsdl.bmp');
IF picture=NIL THEN HALT;

NEW(source_rect);
source_rect^.x:=0;
source_rect^.y:=0;
source_rect^.w:=200;
source_rect^.h:=200;
NEW(destination_rect);
destination_rect^.x:=0;
destination_rect^.y:=0;
destination_rect^.w:=200;
destination_rect^.h:=200;

REPEAT
  SDL_BLITSURFACE(picture,source_rect,screen,destination_rect);
  SDL_FLIP(screen);
  DEC(source_rect^.w);
  DEC(source_rect^.h);
  INC(destination_rect^.x);
  INC(destination_rect^.y);
  DEC(destination_rect^.w);
  DEC(destination_rect^.h);
  SDL_DELAY(30);
  IF source_rect^.w=1 THEN
  BEGIN
    source_rect^.x:=0;
    source_rect^.y:=0;
    source_rect^.w:=200;
    source_rect^.h:=200;
    destination_rect^.x:=0;
    destination_rect^.y:=0;
    destination_rect^.w:=200;
    destination_rect^.h:=200;
  END;
UNTIL keypressed;

SDL_FREESURFACE(picture);
SDL_FREESURFACE(screen);

DISPOSE(source_rect);
DISPOSE(destination_rect);

SDL_QUIT;
END.
Now we need a command to create a display surface. Creating a surface is always introduced by setting up a surface variable. The variable type is pSDL_SURFACE and is kind of pointer type as indicated by the “p” in front of it. pSDL_SURFACE is used for the display surface and any other surface.
PROGRAM chap3;
USES SDL, CRT;
VAR
screen,picture:pSDL_SURFACE;
source_rect,destination_rect:pSDL_RECT;
The first line determines the program name. Then we again define that we want to use the SDL unit to be loaded. We introduce the CRT unit which is a basic Pascal unit (check Chapter 2 for more details on CRT). It is needed to detect in a simple way when the user presses a key to stop the repeat/until loop (in Chapter 6 we will learn how SDL handles keyboard interactions). Finally we decide to set up two surfaces. The display surface (screen) has some special properties that can be set. The surface “picture” will store the picutre from a bitmap file. The two variabes “source_rect” and “destination_rect” will be used later to define some rectangles. More details on this later in this chapter.
After using surfaces you have to clean the memory if you don’t need them anymore. Therefore you use the procedure SDL_FREESURFACE(surface:pSDL_Surface) which you have to call for any surface (including the display surface).
BEGIN
SDL_INIT(SDL_INIT_VIDEO);
screen:=SDL_SETVIDEOMODE(200,200,32,SDL_SWSURFACE);
IF screen=NIL THEN HALT;
After initializing SDL as seen in the previous chapter already we now go into details on the set up of the display surface. The function to define a surface as display surface is SDL_SETVIDEOMODE(width,height,bpp:INTEGER; flags:UInt32):pSDL_SURFACE and returns NIL if an errors occurs meaning no pointer for a display surface could be set up. The first parameter determines the width, the second one the height in pixels. The third parameter determines the colordepth in bits (32 bit for now) and the last one the appearance (windowed or fullscreen, with or without border) and space handling (software or hardware memory used). The first three parameters are of integer type, the last one UInt32 (check Chapter 2 for more details on UInt32). There are some very interesting flags. The chosen one, SDL_SWSURFACE, is used if you want to store the surface in system memory (RAM). Alternatively you could chose SDL_HWSURFACE what causes a storage in video memory. Both will create windowed screens that cannot be resized. SDL_NOFRAME would create a windowed screen without a frame. Eventually there is SDL_FULLSCREEN which leads to a fullscreen display. You also can combine several flags by “OR” keyword. So setting up this same window without a frame would be screen:=SDL_SETVIDEOMODE(200,200,32,SDL_SWSURFACE OR SDL_NOFRAME).
Direct loading of a picture to the screen surface is impossible so it is necessary to create another surface that contains the picture. Fourtunately there is a function called SDL_LOADBMP(filename:pCHAR):pSDL_SURFACE. Make sure you give the FULL path for “filename”; relative pathes are not allowed. If you drew something onto the screen and would like to save it as a bitmap file the corresponding function is called SDL_SAVEBMP(surface:pSDL_SURFACE; filename:pCHAR):INTEGER. The surface you want to save doesn’t have to be necessarily the screen surface. It returns 0 on success and -1 on error. Incidentally there is no such import/export feature for other graphic formats (that doesn’t mean there are no other easy ways to use other important graphic formats ;), check Chapter 3a for details on this).

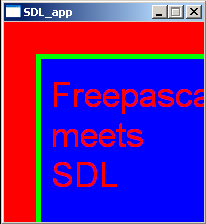
This picture (8 bit) is the one that will be copied to the screen. The pictures width and height are both exactly 200 pixels.
{add the correct path here}
picture:=SDL_LOADBMP('C:\FPC\2.0.4\test\fpsdl.bmp');
{if the path is wrong you will get an abortion}
IF picture=NIL THEN HALT;
The surface is named “picture” here and the file fpsdl.bmp is located at the given directory, “C:\FPC\2.0.4\test”. As already known from setting of the screen variable the SDL_LOADBMP(path) function returns NIL if something is wrong. The path has to be of type pCHAR.
Actually we now could copy the loaded picture from the picture surface to the display surface. Remember: This process is called blitting. But to demonstrate another quite usable feature strongly related to picture blitting we will now define some rectangles. Instead of blitting the whole image we are then also able to blit just parts of the source image.
NEW(source_rect);
source_rect^.x:=0;
source_rect^.y:=0;
source_rect^.w:=200;
source_rect^.h:=200;
NEW(destination_rect);
destination_rect^.x:=0;
destination_rect^.y:=0;
destination_rect^.w:=200;
destination_rect^.h:=200;
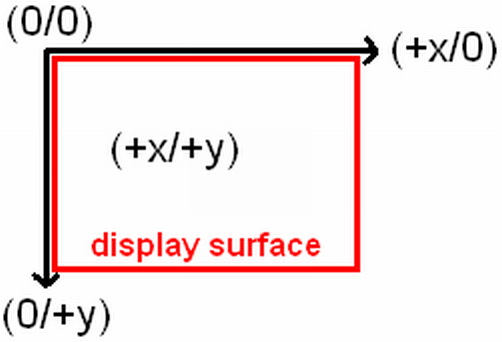
Now let’s have a look at the code. We define the rectangles called source_rect and destination_rect which store what part of the source image will be copied to what position at the destination surface (here: display surface). The command NEW(pointer) is a common Pascal command and should be known. source_rect and destination_rect are of type pSDL_RECT and are simple records which store a (x,y) and a (width, height) pair. The values set for both rectangles are identical. They are further exactly of the same size as our display surface and our image. The coordinates of x and y relate to the corresponding surface so (x/y) is (0/0) here for both rectangles and corresponds to the left upper corner. From this point to the right direction the width is 200 pixels. The height is from this point 200 pixels down to the bottom side of the display surface. The following image may explain this.
 Next we will enter the repeat/until loop.
REPEAT
  SDL_BLITSURFACE(picture,source_rect,screen,destination_rect);
  SDL_FLIP(screen);
  DEC(source_rect^.w);
  DEC(source_rect^.h);
  INC(destination_rect^.x);
  INC(destination_rect^.y);
  DEC(destination_rect^.w);
  DEC(destination_rect^.h);
  SDL_DELAY(30);
SDL_BLITSURFACE(src:pSDL_SURFACE; srcrect:pSDL_RECT; dst:pSDL_SURFACE; dstrect:pSDL_RECT):INTEGER is the needed command for blit processes. For successful blitting (copying) four parameters are requested. The first determines the source surface, the third the destination surface. The second and the fourth parameter can be NIL. Then the whole source surface is blitted to the (0,0) position (upper left corner) of the destination surface. If you want to blit the source surface to any other position on the destination surface (which is usually the case) you have to provide the coordinates by usage of the pSDL_RECT record. In the first run the content of surface “picture” within the defined rectangle of “source_rect” (x/y)=(0/0) and (w/h)=(200/200) is blitted to the display surface within the defined rectangle of “destination_rect” (x/y)=(0/0) and (w/h)=(200/200). Actually this means the complete content of the “picture” surface is blitted to the display surface.
After the blit process is finished the display surface has to be refreshed. Procedure SDL_UPDATERECT(screen:pSDL_SURFACE; x,y:SInt32; w,h:UInt32) or function SDL_FLIP(screen:pSDL_SURFACE):INTEGER are doing that. The SDL_FLIP(screen surface) command you use if you want to refresh the whole screen surface and furthermore if you want to use double buffering. For most applications and games therefore the SDL_FLIP(screen surface) is much more common. It is equal to SDL_UPDATERECT(screen surface,0,0,0,0) if double buffering is disabled. In comparision to SDL_UPDATERECT, SDL_FLIP furthermore returns an error value, 0 if successful and -1 on error.
The SDL_UPDATERECT command requests five parameters. The first parameter determines which surface has to be refreshed (usually the display surface). The next four ones determine a rectangel with: x-position, y-position (from top to bottom), width (relative to x,y-position), height (relative to x,y-position). If all of these paramters are “0” the whole surface will get updated.
In the example for any further cycle though the x, y, w and h values get incremented or decremented as shown. The destination-x and y values get incremented by one each cycle so it is progressing to the right bottom corner. This leads to the impression that the picture is slipping to the right bottom corner. The width and height values are fit respectivly.
The new introduced SDL_Delay(msec: UInt32) procedure works the same way as the common delay command of the CRT unit in Pascal. It delays the run of the program for the given time in milli seconds. This is a key procedure for nearly any program. If you would remove the delay procedure the program is running so fast, you wouldn’t be able to recognise the shifting but see some flickering. Since this sometimes even leads to abortions of the program I do not advise you to try it out.
ATTENTION: For a fast and clean blitting you should note that both surfaces (source and destination surface) should have the same bit depth! In our example we use a 32 bit screen surface (screen) and blit an 8 bit source surface (picture) onto it (because we loaded an 8 bit image file (fpsdl.bmp) to this surface). This is just an example and therefore it is okay, but you should avoid this especially if you plan to create games or applications where the FPS (frames per second) count is important.
IF source_rect^.w=1 THEN
  BEGIN
    source_rect^.x:=0;
    source_rect^.y:=0;
    source_rect^.w:=200;
    source_rect^.h:=200;
    destination_rect^.x:=0;
    destination_rect^.y:=0;
    destination_rect^.w:=200;
    destination_rect^.h:=200;
  END;
UNTIL keypressed;
The Repeat loop shrinkens the source rectangle from bottom right corner. At the same time the position at the destination surface is increased at the same rate. When the rectangles are of size 1 all values get restored.
When any key is pressed the loop is exited.
SDL_FREESURFACE(picture);
SDL_FREESURFACE(screen);

DISPOSE(source_rect);
DISPOSE(destination_rect);

SDL_QUIT;
END.
The allocated memory of the picture and the display surface and of both rectangles get disposed. Finally SDL has to be quit and so has the program.
This file contains the source code: chap3.pas (right click and “save as”).
This file contains the executable: chap3.exe (right click and “save as”).
Hope you are successful and have fun. The final result should look and behave like this: The blue box with the text “Free Pascal meets SDL” is slipping to the right bottom corner. When it disappears the scene is reset.