Okay. Maybe you think, why to learn how to display pictures first and then learning about the more basic feature to draw single pixels to the screen? – First of all blitting is one of the key features whereas drawing of single pixels to the screen is quite rarely used in applications and games. Though this chapter will get a little bit longer because several things have to be explained more detailed to impart a fully understanding.
We have to know about the meaning of pixels. The physical screen consists of many small units. Every unit consists itself of three different coloured lights. These colours are red, green and blue. If you mix them (additive) you can get every other colour. For example if you mix red and green you get yellow. For three colours that can be mixed with each other there are eight combinations possible which lead to different colours (RGB, RG, RB, R, GB, G, B, all lights off). Some of you may say RGB (white) and all lights off (black) are no colours. That is right but doesn’t matter here and to keep simpliness I will talk of colours even if I talk of black and white.
Did you get confused? Your screen definitvly has more than eight colours, doesn’t it? The reason is, your screen isn’t just able to switch lights on or off. Besides it is able to differ the intensities of the lights. The more intensity levels you have the more colours you can display. The case that you have eight colours as discussed before means that you just have one intensity level. If your screen is in 8 bit mode every pixel on the screen has the possibility to display 2 power 8 colours. That are 256 different colours. Every of the three lights has therefore a certain amount of different intensity levels. If you have 16 bit mode you have 2 power 16 and that are 65536 colours. Each light therefore has the appropriate amount of intensity levels. Since we prefer 32 bit mode, we have 4.29 billion different colours!
All the examples will be at 32 bit mode. If you want to write directly to the screen surface it is possibly necessary that you lock it before performing direct pixel manipulations. We work in software mode (SDL_SWSURFACE) so we can leave locking the screen surface. However, other modes will require you to lock it. Not shown in the example code you can check it by function SDL_MUSTLOCK(surface:pSDL_SURFACE):BOOLEAN. If it evaluates to FALSE or 0 you don’t need to worry about locking. Otherwise you have to lock the surface by function SDL_LOCKSURFACE(surface:pSDL_SURFACE):INTEGER for direct pixel manipulations. It will return 0 if locking was succesful and -1 if locking failed. After pixel manipulations you have to unlock the surface by procedure SDL_UNLOCKSURFACE(surface:pSDL_SURFACE) straight forward.
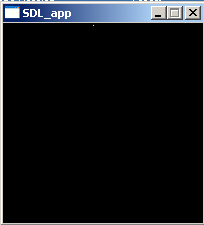
Now the whole example code is presented. The goal is to have 200 x 200 pixels wide black surface. A single yellow pixel will start to move from the top-left corner along the surface from left to right and line by line until it reaches the bottom of the surface. It then will restart at the top-left corner.
PROGRAM chap4;
USES CRT, SDL;

VAR
screen:pSDL_SURFACE;
pixellocation:^LONGWORD;
pixelcolor,i:LONGWORD;

BEGIN

SDL_INIT(SDL_INIT_VIDEO);
screen:=SDL_SETVIDEOMODE(200,200,32,SDL_SWSURFACE);
IF screen=NIL THEN HALT;

NEW(pixellocation);
WRITE('Pitch value: ',screen^.pitch DIV screen^.format^.BytesPerPixel);

i:=0;
REPEAT
inc(i); IF i>39999 THEN i:=0;

pixellocation:=screen^.pixels+i;               //delete old pixel
pixelcolor:=SDL_MAPRGB(screen^.format,0,0,0);
pixellocation^:=pixelcolor;


pixellocation:=screen^.pixels+i+1;             //draw new pixel
pixelcolor:=SDL_MAPRGB(screen^.format,255,255,0);
pixellocation^:=pixelcolor;

SDL_FLIP(screen);
SDL_DELAY(5);
UNTIL keypressed;

DISPOSE(pixellocation);
SDL_FREESURFACE(screen);
SDL_QUIT;
END.
Now we will go through the whole code step by step. Especially direct pixel manipulations are often misunderstood by newcomers to SDL.
PROGRAM chap4;
USES CRT, SDL;

VAR
screen:pSDL_SURFACE;
pixellocation:^LONGWORD;
pixelcolor,i:LONGWORD;

BEGIN

SDL_INIT(SDL_INIT_VIDEO);
screen:=SDL_SETVIDEOMODE(200,200,32,SDL_SWSURFACE);
IF screen=NIL THEN HALT;
The program is called chap4. As known from previous chapters unit CRT is needed here for a simple input handling and unit SDL is needed for SDL support. The screen variable is known from previous chapters as well and will contain the content which is displayed at the physical screen later. The pixellocation variable is a pointer type variable indicated by the tilde (^). Furthermore the space it’ll point at needs to be of size for a Longword value. The two variables pixelcolor and i are common Longword variables.
The SDL program is initilized as known and the display surface is of size 200 x 200 px and has 32 bit. Except from the pointer variable pixellocation there is nothing new up to here.
NEW(pixellocation);
WRITE('Pitch value: ',screen^.pitch DIV screen^.format^.BytesPerPixel);

i:=0;
REPEAT
inc(i); IF i>39999 THEN i:=0;
In the first line of this part of the code the pointer pixellocation gets some space by the common Free Pascal function NEW(pointer).
Next the pitch value of the surface is printed. Please note, if you create a surface of a certain width and height the true surface can be a little bit wider. In our example this means you have a window of width and height of 200 pixels displayed but there could be an additional unvisible piece of surface. Maybe its true width is 210, so the moving pixel wouldn’t restart at a new line after 200 cycles but 210 cycles. To solve problems caused by this pitch to the surface you can read the pitch out. The data type pitch will allow you to do this (e.g. screen^.pitch). Unfortunately the pitch is not given in pixels (as the width value) but in bytes so you have to devide its value by the BytesPerPixel value which is for our 32 bit surface format usually 4. This value can be read out by screen^.format^.BytesPerPixel. You will see that in our example the width and the pitch are equal (both 200) which means there is no exceeding surface part.
Counter variable i is set to 0. Then the repeat loop is entered. Variable i is increased by 1 each cycle until it reaches 39999. It controls the position of the dot. When i reaches 39999 exactly 40000 cycles are done and the dot should restart at the top-left corner.
Now it gets interesting.
pixellocation:=screen^.pixels+i;               //delete old pixel
pixelcolor:=SDL_MAPRGB(screen^.format,0,0,0);
pixellocation^:=pixelcolor;
Let’s first consider the second line concerning the colour of pixels. If you want to add colour to a single pixel you need to know the corresponding pixel value defining the colour of it. The function SDL_MAPRGB(format:pSDL_PIXELFORMAT; r:UInt8; g:UInt8; b:UInt8):UInt32 or in short SDL_MAPRGB(pixel format, red, green, blue) will make it easy for you to find it out. Just add the pixel format of the surface which is stored in the surface’s format field. For the example surface the expression is screen^.format. A RGB triple of (0,0,0) will lead to black, all lights off (which is also the background colour of the surface). The expected variable type for the RGB triple values are of UInt8 meaning an unsigned 8 bit integer which corresponds to a Free Pascal Byte type variable with a range from 0 to 255. The function will return an unsigned 32 bit integer (UInt32) value which corresponds Free Pascal’s Longword type variable.
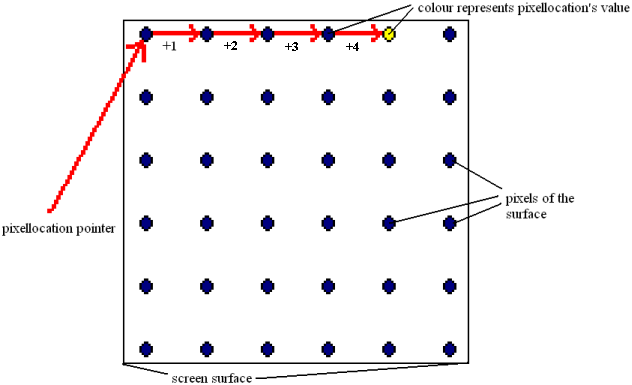
Now we are concerned about the actual allocation of a colour to a specific pixel. Every surface provides the possibility to access its pixels, for example by screen^.pixels. The marker pixels is of type Pointer and points to a certain pixel of the surface. By adding to or substraction from it you can easily access any pixel on the surface. So any pixel’s coordinate on the screen can be accessed by using ONE number instead of a pair of (x,y) values. This is an important concept. The integer value screen^.pixels is pointing at represents the colour of this specific pixel. So, don’t confuse these two values. The value of the pixels pointer itself determines the pixel addressed, the value it is pointing at determines the pixel’s colour. The following diagram may help to explain this.
 For our 32 bit surface all the pixels are of size Uint32 (unsigned integer 32 bit which equals Longword). That is why we initially made variable pixellocation of type Pointer which will point at values of size Longword. In the first cycle i has the value of 1. So from the first line we see that pixellocation points at the colour value of the screens first pixel. This pixel is black. In the second line the colour value for a black pixel is generated and given to pixelcolor. The third line allocates the black colour value to the first pixel. This actually doesn’t change anything.
pixellocation:=screen^.pixels+i+1;             //draw new pixel
pixelcolor:=SDL_MAPRGB(screen^.format,255,255,0);
pixellocation^:=pixelcolor;
If you compare these three lines of code with the previous ones you will see just minor differences. In the first line pixelcolor additionally is increased by 1 which means we refer here to the pixel next to the previous one. The pixel colour defined here (line 2) is another one, it is yellow. Therefore red has to be 255, green has to be 255 and blue has to be 0. The third line is identical.
Now you get a clear picture of what actually is happening to get the effect of a moving pixel. For each cycle the yellow pixel from the previous cycle is overdrawn by a black pixel and then the very next pixel is drawn yellow. This leads to the impression of a moving pixel.
SDL_FLIP(screen);
SDL_DELAY(5);
UNTIL keypressed;

DISPOSE(pixellocation);
SDL_FREESURFACE(screen);
SDL_QUIT;
END.
When all pixel manipulations are done the screen has to be refreshed as known by SDL_FLIP. To be able to recognize all the pixel movement the loop has to be slown down by known SDL_DELAY. The loop is left if the user presses a key. Finally the allocated memory of the Pointer variable pixellocation and the screen surface are free’d by known DISPOSE and SDL_FREESURFACE. The SDL system is quit by known SDL_QUIT and the program stopped by END.
This file contains the source code: chap4.pas (right click and “save as”)
This file is the executable: chap4.exe (right click and “save as”)
If you didn’t check the demo03.pas program from last chapter you really should check it now. It demonstrates how you can use the pixel by pixel manipulation to create nice effects and the basis for a simple game.
This file contains the source code: demo03.pas (right click and “save as”)
This file is the executable: demo03.exe (right click and “save as”)
The final result should look and behave like this: You have to look quite carefully to recognize a single yellow pixel moving from the left top corner, line by line down until it reaches the right bottom corner.