This chapter will introduce you on how to load music and sounds since these are key features of every game and many applications.
SDL_mixer 2.0 for easy music and sound support
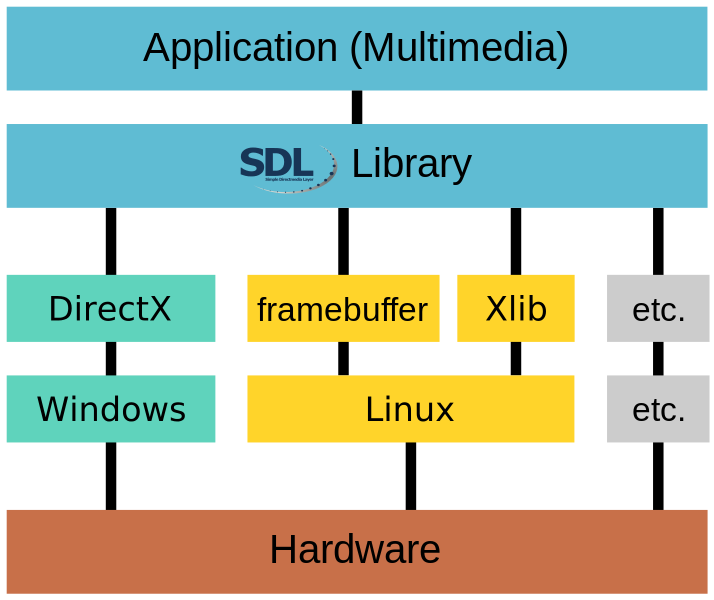
Although SDL 2.0 supports music and sound handling natively, there is an easier way to play music and sound files. The official unit SDL_mixer 2.0 (unit’s name SDL2_mixer) has been created exactly for this purpose and is maintained by the same authors (Sam Lantinga, Stephane Peter, Ryan Gordon) as SDL 2.0 itself. The Pascal translation is fortunately available, too in Tim Blume’s header translations.
Supported music and sound file formats in SDL 2.0
According to the official SDL2_mixer documentation the following music and sound formats are supported:
- WAVE/RIFF (.wav)
- AIFF (.aiff)
- VOC (.voc)
- MOD (.mod .xm .s3m .669 .it .med and more) requiring libmikmod on system
- MIDI (.mid) using timidity or native midi hardware
- OggVorbis (.ogg) requiring ogg/vorbis libraries on system
- MP3 (.mp3) requiring SMPEG or MAD library on system
- FLAC (.flac) requiring the FLAC library on system
You’ll need these files:
| Software Version |
File name Link |
Description |
|---|---|---|
| SDL2_mixer dynamic link library 2.0.1 |
SDL2_mixer-2.0.1-win32-x86.zip (32-bit Windows) SDL2_mixer-2.0.1-win32-x64.zip (64-bit Windows) https://www.libsdl.org/projects/SDL_mixer/ |
This is the corresponding dynamic link library file for the unit for Windows. Note: Mac OS X and Linux versions are also available. |
| dial.wav sound file | dial.wav dial.wav |
A simple telephone dial sound. Source: pdsounds. License: Public domain. |
| In my mind.ogg music file | In my mind.ogg In my mind.ogg |
A nice music sample. Source/Creator: First. License: CC BY-ND 3.0. |
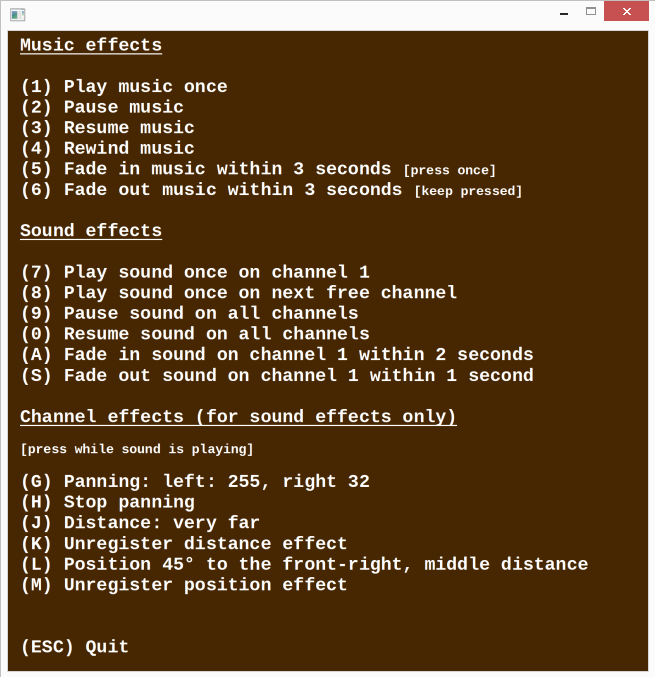
| music-menu.bmp image file | music-menu.bmp music-menu.bmp |
A simple bitmap image file which displays the menu options for the tutorial program. |
You should extract the zip-file and get several files. These are four license text files and a readme text file, furthermore you have eight dll files including the important SDL2_mixer.dll. The other dll files are necessary to play the different sound and music formats. Copy all the files to the Windows system32-folder (or the corresponding place). If you forget this and run the examples below you will get an error with exitcode = 309.
Now that you are prepared, let’s have an overview of the code.
program SDL_MusicSound;
uses SDL2, SDL2_mixer;
var
sdlWindow: PSDL_Window;
sdlRenderer: PSDL_Renderer;
sdlSurface: PSDL_Surface;
sdlTexture: PSDL_Texture;
sdlKeyboardState: PUInt8;
Music: PMix_Music;
Sound: PMix_Chunk;
Run: Boolean = True;
begin
if SDL_Init(SDL_INIT_VIDEO or SDL_INIT_AUDIO) < 0 then Exit;
// Get window and renderer
if SDL_CreateWindowAndRenderer(
640, 640, SDL_WINDOW_SHOWN, @sdlWindow,@sdlRenderer) <> 0 then Exit;
// Create and render menu texture
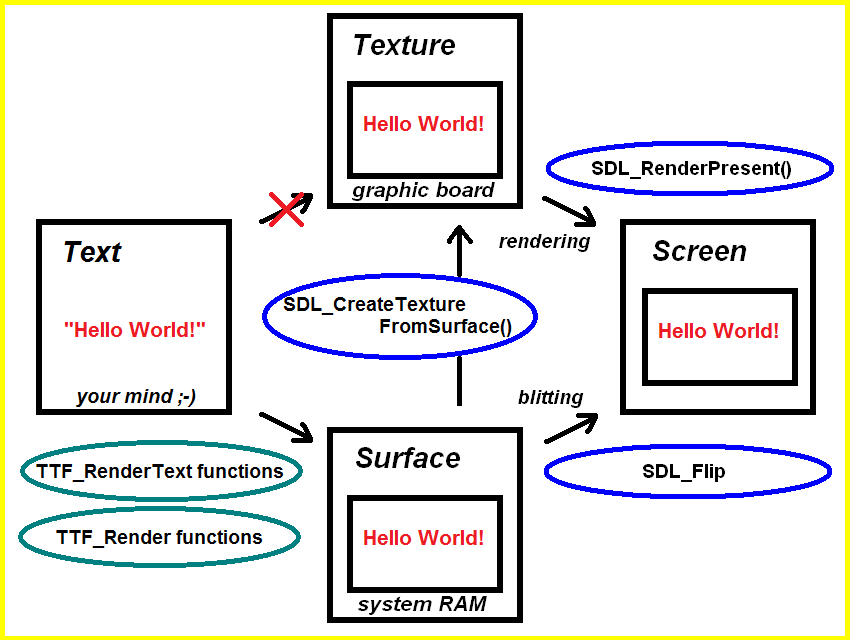
sdlSurface := SDL_LoadBMP('music-menu.bmp');
if sdlSurface = nil then Exit;
sdlTexture := SDL_CreateTextureFromSurface(sdlRenderer, sdlSurface);
if sdlTexture = nil then Exit;
if SDL_RenderCopy(sdlRenderer, sdlTexture, nil, nil) <> 0 then Exit;
SDL_RenderPresent(sdlRenderer);
// Prepare mixer
if Mix_OpenAudio(MIX_DEFAULT_FREQUENCY, MIX_DEFAULT_FORMAT,
MIX_DEFAULT_CHANNELS, 4096) < 0 then Exit;
// Load music
Music := Mix_LoadMUS('In-my-mind-1.ogg');
if Music = nil then Exit;
Mix_VolumeMusic(MIX_MAX_VOLUME);
// Load sound
Sound := Mix_LoadWAV('dial-1.wav');
if Sound = nil then Exit;
Mix_VolumeChunk(Sound, MIX_MAX_VOLUME);
while Run = True do
begin
SDL_PumpEvents;
sdlKeyboardState := SDL_GetKeyboardState(nil);
// ESC pressed
if sdlKeyboardState[SDL_SCANCODE_ESCAPE] = 1 then
Run := False;
// Music effect keys
if sdlKeyboardState[SDL_SCANCODE_1] = 1 then
if Mix_PlayMusic(Music, 0) < 0 then Writeln(SDL_GetError);
if sdlKeyboardState[SDL_SCANCODE_2] = 1 then Mix_PauseMusic;
if sdlKeyboardState[SDL_SCANCODE_3] = 1 then Mix_ResumeMusic;
if sdlKeyboardState[SDL_SCANCODE_4] = 1 then Mix_RewindMusic;
if sdlKeyboardState[SDL_SCANCODE_5] = 1 then
if Mix_FadeInMusic(Music, 10, 3000) = 0 then Writeln(SDL_GetError);
if sdlKeyboardState[SDL_SCANCODE_6] = 1 then
if Mix_FadeOutMusic(3000) = 0 then Writeln(SDL_GetError);
// Sound effect keys
if sdlKeyboardState[SDL_SCANCODE_7] = 1 then
if Mix_PlayChannel(1, Sound, 0) < 0 then Writeln(SDL_GetError);
if sdlKeyboardState[SDL_SCANCODE_8] = 1 then
if Mix_PlayChannel(-1, Sound, 0) < 0 then Writeln(SDL_GetError);
if sdlKeyboardState[SDL_SCANCODE_9] = 1 then Mix_Pause(-1);
if sdlKeyboardState[SDL_SCANCODE_0] = 1 then Mix_Resume(-1);
if sdlKeyboardState[SDL_SCANCODE_A] = 1 then
if Mix_FadeInChannel(1, sound, 0, 2000) < 0 then Writeln(SDL_GetError);
if sdlKeyboardState[SDL_SCANCODE_S] = 1 then
if Mix_FadeOutChannel(1, 1000) < 0 then Writeln(SDL_GetError);
// Channel effect keys
if sdlKeyboardState[SDL_SCANCODE_G] = 1 then
if Mix_SetPanning( 1, 255, 32 ) = 0 then Writeln(SDL_GetError);
if sdlKeyboardState[SDL_SCANCODE_H] = 1 then
if Mix_SetPanning( 1, 255, 255 ) = 0 then Writeln(SDL_GetError);
if sdlKeyboardState[SDL_SCANCODE_J] = 1 then
if Mix_SetDistance( 1, 223 ) = 0 then Writeln(SDL_GetError);
if sdlKeyboardState[SDL_SCANCODE_K] = 1 then
if Mix_SetDistance( 1, 0 ) = 0 then Writeln(SDL_GetError);
if sdlKeyboardState[SDL_SCANCODE_L] = 1 then
if Mix_SetPosition( 1, 45, 127 ) = 0 then Writeln(SDL_GetError);
if sdlKeyboardState[SDL_SCANCODE_M] = 1 then
if Mix_SetPosition( 1, 0, 0 ) = 0 then Writeln(SDL_GetError);
end;
// Clean up
if Assigned(sdlSurface) then SDL_FreeSurface(sdlSurface);
if Assigned(sdlTexture) then SDL_DestroyTexture(sdlTexture);
if Assigned(sdlRenderer) then SDL_DestroyRenderer(sdlRenderer);
if Assigned(sdlWindow) then SDL_DestroyWindow(sdlWindow);
if Assigned(Music) then Mix_FreeMusic(Music);
if Assigned(Sound) then Mix_FreeChunk(Sound);
Mix_CloseAudio;
SDL_Quit;
end.When running this program, you’ll get a window with a menue. For this to work, make sure to download the music-menu.bmp file and place it in the program folder.
Let’s start with the first part of the code.
program SDL_MusicSound;
uses SDL2, SDL2_mixer;

var
  sdlWindow: PSDL_Window;
  sdlRenderer: PSDL_Renderer;
  sdlSurface: PSDL_Surface;
  sdlTexture: PSDL_Texture;
  sdlKeyboardState: PUInt8;
  Music: PMix_Music;
  Sound: PMix_Chunk;
  Run: Boolean = True;

begin
  if SDL_Init(SDL_INIT_VIDEO or SDL_INIT_AUDIO) < 0 then Exit;

  // Get window and renderer
  if SDL_CreateWindowAndRenderer(
    640, 640, SDL_WINDOW_SHOWN, @sdlWindow,@sdlRenderer) <> 0 then Exit;

  // Create and render menu texture
  sdlSurface := SDL_LoadBMP('music-menu.bmp');
  if sdlSurface = nil then Exit;
  sdlTexture := SDL_CreateTextureFromSurface(sdlRenderer, sdlSurface);
  if sdlTexture = nil then Exit;
  if SDL_RenderCopy(sdlRenderer, sdlTexture, nil, nil) <> 0 then Exit;
  SDL_RenderPresent(sdlRenderer);
The program is called “SDL”. It uses the SDL2 and the new SDL2_mixer unit.
We’re going to use event handling as discussed in Chapter – Keyboard State and Key States to check what keys have been pressed. Consequently we need a variable “sdlWindow” for the SDL 2.0 window and a keyboard state variable “sdlKeyboardState”.
The pointer variable “Music” is of the new type PMix_Music and points at the loaded music file data later. The “Sound” pointer variable is of type PMix_Chunk and points at the loaded sound file data later. Note: Each song is referenced by an own PMix_Music pointer and each sound effect (e.g. explosions, shots, …) is referenced by an own PMix_Chunk pointer.
What is the difference between music and sound?
Music is associated with PMix_Music pointers and sounds are associated with PMix_Chunk pointers, but why distinguish them at all? – Well, it is convenient to have them separated since they have rather different properties. Music is usually several minutes long, sounds are usually just a few seconds short. It is usually just one song played at a time, sounds need to mix up if necessary. For music it usually doesn’t plays a role if it is sligthly delayed to when it should start, for sounds a larger delay usually means a strange feeling for the player. So, for music there is exactly one channel reserved where the music is played. For sounds eight sound channels are available to make it possible for them to mix up. Now let’s get back to the code.
The variable “Run” is a boolean variable to determine when the main loop of the program should be exited.
The program is initialized by SDL_Init as known. Note though that not only SDL_INIT_VIDEO but additionally SDL_INIT_AUDIO is set. They are combined by the or operator (not the and operator :-)!). The window is set up afterwards by SDL_CreateWindow as known. Also the menu texture file is created and renderered as known. Check Chapter – Loading and rendering a Bitmap file as a reminder, in case.
  // Prepare mixer
  if Mix_OpenAudio(MIX_DEFAULT_FREQUENCY, MIX_DEFAULT_FORMAT,
    MIX_DEFAULT_CHANNELS, 4096) < 0 then Exit;

  // Load music
  Music := Mix_LoadMUS('In-my-mind-1.ogg');
  if Music = nil then Exit;
  Mix_VolumeMusic(MIX_MAX_VOLUME);

  // Load sound
  Sound := Mix_LoadWAV('dial-1.wav');
  if Sound = nil then Exit;
  Mix_VolumeChunk(Sound, MIX_MAX_VOLUME);
To initialize SDL2_mixer
function Mix_OpenAudio(frequency: cint; format: cuint16; channels: cint; chunksize: cint): cinthas to be called. It requests four parameters. These are the frequency, the audio format, the channels (mono or audio) and the chunksize. All these parameters are of Integer type. Function Mix_OpenAudio returns 0 on success and -1 on errors.
The frequency in Hertz (1/s) usually is 22050 Hz or MIX_DEFAULT_FREQUENCY in games but double as high for CD quality sound (44100 Hz). The higher the frequency, the more CPU power is needed.
Next we have to define the audio format. It determines how the audio data is stored. MIX_DEFAULT_FORMAT equals AUDIO_S16SYS. Different values are given in the following list (from official SDL2_mixer documentation):
- Format constant name Description
- AUDIO_U8 Unsigned 8-bit samples
- AUDIO_S8 Signed 8-bit samples
- AUDIO_U16LSB Unsigned 16-bit samples, in little-endian byte order
- AUDIO_S16LSB Signed 16-bit samples, in little-endian byte order
- AUDIO_U16MSB Unsigned 16-bit samples, in big-endian byte order
- AUDIO_S16MSB Signed 16-bit samples, in big-endian byte order
- AUDIO_U16 same as AUDIO_U16LSB (for backwards compatability probably)
- AUDIO_S16 same as AUDIO_S16LSB (for backwards compatability probably)
- AUDIO_U16SYS Unsigned 16-bit samples, in system byte order
- AUDIO_S16SYS Signed 16-bit samples, in system byte order
Then we decide for a sound channel type, which means either stereo or mono. For stereo sound we choose 2 and for mono we choose 1 as value. MIX_DEFAULT_CHANNELS equals stereo output.
Finally the chunksize has to be set, where 4096 bytes per sample is a good and default value. Too low values may lead to skipping samples. Too high values may lead to delayed playing.
Loading music and sounds from files in SDL 2.0
We will load the music by
function Mix_LoadMUS(_file: PAnsiChar): PMix_Music._file can be the absolute path. If the Pascal file and the music file are in the same folder the file name is sufficient (as shown in the example). If the loading was unsuccessful, the function returns nil. The volume can be set by
function Mix_VolumeMusic(volume: cint): cint.The volume can be set between 0 (silence) to 128 (maximum volume). The latter equals MIX_MAX_VOLUME. By the way, if you set -1 as argument, the return value corresponds to the set volume.
Quite similar sound files are loaded by
function Mix_LoadWAV(_file: PAnsiChar): PMix_Chunk.Although the function’s name doesn’t indicate this, use this function to load the sound files of any format (Wave, Aiff, Riff, Ogg, Voc), not only for .wav sound files. It return nil on error. There is alittle difference when setting the volume by
function Mix_VolumeChunk(chunk: PMix_Chunk; volume: cint): cint.Instead of just setting a general volume, the volume is bound to a certain sound. In the example case the sound is in variable “sound”. Just to mention it here, there is a third possibility, to set the volume for a certain channel:
function Mix_Volume(channel: cint; volume: cint): cint.This can be quite handy, anyway, channels are discussed a little bit later below. If your argument is -1 the average volume will be returned.
Playing, pausing, resuming music and sounds
  while Run = True do
  begin

    SDL_PumpEvents;
    sdlKeyboardState := SDL_GetKeyboardState(nil);

    // ESC pressed
    if sdlKeyboardState[SDL_SCANCODE_ESCAPE] = 1 then
      Run := False;

    // Music effect keys
    if sdlKeyboardState[SDL_SCANCODE_1] = 1 then
      if Mix_PlayMusic(Music, 0) < 0 then Writeln(SDL_GetError);
    if sdlKeyboardState[SDL_SCANCODE_2] = 1 then Mix_PauseMusic;
    if sdlKeyboardState[SDL_SCANCODE_3] = 1 then Mix_ResumeMusic;
    if sdlKeyboardState[SDL_SCANCODE_4] = 1 then Mix_RewindMusic;
    if sdlKeyboardState[SDL_SCANCODE_5] = 1 then
      if Mix_FadeInMusic(Music, 10, 3000) = 0 then Writeln(SDL_GetError);
    if sdlKeyboardState[SDL_SCANCODE_6] = 1 then
      if Mix_FadeOutMusic(3000) = 0 then Writeln(SDL_GetError);

    // Sound effect keys
    if sdlKeyboardState[SDL_SCANCODE_7] = 1 then
      if Mix_PlayChannel(1, Sound, 0) < 0 then Writeln(SDL_GetError);
    if sdlKeyboardState[SDL_SCANCODE_8] = 1 then
      if Mix_PlayChannel(-1, Sound, 0) < 0 then Writeln(SDL_GetError);
    if sdlKeyboardState[SDL_SCANCODE_9] = 1 then Mix_Pause(-1);
    if sdlKeyboardState[SDL_SCANCODE_0] = 1 then Mix_Resume(-1);
    if sdlKeyboardState[SDL_SCANCODE_A] = 1 then
      if Mix_FadeInChannel(1, sound, 0, 2000) < 0 then Writeln(SDL_GetError);
    if sdlKeyboardState[SDL_SCANCODE_S] = 1 then
      if Mix_FadeOutChannel(1, 1000) < 0 then Writeln(SDL_GetError);
The main application loop is entered and should be left if variable “Run” is false which is achieved by pressing the ESCAPE key.
For each key state a different music or sound related function is used to do something. Let’s discuss them now in detail. We start with the functions triggered by the keys 1 – 4:
function Mix_PlayMusic(music: PMix_Music; loops: cint): cint procedure Mix_PauseMusic procedure Mix_ResumeMusic procedure Mix_RewindMusicMix_PlayMusic plays music. The first argument is the music itself which we previously got from the example .ogg music file and associated with the “Music” pointer of PMix_Music type. The second argument determines how often the music is played. Additionally -1 means infinite repetition. This function returns 0 on success and -1 on error.
The meaning of the three procedures Mix_PauseMusic, Mix_ResumeMusic and Mix_RewindMusic ist obvious from their names. They are used to pause, resume (if paused before) and rewind the played music.
The analogous function and procedures for sound channels triggered by the keys 7 – 9 and 0 are shown now:
function Mix_PlayChannel(channel: cint; chunk: PMix_Chunk; loops: cint): cintprocedure Mix_Pause(channel: cint) procedure Mix_Resume(channel: cint)As you can see the function Mix_PlayChannel has three parameters. The first parameter asks for a channel with which the sound should be associated. SDL2_mixer provides eight sound channels. Usually you should use -1 which means the first free channel will be used to play the sound. Anyway, you could specifiy a certain channel here if you like. The second parameter asks for a sound pointer of PMix_Chunk type. The third parameter is the same as for music, -1 means an infinite loop. Attention though for specific repetitions. The value for loops is increased by 1. So, if you want a sound to be played once, you need the argument to be 0. The return value corresponds to the sound channel the sound is played on, it is -1 on error.
The procedures Mix_Pause and Mix_Resume are self-explanatory. Use them to pause or resume a certain channel, which is the argument. If the argument is -1 (as in the example code) you pause or resume all channels. By the way, you may have noticed that there is not a rewind analogue, because sounds are not expected to be rewound.
Fading effects
...

    if sdlKeyboardState[SDL_SCANCODE_5] = 1 then
      if Mix_FadeInMusic(Music, 10, 3000) = 0 then Writeln(SDL_GetError);
    if sdlKeyboardState[SDL_SCANCODE_6] = 1 then
      if Mix_FadeOutMusic(3000) = 0 then Writeln(SDL_GetError);

    // Sound effect keys

...

    if sdlKeyboardState[SDL_SCANCODE_A] = 1 then
      if Mix_FadeInChannel(1, sound, 0, 2000) < 0 then Writeln(SDL_GetError);
    if sdlKeyboardState[SDL_SCANCODE_S] = 1 then
      if Mix_FadeOutChannel(1, 1000) < 0 then Writeln(SDL_GetError);

    // Channel effect keys
     if sdlKeyboardState[SDL_SCANCODE_G] = 1 then
       if Mix_SetPanning( 1, 255, 32 ) = 0 then Writeln(SDL_GetError);
     if sdlKeyboardState[SDL_SCANCODE_H] = 1 then
       if Mix_SetPanning( 1, 255, 255 ) = 0 then Writeln(SDL_GetError);
     if sdlKeyboardState[SDL_SCANCODE_J] = 1 then
       if Mix_SetDistance( 1, 223 ) = 0 then Writeln(SDL_GetError);
     if sdlKeyboardState[SDL_SCANCODE_K] = 1 then
       if Mix_SetDistance( 1, 0 ) = 0 then Writeln(SDL_GetError);
     if sdlKeyboardState[SDL_SCANCODE_L] = 1 then
       if Mix_SetPosition( 1, 45, 127 ) = 0 then Writeln(SDL_GetError);
     if sdlKeyboardState[SDL_SCANCODE_M] = 1 then
       if Mix_SetPosition( 1, 0, 0 ) = 0 then Writeln(SDL_GetError);

  end;
Important to know about effects like fading. They are performed on the fly to your data, so the more effects you use, the more computational power they require. It is important to unregister effects you don’t need anymore.
These are the four fade functions triggered by the keys 5, 6, A and S :
function Mix_FadeInMusic(music: PMix_Music; loops: cint; ms: cint): cint function Mix_FadeOutMusic(ms: cint): Integer function Mix_FadeInChannel(channel: cint; chunk: PMix_Chunk; loops: cint; ms: cint): cintfunction Mix_FadeOutChannel(which: cint; ms: cint): cintThe function Mix_FadeInMusic works the very same way as Mix_PlayMusic above, but there is a further parameter which allows for a fade in effect in milliseconds. 3000 milliseconds equals 3 seconds. It returns 0 on success and -1 on error.
Mix_FadeOutMusic fades out the playing music within the given time in milliseconds in the moment the function is called (hence the key is pressed in the example program). Attention, it returns 1 on success and 0 on error.
Quite similar the functions Mix_FadeInChannel and Mix_FadeOutChannel work. Instead of the music pointer, the sound pointer and the channel has to be given. By the way, also here the number of times the sound is played is increased by 1, so if you want to play a sound with fade in effect once, the argument has to be 0. The fade effect applies only for the first run. Both functions return 0 on success and -1 on error.
Panning and distance effects
The functions triggered by the keys G – M are:
function Mix_SetPanning(channel: cint; left: cuint8; right: cuint8): cintFor setting the panning you need the channel to which panning should be applied and the volume values which may vary from 0 (quiet) to 255 (loudest). For a consistent panning effect you may substract the left value from the right value (left: volume, right: 255-volume). To unregister this effect, you should set both values to 255, which is recommended to be done if you don’t need panning anymore. The function returns 0 on errors.
function Mix_SetDistance(channel: cint; distance: cuint8): cintThe higher the distance, the quieter the sound appears. The value can range between 0 (near) and 255 (far). If distance is set to 0 the effect is unregistered. It returns 0 on errors.
function Mix_SetPosition(channel: cint; angle: cint16; distance: cuint8): cintThis function adjusts volumes according to an angle and a distance value, hence it combines the effects of the two functions discussed before for panning and distance. The distance value works the same way as discussed for Mix_SetDistance. Angle of 0 (degree) means in front of you, 90 means directly to the right, 180 means directly behind, 270 means directly to the left.
Closing the SDL2 mixer and clean up
  // Clean up
  if Assigned(sdlSurface) then SDL_FreeSurface(sdlSurface);
  if Assigned(sdlTexture) then SDL_DestroyTexture(sdlTexture);
  if Assigned(sdlRenderer) then SDL_DestroyRenderer(sdlRenderer);
  if Assigned(sdlWindow) then SDL_DestroyWindow(sdlWindow);
  if Assigned(Music) then Mix_FreeMusic(Music);
  if Assigned(Sound) then Mix_FreeChunk(Sound);

  Mix_CloseAudio;
  SDL_Quit;
end.
For the clean up the surface, textre renderer and the window are destroyed as known. New are the procedures Mix_FreeMusic and Mix_FreeChunk to free the music and sound data.
procedure Mix_FreeMusic(music: PMix_Music)procedure Mix_FreeChunk(chunk: PMix_Chunk)The arguments have to be the music and sound pointer respectively.
SDL_mixer 2.0 has to be closed by
procedure Mix_CloseAudio.Finally SDL 2.0 and the application are shut down as known.


